Edit Template

Recipe Tag: Authentic

Andhra Avakaya

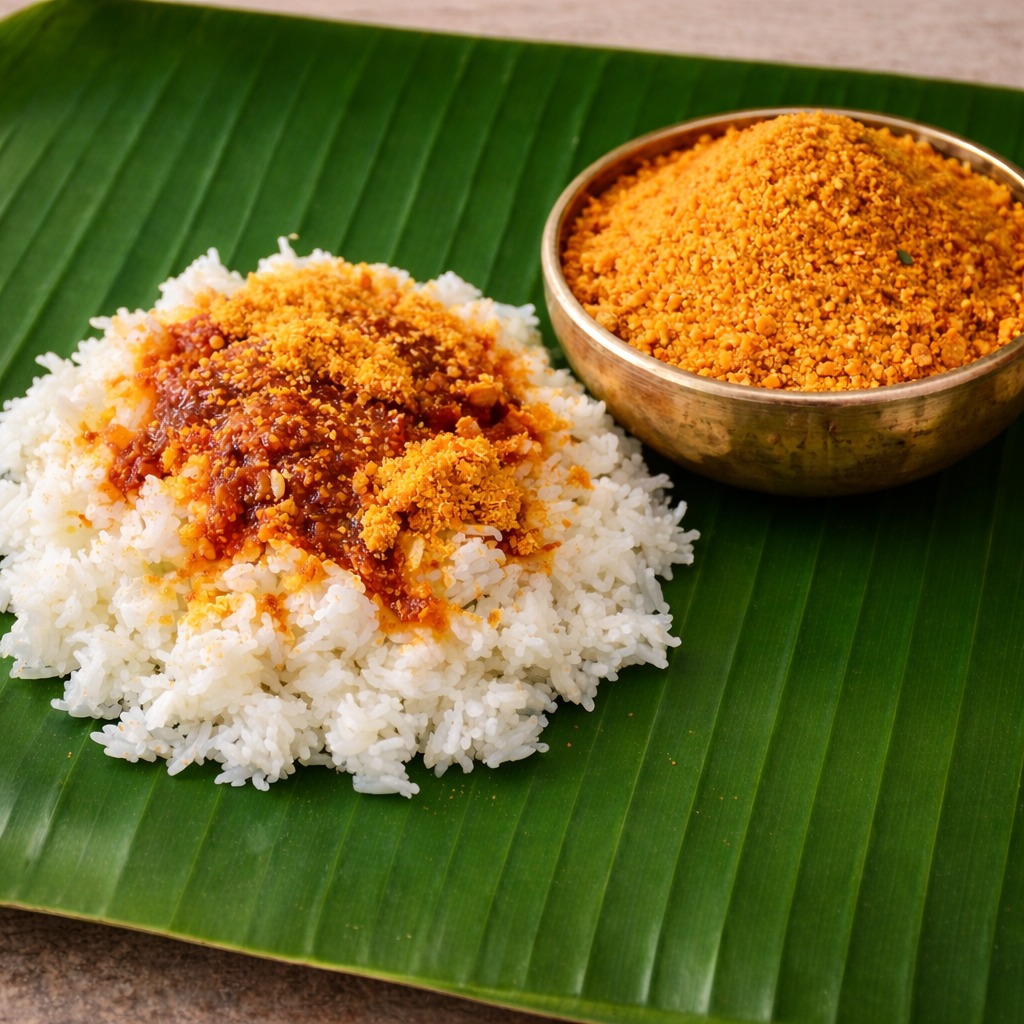
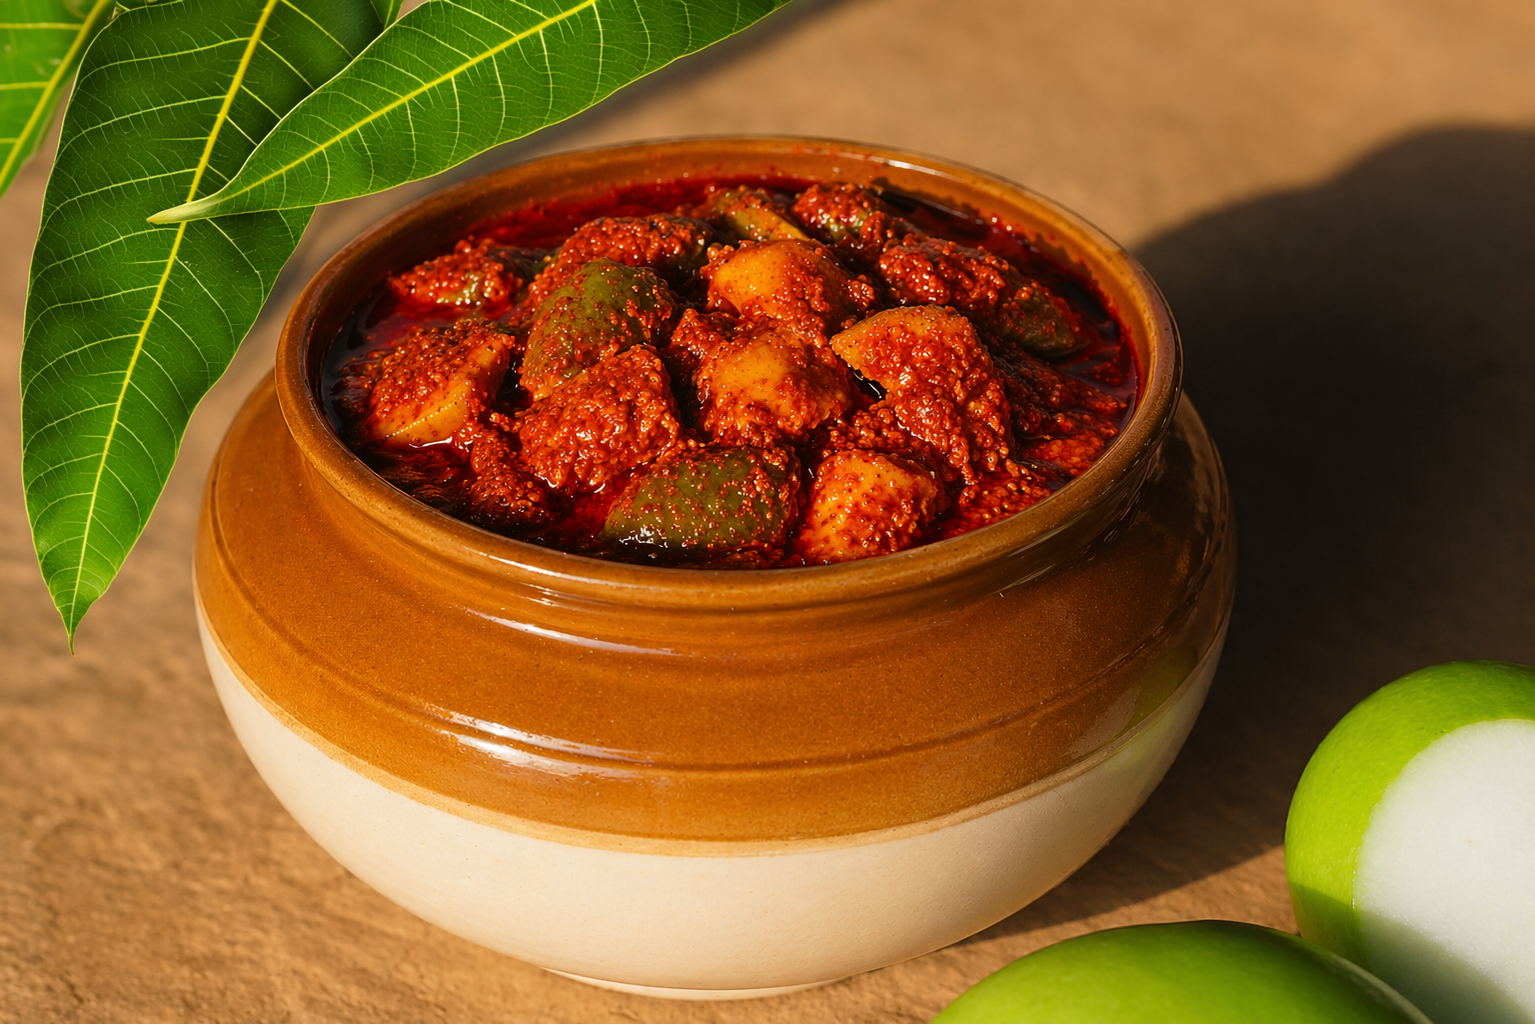
intro The Andhra Avakaya Recipe holds a special place in the hearts of every South Indian. This legendary pickle offers a perfect blend of spicy, tangy, and salty notes. However, making it requires precision and the right quality of ingredients. Therefore, we have simplified the process so you can enjoy this treat at home. Consequently, your meals will never be boring again when you have this jar on your table.story/description Every summer, households in Andhra Pradesh prepare for the mango season with great excitement. Furthermore, the ritual of making the Andhra Avakaya Recipe brings families together to chop, dry, and mix. Traditionally, elders choose specific sour mango varieties like ‘Suvarnarekha’ or ‘Collector’ for the best shelf life. Moreover, the aroma of freshly ground mustard seeds fills the air during this time. Similarly, the deep red color of the chili powder promises a heat that excites the palate. This pickle is not just food; it is a cultural identity that locals cherish deeply. Therefore, people often gift jars of this pickle to friends and relatives as a sign of love. Although it takes time to mature, the result is always worth the wait.cast/ingredients To start your Andhra Avakaya Recipe, gather 6 large raw, sour mangoes. Additionally, you will need 1 cup of mustard powder and 1 cup of spicy red chili powder. You must also prepare 1 cup of sea salt and 1/2 teaspoon of turmeric powder. Furthermore, take 2 cups of pure cold-pressed sesame oil for the authentic taste. Finally, include 1/4 cup of peeled garlic cloves and 1 teaspoon of fenugreek seeds for extra flavor.songs/steps Initially, wash the mangoes thoroughly and dry them with a clean cloth. Subsequently, cut the mangoes into medium-sized cubes while keeping the inner shell intact. Then, spread the pieces on a dry cloth for an hour to remove any remaining moisture. Afterward, mix the mustard powder, chili powder, salt, and turmeric in a large, dry bowl. Consequently, add the garlic cloves and fenugreek seeds to this dry mixture. Moreover, pour half of the sesame oil into the spices and stir well. Now, add the mango pieces and coat them evenly with the spice paste. Finally, transfer everything into a sterilized glass jar and pour the remaining oil on top. Therefore, you must let it rest for three days in a cool, dark place before stirring and eating.about The Andhra Avakaya Recipe represents the bold culinary heritage of the Telugu people. This pickle relies on mustard oil or sesame oil to preserve the fruit for over a year. Additionally, the high salt and spice content act as natural preservatives. Because the mangoes ferment slightly, the flavors deepen over time. Consequently, many people believe the pickle tastes better after a few months of aging.themes/tips To ensure your Andhra Avakaya Recipe stays fresh, always use a dry spoon. Furthermore, never allow moisture to enter the jar as it causes mold. If the oil level drops, you should add more heated and cooled sesame oil immediately. Moreover, choose sun-dried spices to enhance the overall aroma. In contrast, using store-bought powders might reduce the authentic pungency. Therefore, grinding your own mustard seeds is highly recommended for the best results.whyWatch/whyTry You should try this Andhra Avakaya Recipe because it transforms a simple bowl of curd rice into a feast. Additionally, it contains no artificial preservatives or chemicals. Consequently, it is a healthier alternative to commercial pickles. Moreover, the satisfaction of creating an heirloom recipe is truly unmatched. Therefore, start your pickling journey today and enjoy the spicy zing of Andhra in every bite!

Read More »

Kandi Podi

intro Are you looking for a comforting meal? The Kandi Podi Recipe offers a burst of flavor to your plate. Many people call it ‘Andhra Gunpowder’ because of its spicy nature. However, this version uses roasted lentils for a deep, nutty taste. Therefore, it is a must-have for every spice lover who wants an authentic Indian taste.story/description This spice blend comes from the heart of Andhra Pradesh. People love it because it tastes like a warm hug from home. Additionally, families often pass down these secrets through generations to keep the tradition alive. Consequently, every household has a slightly different version, but the soul of the recipe remains the same.cast/ingredients To start, you will need 1 cup of Toor Dal (Pigeon Peas) and 1/4 cup of Chana Dal (Bengal Gram). Additionally, gather 10-12 Dried Red Chilies to provide the heat. You also need 1 teaspoon of Cumin Seeds and 1/4 teaspoon of Hing (Asafoetida). Finally, include Salt to taste to balance all the earthy flavors.songs/steps Firstly, heat a heavy-bottomed pan over a low flame. Roast the toor dal until it turns golden brown and smells nutty. Similarly, roast the chana dal separately until it changes color. After that, add the red chilies and cumin seeds to the pan. Roast them for a minute until they become crisp. Consequently, let all the ingredients cool down completely on a plate. Finally, grind the mixture into a coarse powder along with salt and hing.about This powder represents the true simplicity of Indian cooking. However, the taste is quite complex and very rewarding. You can enjoy it with hot steamed rice and a dollop of ghee. In addition, it provides a good amount of plant-based protein from the lentils. Therefore, it is a healthy addition to your daily diet.themes/tips ### Success Tips for Kandi Podi Recipe Always roast the lentils on low heat to ensure even cooking. Otherwise, the dal might burn on the outside while staying raw inside. Moreover, keep the finished powder in an airtight glass jar for maximum freshness. If you use a wet spoon, the shelf life will decrease significantly. Therefore, stay very careful with moisture during the storage process.whyWatch/whyTry You should try this Kandi Podi Recipe for a quick and easy lunch solution. It saves a lot of time on busy weekdays when you cannot cook a full meal. Furthermore, it adds a spicy kick to otherwise bland dishes like idli or dosa. Similarly, it makes for a great travel companion as it does not spoil easily and provides instant flavor.

Read More »

Spicy Stuffed Brinjal

intro This Brinjal Recipe offers a perfect blend of smoky flavors and spicy goodness. Because it uses simple ingredients, you can cook it very quickly. Additionally, it provides many health benefits for your daily diet. Consequently, this dish remains a favorite in many households across the globe.story/description Brinjal, also known as eggplant, has a long and rich history in global cuisines. However, many people struggle to cook it correctly because the texture can be tricky. Therefore, we created this guide to help you master the dish. Furthermore, the texture of the vegetable changes beautifully when you sauté it over medium heat. Since it absorbs spices very well, the final result is always flavorful. Moreover, you can adjust the heat levels to suit your personal taste. Thus, every single bite feels satisfying and rich. While some prefer it mashed, this version keeps the pieces intact for a better mouthfeel.cast/ingredients To start this Brinjal Recipe, gather two large fresh brinjals. Additionally, you will need two tablespoons of vegetable oil and one teaspoon of cumin seeds. Furthermore, prepare one finely chopped onion and two minced cloves of garlic. Finally, collect your spices including turmeric, red chili powder, and sea salt. Because freshness matters, ensure your herbs like cilantro are also ready for garnishing.songs/steps First, you must wash and cut the vegetables into small, even cubes. Consequently, they will cook at the same rate. Second, heat the oil in a large pan and add the cumin seeds. Once they sizzle, you should add the onions and garlic. Sauté these until they turn a light golden brown. Third, add the brinjals and all the dry spices to the pan. Because you want even coating, stir the mixture thoroughly. Furthermore, cover the pan and cook on low heat for ten minutes. Finally, garnish with fresh cilantro and serve while it is hot.about This Brinjal Recipe represents the heart of home-cooked comfort. While the dish is simple, it carries deep cultural significance in many regions. Therefore, many families pass down these specific instructions through generations. It is a humble meal that proves how basic ingredients can create something extraordinary. Furthermore, it is naturally vegan and gluten-free, making it accessible for everyone.themes/tips You should always use low heat to ensure even cooking throughout the dish. Furthermore, adding a tiny splash of lemon juice provides a lovely tangy kick. Moreover, fresh cilantro improves the aroma significantly before serving. However, do not overcook the vegetable, or it might become too mushy. Additionally, soaking the cut pieces in salt water for ten minutes removes any potential bitterness.whyWatch/whyTry You should try this Brinjal Recipe because it is extremely budget-friendly and nutritious. Additionally, it tastes amazing when you pair it with warm flatbread or steamed rice. Finally, it provides a healthy alternative to heavy meat dishes without sacrificing any flavor. Because it is so easy to make, it will quickly become a staple in your weekly meal rotation.

Read More »

Ariselu

intro Making an Ariselu Recipe brings back beautiful memories of festive seasons and family gatherings. Therefore, many families in South India prepare this sweet specifically during the Sankranti festival. Furthermore, it symbolizes prosperity and joy because of its golden color and rich taste. Consequently, you should learn how to make this authentic version at home to impress your loved ones.story/description This sweet is a legendary staple in Andhra Pradesh and Odisha. However, it requires a bit of patience to master the dough texture. Additionally, the deep flavor of organic jaggery makes it much healthier than modern sugar-based snacks. Thus, it remains a favorite for generations. People often share these treats with neighbors during celebrations. Moreover, the combination of sesame seeds and ghee creates an aroma that fills the entire house.cast/ingredients To start, you will need 1 kilogram of raw rice. Additionally, gather 750 grams of high-quality jaggery. You must also have 100 grams of ghee for richness. Furthermore, include 2 tablespoons of sesame seeds or poppy seeds for crunch. Finally, ensure you have plenty of sunflower oil for deep frying.songs/steps First, soak the rice for at least 24 hours. Consequently, the rice softens and grinds into a smoother powder. After soaking, drain the water and dry the rice on a cloth for thirty minutes. However, do not let it dry completely. Next, grind the rice into a fine powder. Meanwhile, melt the jaggery in a pan with a little water to create a thick syrup. Therefore, you must check for ‘soft ball’ consistency by dropping syrup into cold water. Once the syrup is ready, add the rice flour slowly. Additionally, stir constantly to prevent any lumps from forming. After the dough cools slightly, grease your palms with ghee. Consequently, you can flatten small balls of dough into discs. Finally, deep fry these discs in hot oil until they turn golden brown. Remember to press the fried Ariselu between two flat ladles to remove excess oil.about The Ariselu Recipe is famous across different states under various names. For instance, people call it Adhirasam in Tamil Nadu and Kajjaya in Karnataka. Therefore, it has many regional variations that all celebrate the same core ingredients. Because it uses jaggery instead of refined sugar, it offers a more complex flavor profile. Moreover, the history of this sweet dates back centuries in Indian culinary traditions.themes/tips Perfecting the Ariselu Recipe requires attention to detail. Firstly, always use aged rice for the best results. Additionally, you should keep the rice flour damp until you mix it with the syrup. If the flour dries out, the sweet will become too hard. Furthermore, maintain the oil at a medium temperature. If the oil is too hot, the outside burns while the inside remains raw. Therefore, patience is your best friend in the kitchen. Additionally, using a wooden Ariselu press helps significantly in removing oil.whyWatch/whyTry You should try this recipe because it connects you to authentic Indian traditions. Moreover, these sweets have a long shelf life, so you can enjoy them for weeks. Therefore, they make excellent snacks for children and guests alike. Because you are making them at home, you can control the quality of the ingredients. Consequently, your family will enjoy a fresh, preservative-free treat that tastes better than any store-bought version.

Read More »

Urad Dal Laddu

intro Are you searching for a nutritious snack that tastes amazing? You should try this Urad Dal Laddu Recipe. Traditionally, Indian families prepare these treats to boost strength and immunity. Furthermore, they are very easy to make at home with minimal effort. Consequently, you will love the earthy taste of roasted lentils mixed with sweet jaggery. Therefore, let us start cooking this healthy snack together!story/description This sweet originates from the southern parts of India, where people call it Sunnundalu. Moreover, it holds a special place in traditional Ayurvedic medicine because it strengthens the bones. However, modern families enjoy it mostly as a tasty dessert. You only need a few pantry staples for this dish. Additionally, the high protein content makes it great for growing children and athletes. Similarly, the jaggery adds essential iron to your diet. Therefore, it is much better than processed candy or store-bought biscuits. You can prepare a large batch and store it for weeks. Because it uses ghee, the aroma will fill your kitchen instantly. Consequently, everyone in your house will ask for more.cast/ingredients 1. Two cups of whole white urad dal (husked black gram). 2. One cup of organic grated jaggery or palm sugar. 3. Half a cup of pure melted ghee (clarified butter). 4. One teaspoon of fresh cardamom powder. 5. A handful of chopped cashews or almonds for extra crunch.songs/steps 1. Firstly, clean the white urad dal to remove any dust or stones. 2. Secondly, place the dal in a heavy-bottomed pan and roast it on low heat. 3. Moreover, stir the dal continuously until it turns golden brown and smells nutty. 4. However, do not burn the lentils as they will taste bitter. 5. Once roasted, let the dal cool completely on a plate. 6. Subsequently, grind the roasted dal into a fine powder using a dry blender. 7. Additionally, add the grated jaggery and cardamom powder into the blender. 8. Pulse the mixture again so the jaggery blends perfectly with the lentil flour. 9. Therefore, transfer this sweet mixture to a wide mixing bowl. 10. Gradually, pour warm melted ghee over the powder. 11. Finally, mix everything well and shape the mixture into small round balls while it is still warm.about This Urad Dal Laddu Recipe provides a significant amount of energy for your daily activities. Because urad dal contains high levels of fiber, it helps your digestion. However, you must eat them in moderation since they are calorie-dense. Furthermore, the ghee provides healthy fats that are good for your brain and joints. Consequently, many mothers give these to their kids for lunchboxes. Additionally, you can store these laddus for up to three weeks in an airtight jar. They remain fresh and tasty without any refrigeration. Similarly, you can gift these to friends during festivals as a healthy homemade option.themes/tips Always roast the dal on a very low flame to ensure even cooking. Furthermore, if the mixture is too dry to form balls, add another tablespoon of warm ghee. However, do not add water as it will spoil the shelf life. Additionally, you can add dry ginger powder to improve digestion. If you prefer a crunchier texture, you can grind the dal slightly coarse. Therefore, customize the sweetness by adjusting the amount of jaggery according to your preference.whyWatch/whyTry You should try the Urad Dal Laddu Recipe because it combines health and taste perfectly. Unlike other sweets, it uses no refined sugar or flour. Moreover, it takes less than thirty minutes to prepare. Consequently, it is the best solution for your sudden sugar cravings. Therefore, grab your ingredients and make these protein-packed laddus today!

Read More »
కావలసిన పదార్ధాలు
  • మామిడికాయ ముక్కలు Raw Mango Pieces(firm and sour) 6 cups
  • ఆవపిండి Mustard Powder (ground from small mustard seeds) 1 cup
  • కారం Red Chili Powder (preferably spicy Guntur variety) 1 cup
  • ఉప్పు Salt (powdered sea salt) 1 cup
  • మెంతి పొడి Fenugreek Powder 1/4 cup
  • పసుపు Turmeric Powder 1 teaspoon
  • వేరుశనగ నూనె Groundnut Oil (cold-pressed) 2 cups
  • వెల్లుల్లి రెబ్బలు Garlic Cloves (peeled) 1/4 cup
  • ఇంగువ Asafoetida 1 teaspoon
తయారి విధానం
  1. ముందుగా పచ్చి మామిడికాయలను శుభ్రంగా కడిగి, పొడి గుడ్డతో తడి లేకుండా తుడుచుకోవాలి.
    Wash the raw mangoes thoroughly and pat them completely dry with a clean cloth.
  2. కాయలను మధ్యస్థ పరిమాణంలో ముక్కలుగా కోసుకోవాలి, ప్రతి ముక్కకు కొంచెం టెంక ఉండేలా చూసుకోవాలి.
    Cut the mangoes into medium-sized cubes ensuring each piece has a bit of the hard inner shell (tenkay).
  3. కోసిన ముక్కలను మరొకసారి పొడి గుడ్డతో తుడిచి పైన ఉన్న పల్చని తెల్లని పొరను తొలగించాలి.
    Clean the cut pieces again with a dry cloth to remove any moisture or the thin white pith.
  4. ఒక పెద్ద పొడి గిన్నెలో కారం, ఆవపిండి, ఉప్పు మరియు మెంతి పొడి వేసి బాగా కలపాలి.
    In a large dry mixing bowl, combine the red chili powder, mustard powder, salt, and fenugreek powder.
  5. ఈ మిశ్రమంలో పసుపు, ఇంగువ మరియు వెల్లుల్లి రెబ్బలు వేసి మళ్ళీ ఒకసారి కలుపుకోవాలి.
    Add the turmeric powder, asafoetida, and garlic cloves to this spice mixture and mix well.
  6. సగం వేరుశనగ నూనెను ఈ పొడి మిశ్రమంలో పోసి గట్టి పేస్టులా కలుపుకోవాలి.
    Pour half of the groundnut oil into the dry mix and stir until it forms a thick paste.
  7. ఇప్పుడు మామిడికాయ ముక్కలను వేసి ప్రతి ముక్కకు మసాలా బాగా పట్టేలా కలపాలి.
    Add the mango pieces to the bowl and coat each piece thoroughly with the spice-oil mixture.
  8. ఈ మిశ్రమాన్ని ఒక శుభ్రమైన జాడీలోకి లేదా గాజు పాత్రలోకి మార్చుకోవాలి.
    Transfer the mixture into a clean, dry ceramic jar (Jhaadi) or glass container.
  9. మిగిలిన నూనెను పైన పోయాలి, ముక్కలు నూనెలో పూర్తిగా మునిగి ఉండేలా చూసుకోవాలి.
    Pour the remaining oil on top until the mango pieces are completely submerged.
  10. జాడీ మూతిపై శుభ్రమైన గుడ్డ కట్టి, మూడు రోజుల పాటు కదపకుండా పక్కన పెట్టాలి.
    Cover the jar with a clean cloth and tie it tightly, then store it in a cool, dry place.
  11. మూడవ రోజున పొడి గరిటెతో పచ్చడిని బాగా కలపాలి, అవసరమైతే మరికొంత ఉప్పు లేదా నూనె వేసుకోవచ్చు.
    On the third day, open the jar and mix everything well with a dry ladle, adjust salt or oil if necessary.
[real3dflipbook id='1']