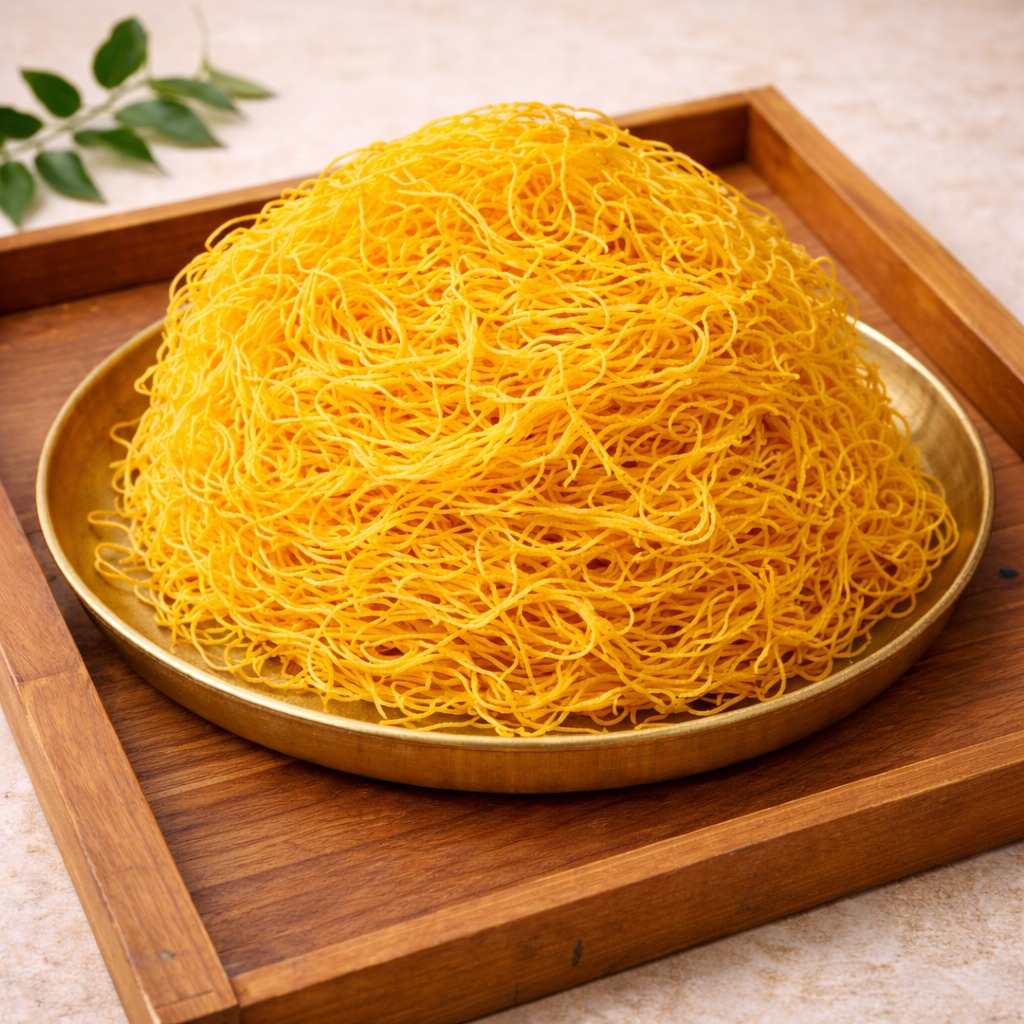
Edit Template

Recipe Tag: Snacks

Sanna Kaarapoosa

intro Making the perfect Sanna Kaarapoosa Recipe at home brings a delightful crunch to your tea time. Furthermore, this traditional South Indian snack is quite simple to prepare with just a few pantry staples. Consequently, many families make large batches during festivals like Diwali. However, you must follow specific steps to get that thin, crispy texture.story Sanna Kaarapoosa is a very thin, noodle-like snack that tastes delicious. It primarily uses besan and rice flour for that signature crispness. Additionally, the spice level depends on your personal preference for red chili powder. Therefore, you can customize it for children or adults. Many people enjoy it with hot tea. Specifically, the name ‘Sanna’ refers to the thinness of the strands.cast 2 cups Gram Flour (Besan), 1 cup Rice Flour, 2 tsp Red Chili Powder, 1 tsp Salt, 1/2 tsp Ajwain (Carom seeds), 2 tbsp Hot Oil, Oil for deep frying, Water as needed.songs 1. Initially, sift the gram flour and rice flour together in a large bowl. 2. Add the red chili powder, salt, and ajwain to the mixture. 3. Pour two tablespoons of hot oil over the flour to ensure crispness. 4. Gradually add water and knead it into a soft, smooth dough. 5. Meanwhile, heat oil in a deep frying pan on medium heat. 6. Place a portion of the dough into the Murukku maker using the small-hole plate. 7. Press the maker in a circular motion directly over the hot oil. 8. Fry the strands until they turn light golden brown. 9. Finally, remove the kaarapoosa and drain the excess oil on a paper towel.about ## Mastering the Sanna Kaarapoosa Recipe Initially, you need a special kitchen tool called a ‘Murukku maker’ with the finest hole plate. This tool allows the dough to flow in thin strands into the hot oil. Moreover, using high-quality oil ensures a long shelf life. Although it looks complex, the process is actually very fast. Therefore, you can prepare this snack in less than thirty minutes without much effort.themes ## Secrets of the Sanna Kaarapoosa Recipe To get the best texture, ensure you add hot oil to the dough before kneading. Similarly, do not over-knead the dough, or the snack might become hard. Furthermore, store it in an airtight container once it cools down completely. Consequently, the snack stays fresh for weeks. Always fry on medium heat so it cooks evenly and remains golden.whyWatch You should try this recipe because it is healthier than store-bought snacks. Additionally, the flavor of homemade kaarapoosa is unmatched. Finally, your family will love the crispy texture and savory taste of this traditional treat. It makes every tea break special.

Read More »

Urad Dal Laddu

intro Are you searching for a nutritious snack that tastes amazing? You should try this Urad Dal Laddu Recipe. Traditionally, Indian families prepare these treats to boost strength and immunity. Furthermore, they are very easy to make at home with minimal effort. Consequently, you will love the earthy taste of roasted lentils mixed with sweet jaggery. Therefore, let us start cooking this healthy snack together!story/description This sweet originates from the southern parts of India, where people call it Sunnundalu. Moreover, it holds a special place in traditional Ayurvedic medicine because it strengthens the bones. However, modern families enjoy it mostly as a tasty dessert. You only need a few pantry staples for this dish. Additionally, the high protein content makes it great for growing children and athletes. Similarly, the jaggery adds essential iron to your diet. Therefore, it is much better than processed candy or store-bought biscuits. You can prepare a large batch and store it for weeks. Because it uses ghee, the aroma will fill your kitchen instantly. Consequently, everyone in your house will ask for more.cast/ingredients 1. Two cups of whole white urad dal (husked black gram). 2. One cup of organic grated jaggery or palm sugar. 3. Half a cup of pure melted ghee (clarified butter). 4. One teaspoon of fresh cardamom powder. 5. A handful of chopped cashews or almonds for extra crunch.songs/steps 1. Firstly, clean the white urad dal to remove any dust or stones. 2. Secondly, place the dal in a heavy-bottomed pan and roast it on low heat. 3. Moreover, stir the dal continuously until it turns golden brown and smells nutty. 4. However, do not burn the lentils as they will taste bitter. 5. Once roasted, let the dal cool completely on a plate. 6. Subsequently, grind the roasted dal into a fine powder using a dry blender. 7. Additionally, add the grated jaggery and cardamom powder into the blender. 8. Pulse the mixture again so the jaggery blends perfectly with the lentil flour. 9. Therefore, transfer this sweet mixture to a wide mixing bowl. 10. Gradually, pour warm melted ghee over the powder. 11. Finally, mix everything well and shape the mixture into small round balls while it is still warm.about This Urad Dal Laddu Recipe provides a significant amount of energy for your daily activities. Because urad dal contains high levels of fiber, it helps your digestion. However, you must eat them in moderation since they are calorie-dense. Furthermore, the ghee provides healthy fats that are good for your brain and joints. Consequently, many mothers give these to their kids for lunchboxes. Additionally, you can store these laddus for up to three weeks in an airtight jar. They remain fresh and tasty without any refrigeration. Similarly, you can gift these to friends during festivals as a healthy homemade option.themes/tips Always roast the dal on a very low flame to ensure even cooking. Furthermore, if the mixture is too dry to form balls, add another tablespoon of warm ghee. However, do not add water as it will spoil the shelf life. Additionally, you can add dry ginger powder to improve digestion. If you prefer a crunchier texture, you can grind the dal slightly coarse. Therefore, customize the sweetness by adjusting the amount of jaggery according to your preference.whyWatch/whyTry You should try the Urad Dal Laddu Recipe because it combines health and taste perfectly. Unlike other sweets, it uses no refined sugar or flour. Moreover, it takes less than thirty minutes to prepare. Consequently, it is the best solution for your sudden sugar cravings. Therefore, grab your ingredients and make these protein-packed laddus today!

Read More »
కావలసిన పదార్ధాలు
  • శనగపిండి Gram Flour (Besan) 2 cups
  • బియ్యం పిండి Rice Flour 1/2 cup
  • వాము Carom Seeds (Ajwain powder) 1 teaspoon
  • పసుపు Turmeric Powder 1/2 teaspoon
  • ఎర్ర కారం Red Chili Powder 1 teaspoon
  • ఉప్పు Salt (as required) 1/2 teaspoon
  • వేడి నూనె Hot Oil (to mix in dough) 2 tablespoons
  • వేయించడానికి నూనె Cooking Oil (for deep frying) As needed
  • నీళ్లు Water (to knead) As required
తయారి విధానం
  1. ఒక వెడల్పాటి గిన్నెలోకి శనగపిండి మరియు బియ్యం పిండిని జల్లించుకోండి.
    Sieve the gram flour and rice flour together into a large mixing bowl to remove any lumps.
  2. అందులో వాము పొడి, పసుపు, కారం మరియు రుచికి సరిపడా ఉప్పు వేసి బాగా కలపండి.
    Add the carom seed powder, turmeric powder, red chili powder, and salt to the flour and mix well.
  3. రెండు టేబుల్ స్పూన్ల వేడి నూనెను పిండి మిశ్రమంలో వేసి వేళ్లతో బాగా కలపండి.
    Pour two tablespoons of hot oil over the dry flour mixture and mix it in using your fingertips.
  4. ఇప్పుడు కొద్దికొద్దిగా నీళ్లను పోస్తూ పిండిని మరీ గట్టిగా కాకుండా, మెత్తగా మరియు సాఫీగా ఉండేలా కలుపుకోండి.
    Gradually add water and knead the mixture into a smooth, soft, and non-sticky dough.
  5. స్టవ్ మీద కడాయి పెట్టి వేయించడానికి సరిపడా నూనె పోసి మధ్యస్థ మంట మీద వేడి చేయండి.
    Heat sufficient oil in a deep frying pan or kadai over medium heat.
  6. కారప్పూస గొట్టానికి అత్యంత సన్నని రంధ్రాలు ఉన్న బిళ్ళను అమర్చి, అందులో సిద్ధం చేసుకున్న పిండిని ఉంచండి.
    Grease the inside of a sev press and fit it with the smallest hole disc (the fine sev plate).
  7. నూనె వేడెక్కిన తర్వాత నేరుగా నూనెలోకి వలయాకారంలో పిండిని ఒత్తుకోండి.
    Place a portion of the dough into the press and close it.
  8. నూనెలో బుడగలు తగ్గి, కారప్పూస లేత బంగారు రంగులోకి రాగానే జాగ్రత్తగా రెండవ వైపుకు తిప్పండి.
    Once the oil is hot, press the dough directly into the oil in a circular motion to form a large disc.
  9. రెండు వైపులా వేగిన తర్వాత నూనె నుండి తీసి టిష్యూ పేపర్ మీద వేయండి.
    Fry until the sizzling sound stops and the bubbles subside, then carefully flip to the other side.
  10. పూర్తిగా చల్లారిన తర్వాత చేత్తో చిన్న ముక్కలుగా విరిచి గాలి తగలకుండా డబ్బాలో భద్రపరుచుకోండి.
    When it turns a light golden colour, remove it from the oil and drain on paper towels.
[real3dflipbook id='1']