Snacks & Evening Bites

Finding the perfect Snacks & Evening Bites Recipe can change your daily routine. Most people feel hungry between lunch and dinner. Therefore, having a quick recipe helps everyone stay happy. This guide shows you how to make a delicious bite in no time. Furthermore, these snacks pair perfectly with hot tea or coffee.

This Snacks & Evening Bites Recipe focuses on texture and flavor balance. It draws inspiration from traditional South Asian street food known for its bold spices. Therefore, it serves as more than just a snack; it is a cultural experience. Many people prepare these treats during rainy days or festive seasons. Specifically, the use of gram flour makes it naturally gluten-free for those with dietary restrictions. Furthermore, the crunchiness provides a sensory delight that store-bought snacks simply cannot match.

To ensure the best results, always check the oil temperature before frying. If the oil is too cold, the snacks will absorb too much grease. However, if the oil is too hot, they will burn on the outside. Additionally, you can add crushed peanuts or sesame seeds for extra flavor. Specifically, store the leftovers in an airtight container once they cool down completely. Consequently, they will stay fresh and crunchy for up to three days. Furthermore, you can serve these with a side of mint chutney or sweet tamarind sauce to enhance the taste profile.

You should try this Snacks & Evening Bites Recipe because it is cost-effective and delicious. Furthermore, it allows you to avoid the preservatives found in processed foods. Therefore, your family can enjoy a healthier alternative to potato chips. Additionally, the cooking process is fun and easy for beginners. Consequently, you will feel proud of creating such a professional-tasting snack at home. Start your cooking journey today and transform your evening tea time into a gourmet experience!

banana Fritters

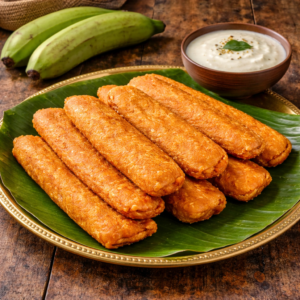
intro Looking for a sweet treat to brighten your morning? This banana Fritters Recipe offers the perfect solution for your overripe fruit. Furthermore, it takes less than twenty minutes to prepare from start to finish. Consequently, you can enjoy a warm snack whenever cravings hit. Therefore, gather your ingredients and let us start cooking this delicious dish right now.story Banana fritters remind me of lazy Sunday mornings at home. My mother always used the darkest bananas because they provided the most natural sugar. Additionally, she added a pinch of nutmeg for extra warmth. Therefore, the entire kitchen felt cozy and inviting. However, the best part was always the crispy edge of each fritter. Because we ate them hot, the centers stayed soft and creamy. Consequently, these fritters became a family tradition that everyone requested for birthdays. Furthermore, they are the best way to avoid food waste in your kitchen. You will surely love how simple and rewarding this cooking process feels.cast To make this recipe, you will need three large ripe bananas. Additionally, prepare one cup of all-purpose flour and two tablespoons of sugar. You must also include one teaspoon of baking powder and a half teaspoon of cinnamon for flavor. Furthermore, have one-quarter cup of milk and oil for frying ready on your counter.songs First, peel and mash your bananas in a large mixing bowl. Next, add the sugar, cinnamon, and milk to the fruit mash. Consequently, the mixture should look smooth but still slightly chunky. Then, whisk in the flour and baking powder until a thick batter forms. Therefore, you are now ready to fry. Heat oil in a skillet over medium heat. Carefully drop spoonfuls of batter into the hot oil. Furthermore, fry each side until it turns a deep golden brown. Finally, drain them on paper towels and serve them while they are hot.about Why the banana Fritters Recipe Works Every Time. This banana Fritters Recipe has roots in many tropical regions across the globe. For instance, many Caribbean islands serve them as a popular side dish. Additionally, Southeast Asian countries have their own unique versions of this snack. Because bananas grow abundantly in these climates, people invented creative ways to cook them. Therefore, this recipe connects you to a rich global culinary history. Moreover, it shows how simple ingredients can create very complex and satisfying flavors.themes Use bananas with many brown spots because they are much sweeter. However, do not use mushy fruit that has turned completely black inside. Additionally, ensure your oil is hot enough before you start frying. If the oil is cold, the fritters will soak up too much grease. Therefore, test a small drop of batter first to see if it sizzles. Furthermore, you can sprinkle powdered sugar on top for a beautiful finish. Consequently, your guests will be very impressed with your presentation.whyWatch You should try this recipe because it is incredibly budget-friendly for any family. Additionally, it requires minimal equipment and basic pantry staples. Therefore, even beginners can achieve great results on their first try. Furthermore, the taste is far superior to any store-bought snacks you might find. Consequently, you will save money while eating much better food.

banana Fritters Read More »

Poha Mixture

intro Searching for a quick bite? The Poha Mixture Recipe provides an amazing crunch for your tea time. Specifically, this recipe uses thin flattened rice and various nuts. Furthermore, you can prepare it in under twenty minutes. Therefore, it serves as the ultimate homemade snack for your family. Instead of buying packaged snacks, try this healthy version today. story People across India love this traditional snack deeply. Specifically, many regions call it ‘Chivda’. However, every household adds its own unique twist to the flavors. Some people prefer a sweet hint, while others like it extremely spicy. Consequently, the flavor profile varies significantly from kitchen to kitchen. Furthermore, the light texture makes it a much healthier alternative to greasy potato chips. Families often prepare large batches during festivals to share with neighbors. Moreover, the wonderful aroma of fried curry leaves brings everyone to the kitchen immediately. It represents the heart of Indian hospitality and homemade goodness.cast The Poha Mixture Recipe requires simple pantry staples. You will need thin poha (flattened rice), peanuts, and roasted gram. Additionally, gather some cashews, dry coconut slices, and fresh curry leaves for extra flavor. For the spices, prepare turmeric powder, red chili powder, and salt. Finally, ensure you have enough vegetable oil for deep frying the components to perfection.songs ## How to Master the Poha Mixture Recipe Initially, you must heat oil in a deep pan or kadai. Furthermore, fry the peanuts until they turn golden brown. Similarly, roast the roasted gram and cashews for a rich, nutty taste. Therefore, the mixture gains a delightful crunch in every single bite. After that, fry the thin poha in small batches using a metal strainer. This technique prevents the poha from burning quickly. Consequently, the poha remains light and perfectly crispy. Place the fried ingredients on a paper towel to absorb excess oil. Finally, transfer everything to a large mixing bowl. While the ingredients are still warm, add the spices. Mix them thoroughly so the turmeric and chili powder coat every flake. Your snack is now ready to serve.about ## Perfecting Your Poha Mixture Recipe This snack is essentially a savory granola. Specifically, it combines textures from nuts, seeds, and grains. Because it is homemade, you control the quality of the oil and spices. Furthermore, it is naturally gluten-free and vegan-friendly. Consequently, it suits almost every dietary preference. You can easily serve it to guests with a hot cup of masala chai or coffee. Additionally, the shelf life is quite long if you store it correctly in an airtight container.themes Always use thin poha instead of thick poha for a lighter crunch. However, you must fry it very quickly because it burns easily. Therefore, keep your strainer ready. Additionally, you can add a pinch of citric acid or lemon powder for a tangy kick. Moreover, if you enjoy a sweet and salty contrast, add a teaspoon of powdered sugar at the end. These small adjustments will elevate your snack to a professional level.whyWatch You should try this Poha Mixture Recipe because it is cost-effective and delicious. Instead of consuming preservatives, you will enjoy a fresh and crispy treat. Furthermore, the preparation process is incredibly satisfying and fast. Therefore, it is the perfect solution for sudden hunger pangs. Consequently, once you taste this homemade version, you will never go back to store-bought mixtures again. Give your family the best snack experience today!

Poha Mixture Read More »

Onion Pakodi

intro Are you looking for the perfect snack for a rainy afternoon? This Onion Pakodi Recipe provides the ultimate crunch and flavor in every single bite. Therefore, you can skip the store-bought snacks and make something fresh at home. Furthermore, the aroma of frying onions will fill your home with warmth. Additionally, this recipe uses simple ingredients from your pantry. Consequently, you can prepare it in just a few minutes.story/description In India, street vendors sell these crispy fritters on almost every corner. People love them because they are affordable and delicious. Specifically, people call them ‘Kanda Bhaji’ in many regions. However, the basic technique remains the same everywhere. Additionally, families gather around the table to enjoy these with hot tea. Therefore, it is more than just food; it is a tradition. Moreover, the crispy texture makes it a favorite for all ages. Because it is so popular, every household has its own special version.cast/ingredients To make this dish, you will need 2 large onions (thinly sliced), 1 cup gram flour (besan), 2 tablespoons rice flour for extra crunch, 1 teaspoon red chili powder, 1/2 teaspoon turmeric powder, salt to taste, a handful of chopped coriander leaves, and oil for deep frying.songs/steps 1. Firstly, slice the onions thinly and place them in a large mixing bowl. 2. Add salt to the onions and let them sit for five minutes. Consequently, the onions will release their natural moisture. 3. Add the chili powder, turmeric, and chopped coriander to the bowl. 4. Gradually mix in the gram flour and rice flour. However, do not add extra water yet. 5. Heat the oil in a deep pan until it is hot. 6. Drop small, irregular portions of the mixture into the oil. 7. Fry the pakodis until they turn a deep golden brown and feel crispy. 8. Finally, remove them and drain the excess oil on a paper towel.about How to Master the Onion Pakodi Recipe: Making the perfect fritter requires patience and the right technique. Furthermore, the ratio of flour to onions must be perfect. If you add too much flour, the pakodas become doughy and soft. However, if you keep the flour light, you get that signature crunch. Additionally, the rice flour adds a professional touch that keeps them crispy for longer. Therefore, always aim for a light coating rather than a thick batter.themes/tips Secret Tips for the Onion Pakodi Recipe: Many people wonder why their fritters turn soggy. However, you can avoid this by following a few simple rules. Firstly, do not add water to the mixture unless absolutely necessary. Because onions release moisture when salted, they create their own binder. Additionally, fry the pakodis in small batches. If you crowd the pan, the temperature drops. Therefore, the fritters absorb too much oil and lose their crunch. Furthermore, always use medium-high heat to ensure the inside cooks properly while the outside crisps up.whyWatch/whyTry You should try this recipe because it is the ultimate comfort food for any occasion. Furthermore, it requires very little effort and minimal cleanup. Additionally, it pairs perfectly with green chutney, tamarind sauce, or simple tomato ketchup. Therefore, it is the ideal choice for unexpected guests or late-night cravings. Because it is so versatile, you can even add chopped green chilies for an extra kick. Consequently, this snack will quickly become a staple in your household.

Onion Pakodi Read More »

Sanna Kaarapoosa

intro Making the perfect Sanna Kaarapoosa Recipe at home brings a delightful crunch to your tea time. Furthermore, this traditional South Indian snack is quite simple to prepare with just a few pantry staples. Consequently, many families make large batches during festivals like Diwali. However, you must follow specific steps to get that thin, crispy texture.story Sanna Kaarapoosa is a very thin, noodle-like snack that tastes delicious. It primarily uses besan and rice flour for that signature crispness. Additionally, the spice level depends on your personal preference for red chili powder. Therefore, you can customize it for children or adults. Many people enjoy it with hot tea. Specifically, the name ‘Sanna’ refers to the thinness of the strands.cast 2 cups Gram Flour (Besan), 1 cup Rice Flour, 2 tsp Red Chili Powder, 1 tsp Salt, 1/2 tsp Ajwain (Carom seeds), 2 tbsp Hot Oil, Oil for deep frying, Water as needed.songs 1. Initially, sift the gram flour and rice flour together in a large bowl. 2. Add the red chili powder, salt, and ajwain to the mixture. 3. Pour two tablespoons of hot oil over the flour to ensure crispness. 4. Gradually add water and knead it into a soft, smooth dough. 5. Meanwhile, heat oil in a deep frying pan on medium heat. 6. Place a portion of the dough into the Murukku maker using the small-hole plate. 7. Press the maker in a circular motion directly over the hot oil. 8. Fry the strands until they turn light golden brown. 9. Finally, remove the kaarapoosa and drain the excess oil on a paper towel.about ## Mastering the Sanna Kaarapoosa Recipe Initially, you need a special kitchen tool called a ‘Murukku maker’ with the finest hole plate. This tool allows the dough to flow in thin strands into the hot oil. Moreover, using high-quality oil ensures a long shelf life. Although it looks complex, the process is actually very fast. Therefore, you can prepare this snack in less than thirty minutes without much effort.themes ## Secrets of the Sanna Kaarapoosa Recipe To get the best texture, ensure you add hot oil to the dough before kneading. Similarly, do not over-knead the dough, or the snack might become hard. Furthermore, store it in an airtight container once it cools down completely. Consequently, the snack stays fresh for weeks. Always fry on medium heat so it cooks evenly and remains golden.whyWatch You should try this recipe because it is healthier than store-bought snacks. Additionally, the flavor of homemade kaarapoosa is unmatched. Finally, your family will love the crispy texture and savory taste of this traditional treat. It makes every tea break special.

Sanna Kaarapoosa Read More »

Mirchi Bajji

intro Are you looking for a spicy and crunchy snack? This Mirchi Bajji Recipe will satisfy your cravings immediately. Furthermore, it brings the authentic taste of Indian street food right to your kitchen. Consequently, many people love this snack during the monsoon season. You can prepare it quickly if you have the right ingredients. Therefore, let us explore how to make these delicious fritters today.story/description Mirchi Bajji is a beloved snack across India, especially in the southern regions. Vendors often sell these crispy treats near beaches or busy markets. Additionally, families enjoy them with hot chai on rainy evenings. The dish features large green chilies dipped in a spiced gram flour batter. Although the chilies look intimidating, they are usually mild in heat. However, the tangy stuffing adds a kick that creates a perfect flavor balance. Consequently, every bite offers a delightful mix of crunch and spice.cast/ingredients To prepare this dish, you will need 6-8 large green chilies (Bhavnagri variety). For the batter, gather 1 cup of gram flour (besan) and 2 tablespoons of rice flour. Additionally, prepare 1 teaspoon of red chili powder and 1/4 teaspoon of turmeric powder. You also need a pinch of baking soda and salt to taste. For the tangy stuffing, collect 1 tablespoon of tamarind pulp and 1 teaspoon of cumin powder. Finally, ensure you have plenty of oil for deep frying.songs/steps 1. First, wash the green chilies and pat them dry with a towel. 2. Carefully slit each chili lengthwise and remove the seeds to reduce heat. 3. Mix the tamarind pulp, cumin powder, and a little salt in a small bowl. 4. Stuff this tangy mixture into the slit chilies to enhance the flavor. 5. In a separate bowl, combine the gram flour, rice flour, spices, and baking soda. 6. Add water gradually to the flour mixture to form a thick, smooth batter. 7. Heat the oil in a deep pan until it reaches a high temperature. 8. Dip each stuffed chili into the batter until you coat it completely. 9. Drop the chilies gently into the hot oil one by one. 10. Fry them on medium heat until they turn golden brown and crispy.about This snack is more than just food; it is a cultural experience found in every Indian street corner. People often serve it with chopped onions and lemon juice to add extra zing. Furthermore, different regions have their own variations of the stuffing. Some people use mashed potatoes, while others prefer simple spices. Regardless of the version, the Mirchi Bajji Recipe remains a timeless favorite for all age groups.themes/tips Tips for the Perfect Mirchi Bajji Recipe: You should always use fresh, firm chilies for the best texture. Furthermore, adding rice flour makes the bajji extra crunchy and light. If the batter is too thin, it will not stick to the chili properly. Consequently, you must ensure the consistency is thick like pancake batter. Additionally, frying on medium heat ensures the chili inside cooks thoroughly without burning the exterior. Therefore, do not rush the frying process to maintain the perfect crunch.whyWatch/whyTry You should try this Mirchi Bajji Recipe because it is versatile, flavorful, and easy to make. Moreover, it allows you to bring the authentic street food experience into your home. Consequently, your guests will appreciate the bold flavors and professional results. Furthermore, it pairs perfectly with mint chutney or sweet tomato ketchup. Therefore, start cooking now and enjoy this spicy delight with your friends and family.

Mirchi Bajji Read More »

కావలసిన పదార్ధాలు
  • పచ్చిమిర్చి Large Green Chilies (Bajji Mirchi) 10
  • శనగపిండి Gram Flour (Besan) 1.5 cups
  • బియ్యం పిండి Rice Flour 2 tablespoons
  • పసుపు Turmeric Powder 1/2 teaspoon
  • కారం Red Chili Powder 1 teaspoon
  • వాము Carom Seeds (Ajwain) 1 teaspoon
  • వంట సోడా Baking Soda 1/4 teaspoon
  • ఉప్పు Salt (Adjust to taste) 1 teaspoon
  • చింతపండు గుజ్జు Tamarind Pulp (For stuffing) 2 tablespoons
  • జీలకర్ర పొడి Cumin Powder (For stuffing) 1 teaspoon
  • తరిగిన ఉల్లిపాయలు Finely Chopped Onions (For garnish) 1/2 cup
  • తరిగిన కొత్తిమీర Chopped Coriander Leaves (For garnish) 2 tablespoons
  • నిమ్మరసం Lemon Juice 1 tablespoon
  • వేయించడానికి నూనె Cooking Oil (For deep frying) 2 cups
తయారి విధానం
  1. మొదట మిర్చిలను శుభ్రంగా కడిగి తుడుచుకోవాలి. మధ్యలోకి పొడవుగా గాటు పెట్టి లోపల ఉన్న గింజలను తీసివేయాలి.
    Wash the large green chilies and pat them dry. Make a vertical slit in each chili and carefully remove the seeds to reduce the heat.
  2. ఒక చిన్న గిన్నెలో చింతపండు గుజ్జు, కొంచెం వాము, జీలకర్ర పొడి మరియు కొద్దిగా ఉప్పు కలిపి పక్కన పెట్టుకోవాలి. ఈ మిశ్రమాన్ని మిర్చిల లోపల కొద్దిగా పూయాలి.
    In a small bowl, mix the tamarind pulp, a pinch of salt, carom seeds, and cumin powder. Spread a little of this paste inside each slit chili.
  3. ఒక వెడల్పాటి పాత్రలో శనగపిండి, బియ్యం పిండి, పసుపు, కారం, వాము, వంట సోడా మరియు ఉప్పు వేసి బాగా కలపాలి.
    In a large mixing bowl, combine gram flour, rice flour, turmeric powder, red chili powder, carom seeds, baking soda, and salt.
  4. అందులో కొద్దికొద్దిగా నీళ్లు పోస్తూ పిండిని మందపాటి జారుడు మిశ్రమంలా (దోశ పిండి కంటే కొంచెం గట్టిగా) కలుపుకోవాలి. పిండిలో ఉండలు లేకుండా చూసుకోవాలి.
    Gradually add water and whisk to form a thick, smooth batter. The consistency should be thick enough to coat the chilies evenly without dripping off too quickly.
  5. బాండీలో నూనె వేడి చేయాలి. నూనె బాగా కాగిన తర్వాత మంటను మీడియం ఫ్లేమ్ లో ఉంచాలి.
    Heat oil in a deep frying pan over medium heat. To check if the oil is ready, drop a small bit of batter; it should sizzle and rise to the surface immediately.
  6. ఒక్కో మిర్చిని తీసుకుని పిండిలో ముంచి, మిర్చి అంతా పిండి సమానంగా అంటేలా చూసి మెల్లగా నూనెలో వేయాలి.
    Hold a chili by its stem, dip it into the batter until it is completely coated, and gently drop it into the hot oil.
  7. బజ్జీలు బంగారు రంగులోకి మారి కరకరలాడే వరకు అన్ని వైపులా వేయించి, టిష్యూ పేపర్ మీదకు తీసుకోవాలి.
    Fry the bajjis on medium heat, turning occasionally, until they turn golden brown and crispy on all sides.
  8. తర్వాత వేయించిన బజ్జీలను మధ్యలోకి కోసి, అందులో సన్నగా తరిగిన ఉల్లిపాయలు, కొత్తిమీర మరియు నిమ్మరసం చల్లి వేడివేడిగా వడ్డించాలి.
    Remove the bajjis and drain them on paper towels. For a street-style finish, slit the fried bajjis, stuff them with chopped onions, coriander, and a squeeze of fresh lemon juice before serving.
[real3dflipbook id='1']