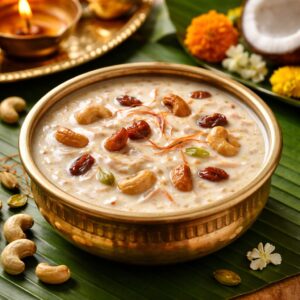
Edit Template

Recipe Tag: Kids Favorite

Semiya Payasam

intro Everyone loves a sweet ending to their meal. Therefore, this Semiya Payasam Recipe serves as the perfect solution for your dessert cravings. Furthermore, you can prepare this delicious dish in under thirty minutes. Additionally, the recipe requires only basic kitchen staples like milk and sugar. However, you must follow the steps carefully to achieve the best texture. Consequently, your family will enjoy every creamy spoonful of this traditional Indian delight. story/description Semiya Payasam, also known as Vermicelli Kheer, holds a special place in Indian households. People usually serve it during festivals like Onam, Diwali, and Eid. Furthermore, it symbolizes celebration and joy across many cultures. Traditionally, grandmothers would slow-cook the milk until it reached a thick consistency. However, modern versions allow for quicker preparation without losing the authentic taste. Consequently, this dessert remains a staple for both beginners and experienced cooks. Therefore, the aroma of roasting vermicelli in pure ghee often signals the start of a festive season. cast/ingredients To begin, you will need one cup of semiya or vermicelli. Additionally, gather four cups of full-fat milk for a rich texture. You also need half a cup of sugar, although you can adjust this to your preference. Furthermore, pick a few green cardamom pods for a refreshing scent. For the garnish, keep a handful of cashew nuts and raisins ready. Finally, use two tablespoons of ghee to roast the ingredients perfectly. These simple components work together to create a masterpiece. songs/steps ### How to Master the Semiya Payasam Recipe First, heat the ghee in a heavy-bottomed pan. Furthermore, add the cashews and raisins to the hot ghee. Fry them until the nuts turn golden and the raisins plump up. After that, remove them and set them aside for later. Next, add the vermicelli to the same pan. Roast it on a low flame until it turns a beautiful golden brown. However, be careful not to burn it. Meanwhile, boil the milk in a separate thick-bottomed pot. Once the milk starts boiling, add the roasted vermicelli to it. Consequently, the vermicelli will cook and become soft in the milk. Furthermore, stir the mixture frequently to prevent it from sticking to the bottom. Additionally, add the sugar and cardamom powder once the vermicelli is fully cooked. Simmer the mixture for another five minutes until it thickens slightly. Finally, garnish the dish with the fried nuts and raisins. about This dessert is not just a treat for the palate; it also offers a sense of comfort. Furthermore, it provides energy through the carbohydrates in the vermicelli and the fats in the milk. Additionally, cardamom helps with digestion after a heavy meal. Therefore, it is a balanced way to end a feast. However, you can make it healthier by using jaggery instead of white sugar. Consequently, this dish adapts well to different dietary needs.themes/tips ### Why You Will Love This Semiya Payasam Recipe To ensure success, always roast the semiya well before adding it to the milk. Furthermore, use full-cream milk to get that signature velvety texture. Additionally, remember that the payasam thickens as it cools down. Therefore, you should keep the consistency a bit thin when you turn off the heat. However, if it becomes too thick later, simply add a splash of warm milk. Consequently, you will always have the perfect serving consistency for your guests.whyWatch/whyTry You should try this Semiya Payasam Recipe because it is incredibly versatile and easy. Furthermore, it brings the authentic flavors of India right into your kitchen. Additionally, it takes very little effort to impress your friends and family. Therefore, don’t wait for a festival to cook this. Try it today and experience the magic of creamy vermicelli in every bite!

Read More »

Uthappam

intro Are you looking for a healthy and filling breakfast? This Uthappam Recipe offers a delicious start to your morning. Furthermore, it combines fermented batter with colorful, fresh vegetables. Consequently, you get a meal that is both nutritious and incredibly tasty for your whole family. Therefore, let us dive into this classic culinary delight.story/description Uthappam originates from the southern regions of India. Many people often describe it as the Indian version of a savory pizza. However, instead of dough, it uses a fermented lentil and rice base. Additionally, the thick pancake supports a variety of toppings like crunchy onions, juicy tomatoes, and spicy green chilies. Therefore, every single bite provides a burst of authentic flavor. Moreover, the fermentation process makes the batter very light on the stomach. Because you pan-fry it with minimal oil, it remains a top choice for health-conscious food lovers. Furthermore, the combination of a soft center and crispy edges creates a wonderful texture.cast/ingredients To prepare this dish, you will need 2 cups of fermented Idli or Dosa batter. Additionally, gather 1 large finely chopped onion and 1 medium chopped tomato. Furthermore, prepare 2 minced green chilies and 1/2 cup of fresh coriander leaves. You will also need salt to taste and oil or ghee for cooking on the griddle.songs/steps ### Mastering the Perfect Uthappam Recipe First, you must prepare your batter by whisking it gently in a bowl. Next, heat a non-stick pan or a cast-iron griddle over medium heat. Therefore, pour a large ladle of batter onto the center of the pan. However, you should not spread it too thin like a traditional dosa. Furthermore, immediately sprinkle the chopped onions, tomatoes, and chilies on top. Press the vegetable toppings lightly with a spatula so they stick to the batter. Then, drizzle a small amount of oil around the edges of the pancake. Consequently, flip the pancake over when the bottom turns a beautiful golden brown. Finally, cook the other side for one minute until the vegetables soften and caramelize slightly.about ### Benefits of this Traditional Meal Uthappam is a staple in millions of Indian households. Furthermore, it is an incredibly versatile dish for any time of the day. You can serve it for breakfast, a light lunch, or even a quick dinner. Because the batter undergoes fermentation, it contains natural probiotics. Therefore, it supports better digestion and gut health. Additionally, it provides a fantastic gluten-free option for those with specific dietary restrictions. Consequently, many people prefer it over heavy, wheat-based breads or sugary cereals. Your Uthappam Recipe will always stay exciting if you experiment with different vegetable combinations.themes/tips Always use a slightly sour batter to achieve the best flavor profile. Furthermore, ensure your griddle is hot before you pour the batter. However, you must lower the heat once the batter hits the pan to avoid burning. Additionally, you can add grated carrots or even a sprinkle of cheese for a modern twist. Therefore, you can customize this meal to satisfy everyone at the table. Consequently, consistent practice will help you get those perfectly crispy edges every single time.whyWatch/whyTry You should try this recipe because it is very quick to assemble once the batter is ready. Furthermore, it utilizes simple ingredients that you likely already have in your pantry. Therefore, you can create a restaurant-quality meal in your own kitchen. Additionally, children love the colorful appearance and the soft texture of the pancakes. Consequently, it serves as a great way to include more vegetables in a kid-friendly meal without any fuss.

Read More »

Dosa

introPeople across the globe love the classic Indian crepe. This dosa recipe brings the authentic taste of South India right into your kitchen. Anyone can master this dish with just a few simple ingredients and techniques. Prepare yourself for a delicious, crispy meal that everyone in your family will enjoy. It also provides a healthy start to your busy day. story/description Origins The history of the dosa stretches back centuries to the southern states of India. People originally created this thin pancake using fermented batter made of rice and lentils. Evolution Today, many variations include different fillings and grains. The natural fermentation process makes it very light on the stomach. Global Popularity You can find dosa in street stalls and high-end restaurants alike. It has become a global favorite for food lovers everywhere. The combination of a crunchy exterior and soft interior makes it absolutely irresistible. cast/ingredientsTo begin, gather these items: 3 cups parboiled rice, 1 cup urad dal (black gram), 1/2 teaspoon fenugreek seeds, salt to taste, water for soaking and grinding, and oil or ghee for frying. songs/steps Preparation First, wash the rice and lentils separately until the water runs clear. Then soak them in water with fenugreek seeds for at least six hours. After soaking, grind the mixture into a very smooth, thick batter. Fermentation Let the batter ferment in a warm place for about eight to ten hours until it rises. Once the batter doubles in size, add salt and mix gently. Cooking Heat a non-stick pan or a flat tawa over medium heat. Pour a ladle of batter in the center and spread it outward in a circular motion to make a thin disc. Apply a little oil around the edges and cook until it turns golden brown and crispy. Finally, fold the crepe and serve it hot with fresh coconut chutney or spicy sambar. about Cultural Significance Dosa is much more than just a meal; it is a cultural staple of India. Most people eat it for breakfast, but it also works as a great dinner option. Health Benefits It is naturally gluten-free and vegan, which suits many different diets. Health enthusiasts often choose it because it provides a good balance of carbohydrates and proteins. Variations You can also find various versions like Masala Dosa or Mysore Dosa in many cities. themes/tips Heat Control To get a very crispy texture, keep your pan at the right temperature. If the pan gets too hot, the batter will not spread easily. If it stays too cold, the dosa will stick to the surface. Equipment and Texture Use a well-seasoned cast-iron skillet for the most authentic results. Add a pinch of sugar to the batter to achieve a beautiful golden color. Keep your heat consistent throughout the cooking process for the best outcome. whyWatch/whyTry Taste and Flexibility Try this recipe because it offers a unique combination of crunch and tanginess. It also lets you experiment with various fillings like spiced potatoes, cheese, or vegetables. Practical Benefits Making this dish at home saves money and ensures the use of high-quality ingredients. The satisfaction of flipping a perfect, thin crepe feels truly rewarding. It also gives you a fun way to introduce your family to international flavors.

Read More »

Okra Fry with Peanuts

Intro This Okra Fry with Peanuts Recipe provides a wonderful way to enjoy fresh vegetables with a crunchy twist. Furthermore, the dish pairs perfectly with various Indian breads or steamed rice. Because it uses simple pantry spices, anyone can make it in less than twenty minutes. Consequently, you will love the earthy flavors and vibrant colors this dish brings to your table.story/description Imagine the comforting aroma of sautéing okra filling your home kitchen. Initially, this dish began as a humble stir-fry in South Indian households. However, the addition of roasted peanuts transformed it into a texture-rich masterpiece. This version balances the softness of the okra with the firm bite of the nuts. Moreover, the spices enhance the natural sweetness of the ladyfingers. Because of its simplicity, families often serve it during busy weeknight dinners to ensure everyone eats their greens.cast/ingredients To prepare this dish, you will need 1 pound of fresh okra, thinly sliced into rounds. Additionally, gather 1/2 cup of roasted peanuts and 2 tablespoons of vegetable oil. You also need 1 teaspoon of cumin seeds and 1/2 teaspoon of turmeric powder. Furthermore, prepare 1 teaspoon of red chili powder and salt to taste. Finally, keep a wedge of lemon ready for a bright finish.songs/steps First, wash the okra and dry it completely with a towel. Consequently, drying the vegetables prevents them from becoming slimy during the cooking process. Next, heat the oil in a large open pan over medium heat. Furthermore, add the cumin seeds and wait until they start to sizzle. Add the sliced okra to the pan and sauté them gently. However, do not cover the pan with a lid because steam makes okra soft. Stir the mixture occasionally for ten minutes until the edges turn golden brown. Therefore, you achieve a crispy texture. Finally, toss in the roasted peanuts and the remaining spices. Additionally, stir for two more minutes before squeezing fresh lemon juice over the top.about This Okra Fry with Peanuts Recipe is a variation of the traditional Bhindi Fry found across India. Specifically, it highlights the ‘Poriyal’ style of cooking where vegetables are stir-fried with minimal water. The peanuts add essential protein and a nutty depth that complements the spices. Because it is naturally vegan and gluten-free, it caters to many dietary needs. Truly, it is a versatile side dish that elevates any meal.themes/tips Secrets to a Perfect Okra Fry with Peanuts Recipe. To ensure success, always select tender and young okra pods. Furthermore, you should slice the okra into uniform pieces for even cooking. If the okra feels sticky, you can add a pinch of dried mango powder. Consequently, the acidity cuts through the mucilage. Additionally, use a wide frying pan to avoid crowding the vegetables. Moreover, adding the salt only at the end keeps the okra firm and crispy rather than mushy.whyWatch/whyTry You should try this dish because it offers a perfect balance of nutrition and flavor. Firstly, okra provides high levels of dietary fiber and vitamins. Secondly, the roasted peanuts supply healthy fats and a satisfying crunch. Therefore, it is a wholesome choice for both children and adults. Additionally, the quick preparation time makes it a lifesaver for amateur cooks. Consequently, this recipe makes eating your daily vegetables an enjoyable and tasty experience.

Read More »
కావలసిన పదార్ధాలు
  • సేమియా Vermicelli (Roasted or Plain) 1 cup
  • పాలు Milk (Full cream) 4 cups
  • పంచదార Sugar 1/2 cup
  • నెయ్యి Ghee (Clarified Butter) 2 tablespoon
  • జీడిపప్పు Cashew nuts (Split) 10
  • కిస్మిస్ Raisins (Dry Grapes) 10
  • యాలకుల పొడి Cardamom powder 1/2 teaspoon
  • పచ్చ కర్పూరం Edible Camphor (Optional for aroma) 1 pinch
తయారి విధానం
  1. ఒక మందపాటి గిన్నెలో నెయ్యి వేసి వేడి అయ్యాక జీడిపప్పులను వేయించి, అవి దోరగా మారాక కిస్మిస్ కూడా వేసి వేయించి పక్కన పెట్టుకోవాలి.
    Heat ghee in a heavy-bottomed pan and fry cashew nuts until they turn golden brown, then add raisins and fry until they puff up. Remove and set aside.
  2. అదే గిన్నెలో మిగిలిన నెయ్యిలో సేమియా వేసి మధ్యస్థ మంటపై మంచి సువాసన వచ్చే వరకు దోరగా వేయించాలి.
    In the same pan with remaining ghee, add the vermicelli and roast on medium flame until it turns aromatic and slightly golden.
  3. ఇప్పుడు పాలు పోసి మరిగించాలి. సేమియా మెత్తగా ఉడికే వరకు మధ్య మధ్యలో కలుపుతూ ఉండాలి.
    Pour milk into the pan and bring it to a boil. Lower the flame and cook until the vermicelli becomes soft and translucent.
  4. సేమియా ఉడికిన తర్వాత పంచదార వేసి, అది పూర్తిగా కరిగే వరకు కలపాలి.
    Add sugar and stir continuously until the sugar dissolves completely.
  5. ఇందులో యాలకుల పొడి, పచ్చ కర్పూరం మరియు ముందుగా వేయించి పెట్టుకున్న జీడిపప్పు, కిస్మిస్ వేయాలి.
    Add the cardamom powder, a pinch of edible camphor, and the fried cashews and raisins.
  6. మరో 2-3 నిమిషాల పాటు చిన్న మంటపై ఉంచి స్టవ్ ఆపివేయాలి.
    Let it simmer for another 2-3 minutes until the desired consistency is reached.
  7. పాయసం చల్లారే కొద్దీ చిక్కబడుతుంది కాబట్టి, మీకు కావలసిన చిక్కదనంలో ఉన్నప్పుడే దించుకోవాలి.
    Turn off the heat. Note that the payasam thickens as it cools, so adjust the consistency while it is still slightly thin.
[real3dflipbook id='1']