Edit Template

Recipe Tag: Rayalaseema

Ulli Karam Dosa

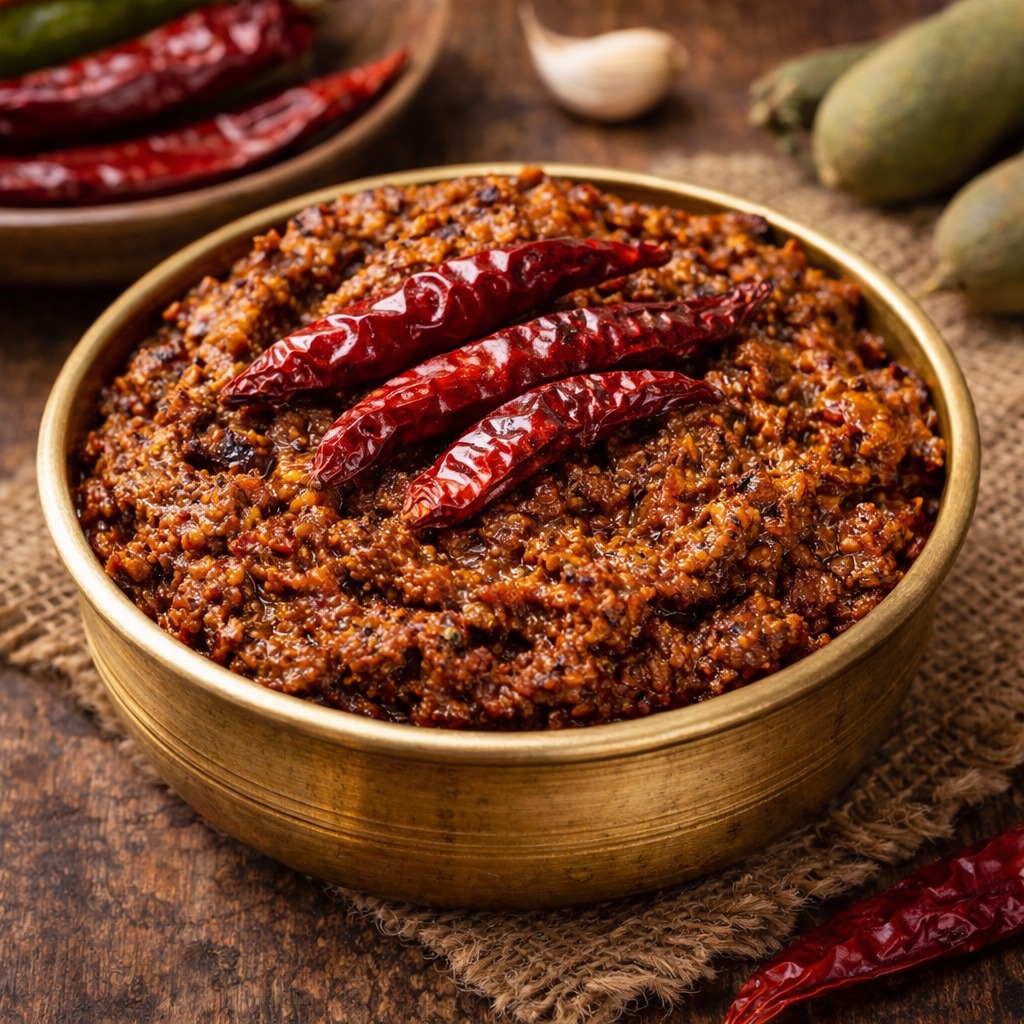
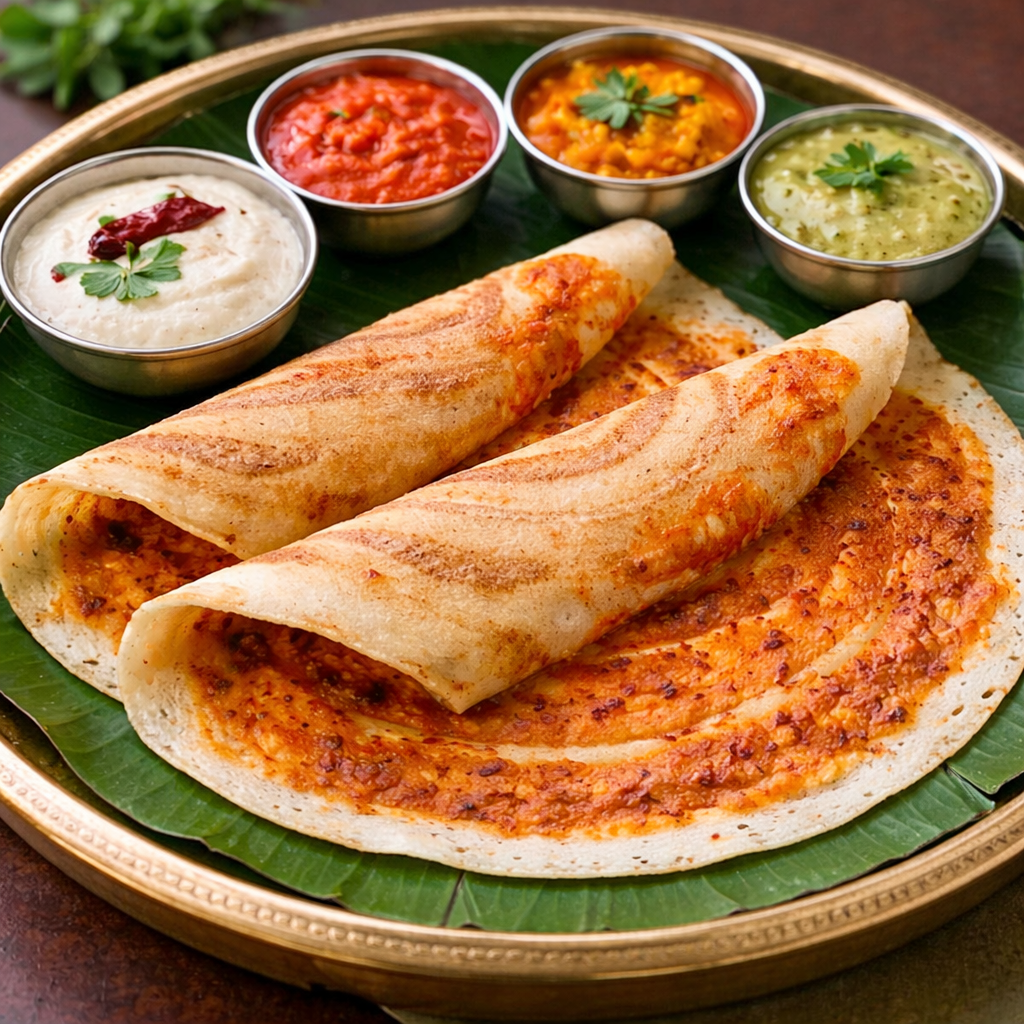
intro First, you will love the vibrant flavors of this Ulli Karam Dosa Recipe. It combines the crunch of a fermented crepe with a fiery onion-garlic paste. Additionally, this dish represents the heart of Andhra’s culinary heritage. Therefore, anyone who enjoys bold spices should try this at home. However, you can easily adjust the heat to suit your personal preference.story/description The term ‘Ulli’ means onion, and ‘Karam’ refers to spice or chili. This recipe originates from the coastal regions of Andhra Pradesh. People there love food that wakes up the senses. Consequently, this dosa became a local favorite in street stalls and homes alike. Furthermore, the magic lies in the red chutney spread inside the dosa. Because the onions caramelize slightly on the hot griddle, they create a sweet yet spicy profile. This Ulli Karam Dosa Recipe transforms a simple breakfast into an extraordinary feast. Moreover, the aroma of fried garlic will fill your kitchen instantly.cast/ingredients 1. Dosa batter (fermented rice and lentil mix) 2. 2 large onions (roughly chopped) 3. 6-8 dried red chilies 4. 4 cloves of garlic 5. 1 small piece of tamarind 6. Salt (to taste) 7. Oil or Ghee (for roasting) 8. 1 teaspoon of cumin seedssongs/steps 1. First, prepare the spicy paste by blending onions, red chilies, garlic, tamarind, cumin, and salt into a smooth texture. 2. Next, heat a non-stick tawa or cast-iron griddle on a medium flame. 3. Pour a ladleful of dosa batter in the center and spread it in a thin, circular motion. 4. Drizzle some oil or ghee around the edges to make it crispy. 5. Then, take a spoonful of the prepared onion-chili paste and spread it evenly over the top of the dosa. 6. Cook the dosa until the bottom turns golden brown and the edges lift easily. 7. Finally, fold the dosa and serve it hot without flipping.about ## The Secret to a Perfect Ulli Karam Dosa Recipe To achieve the best results, you must focus on the consistency of your batter. A thin batter ensures a crispy base. Additionally, the quality of the dried red chilies determines the color of the Karam paste. If you use Kashmiri chilies, you get a bright red color without too much heat. However, spicy Guntur chilies provide that authentic kick. Furthermore, you should always use fresh garlic for the best aroma. Therefore, avoid using store-bought pastes for this specific Ulli Karam Dosa Recipe.themes/tips ## Making Your Own Ulli Karam Dosa Recipe at Home Always grease your pan properly before starting. You can use a sliced onion to rub the pan for a natural non-stick surface. Additionally, do not over-blend the Karam paste into a watery liquid; it should remain thick. Because a thick paste stays on the dosa better, it prevents the crepe from becoming soggy. Furthermore, you should cook the dosa on a medium flame. If the heat is too high, the paste might burn before the dosa gets crispy. Therefore, patience is the key ingredient here.whyWatch/whyTry You should try this recipe because it offers a restaurant-quality experience in your own kitchen. Additionally, it provides a healthy dose of probiotics from the fermented batter. Since you control the ingredients, you can make it as spicy or mild as you like. Moreover, it pairs perfectly with peanut chutney or a simple bowl of sambar. Finally, this dish will certainly impress your family during weekend brunches.

Read More »

Chintakaya Pachadi

intro Welcome to the world of South Indian pickles. If you love tanginess, the Chintakaya Pachadi Recipe is perfect for you. This dish uses raw green tamarind as its main ingredient. Consequently, it delivers a sharp and refreshing taste. Furthermore, it pairs beautifully with hot rice and ghee. You will surely enjoy this traditional flavor in your kitchen. story/description This pickle comes from the heart of Andhra Pradesh. Therefore, it carries the soul of traditional village cooking. Grandmothers usually make this during the tamarind season. First, they pick raw green tamarind directly from the trees. Then, they crush it with sea salt and turmeric powder. Additionally, this process preserves the tamarind for many months. However, the fresh version always tastes even better. People love it because it evokes warm childhood memories. Moreover, the aroma of the hot tempering fills the whole house. Since it is homemade, it feels very special to everyone.cast/ingredients To make this dish, you will need the following items. Specifically, gather these ingredients: – 250g Raw Green Tamarind – 10-12 Green Chilies – 2 tsp Salt – 1/2 tsp Turmeric Powder – 2 tbsp Oil – 1 tsp Mustard Seeds – 1/4 tsp Fenugreek Seeds – 2 Dry Red Chilies – A pinch of Asafoetida – A few Curry Leavessongs/steps ### Preparation Steps for the Chintakaya Pachadi Recipe 1. Clean and dry the raw tamarind thoroughly before starting. 2. Then, crush the tamarind roughly and remove any large seeds. 3. Grind the green chilies with salt and turmeric in a blender. 4. Next, add the crushed tamarind to the grinder jar. 5. Grind everything until you get a coarse and thick paste. 6. Heat oil in a small pan for the tempering. 7. Additionally, add mustard seeds and fenugreek seeds to the hot oil. 8. Toss in the dry red chilies and fresh curry leaves. 9. Finally, pour this hot tempering over the tamarind paste. 10. Mix the contents well and serve it immediately with rice.about This Chintakaya Pachadi Recipe is a staple in Telugu households. Specifically, it represents the bold and spicy nature of authentic Andhra cuisine. While many people buy store-bought pickles, nothing beats the fresh homemade version. Furthermore, the natural acidity of green tamarind acts as a natural preservative. Consequently, this pickle stays fresh for a long time if you handle it properly. Instead of using vinegar, we rely on the natural juices. Thus, the flavor remains authentic and robust. Especially when served with mudda pappu, it tastes absolutely divine.themes/tips Always use fresh and firm green tamarind for the best results. Additionally, you should adjust the number of green chilies according to your spice preference. Furthermore, ensure you use a completely dry spoon to avoid spoilage. Therefore, the pickle will last much longer in storage. You can also store it in a glass jar. Moreover, adding a little extra oil helps in preservation.whyWatch/whyTry ### Why You Should Try This Chintakaya Pachadi Recipe You should try this recipe because it offers a massive burst of flavors. It is sour, spicy, and salty all at once. Moreover, it is very healthy due to the high vitamin C content in tamarind. Since it requires minimal ingredients, it is easy to prepare for any beginner. Thus, you can enjoy a piece of Indian tradition right in your own home. Additionally, it significantly improves your digestion after a heavy meal. Therefore, it is a great addition to your daily lunch. You will love how it changes a simple meal into a wonderful feast.

Read More »

Spicy Stuffed Brinjal

intro This Brinjal Recipe offers a perfect blend of smoky flavors and spicy goodness. Because it uses simple ingredients, you can cook it very quickly. Additionally, it provides many health benefits for your daily diet. Consequently, this dish remains a favorite in many households across the globe.story/description Brinjal, also known as eggplant, has a long and rich history in global cuisines. However, many people struggle to cook it correctly because the texture can be tricky. Therefore, we created this guide to help you master the dish. Furthermore, the texture of the vegetable changes beautifully when you sauté it over medium heat. Since it absorbs spices very well, the final result is always flavorful. Moreover, you can adjust the heat levels to suit your personal taste. Thus, every single bite feels satisfying and rich. While some prefer it mashed, this version keeps the pieces intact for a better mouthfeel.cast/ingredients To start this Brinjal Recipe, gather two large fresh brinjals. Additionally, you will need two tablespoons of vegetable oil and one teaspoon of cumin seeds. Furthermore, prepare one finely chopped onion and two minced cloves of garlic. Finally, collect your spices including turmeric, red chili powder, and sea salt. Because freshness matters, ensure your herbs like cilantro are also ready for garnishing.songs/steps First, you must wash and cut the vegetables into small, even cubes. Consequently, they will cook at the same rate. Second, heat the oil in a large pan and add the cumin seeds. Once they sizzle, you should add the onions and garlic. Sauté these until they turn a light golden brown. Third, add the brinjals and all the dry spices to the pan. Because you want even coating, stir the mixture thoroughly. Furthermore, cover the pan and cook on low heat for ten minutes. Finally, garnish with fresh cilantro and serve while it is hot.about This Brinjal Recipe represents the heart of home-cooked comfort. While the dish is simple, it carries deep cultural significance in many regions. Therefore, many families pass down these specific instructions through generations. It is a humble meal that proves how basic ingredients can create something extraordinary. Furthermore, it is naturally vegan and gluten-free, making it accessible for everyone.themes/tips You should always use low heat to ensure even cooking throughout the dish. Furthermore, adding a tiny splash of lemon juice provides a lovely tangy kick. Moreover, fresh cilantro improves the aroma significantly before serving. However, do not overcook the vegetable, or it might become too mushy. Additionally, soaking the cut pieces in salt water for ten minutes removes any potential bitterness.whyWatch/whyTry You should try this Brinjal Recipe because it is extremely budget-friendly and nutritious. Additionally, it tastes amazing when you pair it with warm flatbread or steamed rice. Finally, it provides a healthy alternative to heavy meat dishes without sacrificing any flavor. Because it is so easy to make, it will quickly become a staple in your weekly meal rotation.

Read More »

Ariselu

intro Making an Ariselu Recipe brings back beautiful memories of festive seasons and family gatherings. Therefore, many families in South India prepare this sweet specifically during the Sankranti festival. Furthermore, it symbolizes prosperity and joy because of its golden color and rich taste. Consequently, you should learn how to make this authentic version at home to impress your loved ones.story/description This sweet is a legendary staple in Andhra Pradesh and Odisha. However, it requires a bit of patience to master the dough texture. Additionally, the deep flavor of organic jaggery makes it much healthier than modern sugar-based snacks. Thus, it remains a favorite for generations. People often share these treats with neighbors during celebrations. Moreover, the combination of sesame seeds and ghee creates an aroma that fills the entire house.cast/ingredients To start, you will need 1 kilogram of raw rice. Additionally, gather 750 grams of high-quality jaggery. You must also have 100 grams of ghee for richness. Furthermore, include 2 tablespoons of sesame seeds or poppy seeds for crunch. Finally, ensure you have plenty of sunflower oil for deep frying.songs/steps First, soak the rice for at least 24 hours. Consequently, the rice softens and grinds into a smoother powder. After soaking, drain the water and dry the rice on a cloth for thirty minutes. However, do not let it dry completely. Next, grind the rice into a fine powder. Meanwhile, melt the jaggery in a pan with a little water to create a thick syrup. Therefore, you must check for ‘soft ball’ consistency by dropping syrup into cold water. Once the syrup is ready, add the rice flour slowly. Additionally, stir constantly to prevent any lumps from forming. After the dough cools slightly, grease your palms with ghee. Consequently, you can flatten small balls of dough into discs. Finally, deep fry these discs in hot oil until they turn golden brown. Remember to press the fried Ariselu between two flat ladles to remove excess oil.about The Ariselu Recipe is famous across different states under various names. For instance, people call it Adhirasam in Tamil Nadu and Kajjaya in Karnataka. Therefore, it has many regional variations that all celebrate the same core ingredients. Because it uses jaggery instead of refined sugar, it offers a more complex flavor profile. Moreover, the history of this sweet dates back centuries in Indian culinary traditions.themes/tips Perfecting the Ariselu Recipe requires attention to detail. Firstly, always use aged rice for the best results. Additionally, you should keep the rice flour damp until you mix it with the syrup. If the flour dries out, the sweet will become too hard. Furthermore, maintain the oil at a medium temperature. If the oil is too hot, the outside burns while the inside remains raw. Therefore, patience is your best friend in the kitchen. Additionally, using a wooden Ariselu press helps significantly in removing oil.whyWatch/whyTry You should try this recipe because it connects you to authentic Indian traditions. Moreover, these sweets have a long shelf life, so you can enjoy them for weeks. Therefore, they make excellent snacks for children and guests alike. Because you are making them at home, you can control the quality of the ingredients. Consequently, your family will enjoy a fresh, preservative-free treat that tastes better than any store-bought version.

Read More »

Bobbatlu

intro The Bobbatlu Recipe stands as a hallmark of South Indian festive traditions. Consequently, many families prepare this sweet flatbread during Ugadi and other celebrations. Moreover, the combination of sweet lentils and soft dough creates a heavenly taste. Therefore, learning this recipe allows you to bring authentic flavors into your own kitchen today.story People across India cherish this dish under various names like Puran Poli or Holige. Furthermore, the history of this sweet dates back centuries. Although ingredients are simple, the technique requires patience. However, the result is always worth the effort. Additionally, mothers pass this skill down to their children. Consequently, the legacy of this traditional sweet continues to thrive in modern homes.cast To begin, you will need one cup of chana dal and one cup of jaggery. Additionally, gather two cups of all-purpose flour for the dough. Furthermore, keep cardamom powder, turmeric, and plenty of pure ghee ready. These simple ingredients combine to create something truly magical. Consequently, you should ensure every ingredient is fresh for the best flavor.songs ## Step-by-Step Bobbatlu Recipe Guide First, soak the chana dal for four hours. Then, pressure cook the dal until it becomes soft. Additionally, drain all excess water from the cooked dal. Moreover, grind the dal with jaggery into a smooth paste. Consequently, this becomes your sweet filling. Similarly, prepare a soft dough using flour and oil. Furthermore, let the dough rest for at least two hours. Afterward, place a ball of filling inside a small disc of dough. Finally, roll it out thinly and cook it on a hot griddle with ghee.about ## Why People Love the Bobbatlu Recipe This dish consists of a thin outer layer made of flour. Inside, you find a rich filling of cooked chana dal and jaggery. Therefore, it provides a perfect balance of texture. Additionally, ghee enhances the flavor significantly. Because of its long shelf life, you can enjoy it for several days. Moreover, the soft texture makes it a favorite among people of all ages. Although it is a dessert, many enjoy it as a breakfast item.themes ## Master Tips for Success Firstly, ensure the dough is very soft and pliable. Furthermore, use plenty of ghee while roasting on the tawa. If you prefer a healthier version, you can substitute wheat flour for all-purpose flour. However, the traditional texture might change slightly. Additionally, mash the dal well to avoid lumps in the filling. Consequently, the flatbread will not tear while you roll it out. Similarly, keep the heat on medium to avoid burning the outer layer.whyWatch You should try this recipe because it brings a sense of nostalgia. Furthermore, it is a healthy alternative to store-bought sweets. Therefore, it serves as a great snack for children. Additionally, the process of making it is quite meditative. Consequently, you will feel proud of creating such a masterpiece from scratch. Moreover, your guests will absolutely love the authentic taste. Finally, it allows you to celebrate culture in your own kitchen.

Read More »
కావలసిన పదార్ధాలు
  • దోశ పిండి Dosa Batter 4 cups
  • ఉల్లిపాయలు Onions (Roughly chopped) 2 large
  • ఎండు మిర్చి Dried Red Chilies 10-12
  • చింతపండు Tamarind 1 small piece
  • వెల్లుల్లి Garlic Cloves 4 రెబ్బలు
  • ఉప్పు Salt 1 teaspoon
  • నెయ్యి Ghee 2 tablespoons
  • సన్నగా తరిగిన ఉల్లిపాయలు Finely Chopped Onions 1/2 cup
  • పుట్నాల పొడి Roasted Gram Flour (Pappula Podi) 4 tablespoons
  • నూనె Oil 2 tablespoons
తయారి విధానం
  1. మిక్సీ జార్‌లో కోసిన ఉల్లిపాయలు, ఎండుమిర్చి, చింతపండు, వెల్లుల్లి రెబ్బలు మరియు ఉప్పు వేయండి.
    In a blender jar, add the roughly chopped onions, dried red chilies, tamarind, garlic cloves, and salt.
  2. ఎక్కువ నీళ్లు పోయకుండా మెత్తని పేస్ట్‌లా గ్రైండ్ చేసి పక్కన పెట్టుకోండి. ఇదే మన ఉల్లి కారం.
    Grind into a smooth paste without adding much water to prepare the Ulli Karam (Onion Chutney).
  3. స్టవ్ మీద దోశ పెనం పెట్టి వేడి చేయండి, పెనం వేడయ్యాక కొద్దిగా నూనె రాయండి.
    Heat a flat cast-iron tawa or non-stick griddle on medium-high heat and grease it lightly with oil.
  4. ఒక గరిటెడు దోశ పిండిని తీసుకుని పెనం మధ్యలో వేసి పల్చగా వృత్తాకారంలో పరచండి.
    Pour a ladleful of dosa batter in the center and spread it in a thin circular motion to form a large crepe.
  5. దోశ అంచుల వెంట మరియు మధ్యలో ఒక టీస్పూన్ నెయ్యి లేదా నూనె వేయండి.
    Drizzle a teaspoon of ghee or oil around the edges and in the center of the dosa.
  6. దోశ పైన మనం తయారుచేసుకున్న ఉల్లి కారం పేస్ట్‌ను ఒక స్పూన్ వేసి దోశ అంతటా సమానంగా రాయండి.
    Spread a generous spoonful of the prepared Ulli Karam paste evenly over the surface of the dosa while it is cooking.
  7. దానిపై కొంచెం పుట్నాల పొడి మరియు సన్నగా తరిగిన ఉల్లిపాయ ముక్కలు చల్లండి.
    Sprinkle a tablespoon of roasted gram flour (pappula podi) and some finely chopped onions on top for extra texture and flavor.
  8. మంటను మీడియం ఫ్లేమ్‌లో ఉంచి దోశ కింద భాగం ఎర్రగా, కరకరలాడే వరకు వేయించండి.
    Cook until the bottom turns golden brown and crispy on a medium flame.
  9. దోశ కాలిన తర్వాత సగానికి మడిచి వేడి వేడిగా కొబ్బరి పచ్చడితో వడ్డించండి.
    Fold the dosa into a half-moon shape and serve hot with coconut chutney or sambar.
[real3dflipbook id='1']