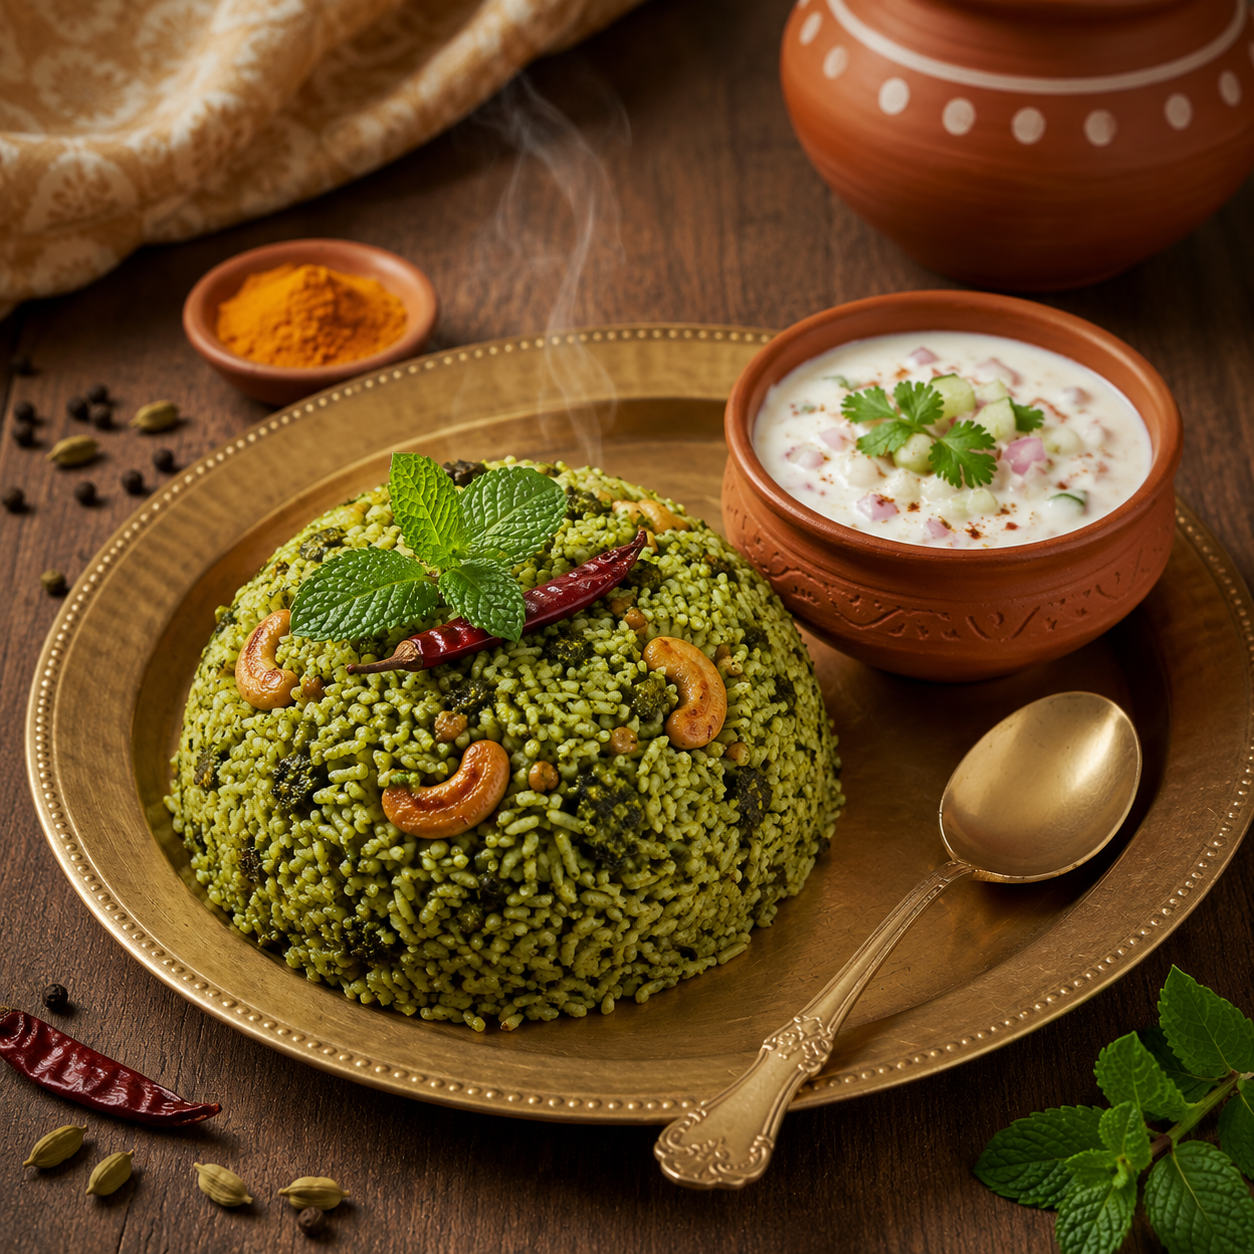
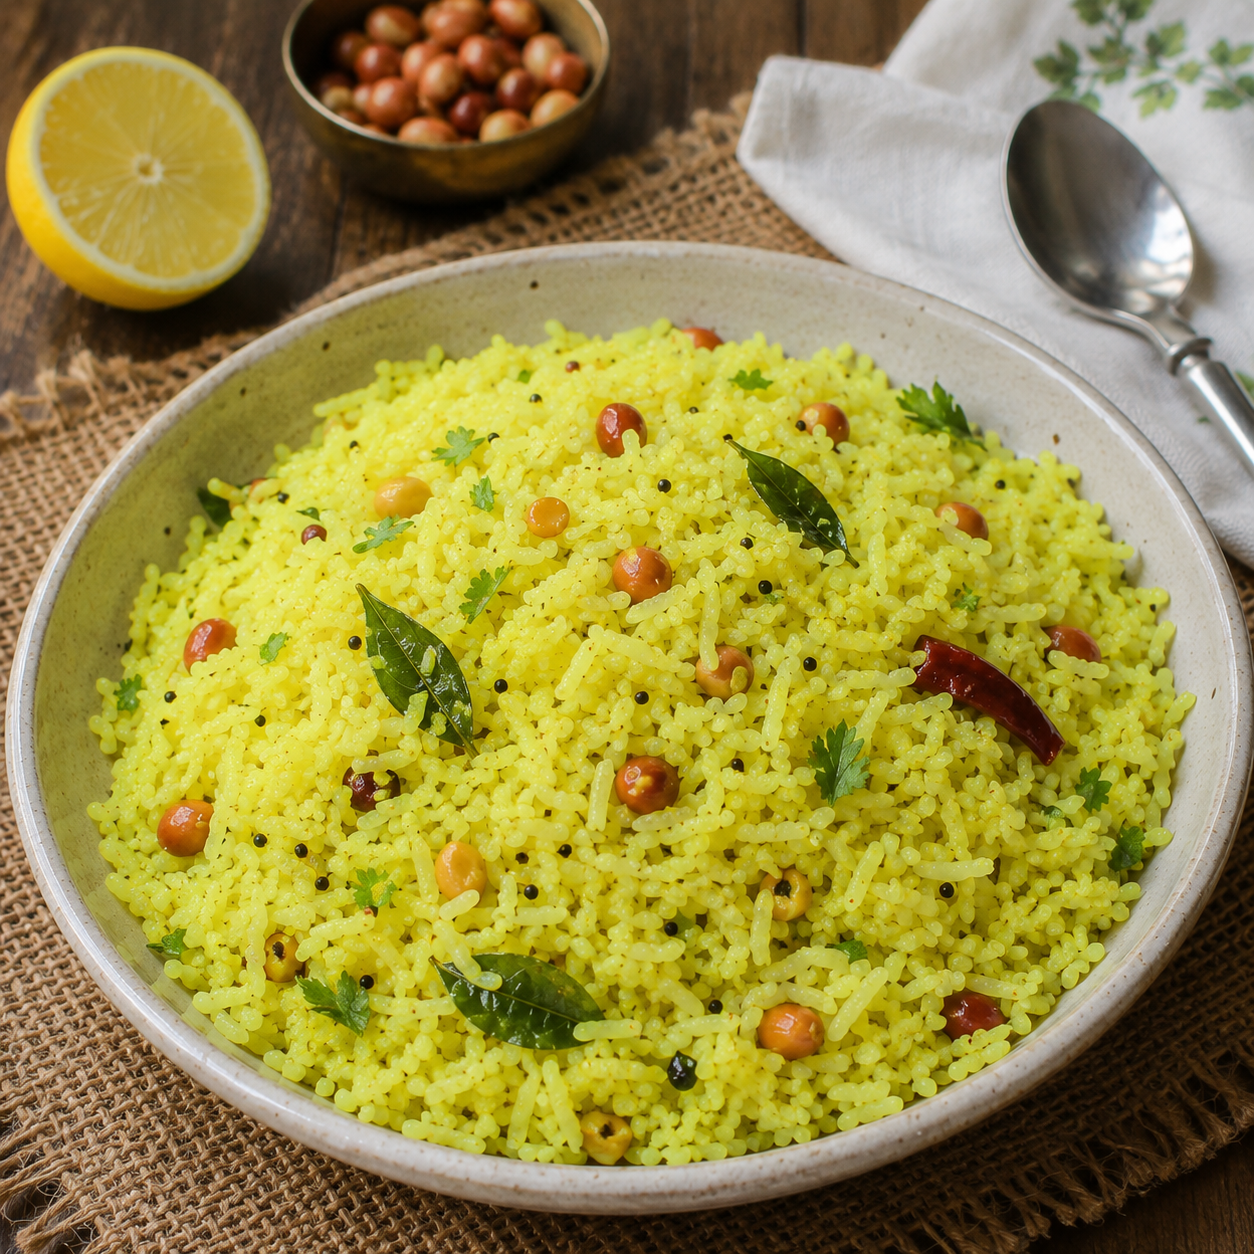
Edit Template

Recipe Tag: Gluten Free

Mamidikaya Menthi Pachadi

intro Are you looking for a burst of traditional flavor? The Mamidikaya Menthi Pachadi Recipe brings the perfect tang to your dining table. This traditional South Indian raw mango pickle tastes amazing when you pair it with hot rice and ghee. Furthermore, it takes very little time to prepare in your kitchen. Consequently, anyone can make it at home easily without much effort. If you enjoy sour and spicy flavors, you will love this preparation.story Summer in India always brings the nostalgic scent of fresh mangoes. Many families wait all year specifically for this pickle. Unlike fermented pickles that take weeks, this version stays fresh and vibrant for several days. Therefore, people often call it an ‘instant’ pickle or ‘thokku.’ Additionally, the aroma of roasted fenugreek fills the kitchen instantly, creating a cozy atmosphere. Historically, grandmothers prepared this dish to celebrate the start of the mango season. Moreover, it represents the heart of coastal Andhra cuisine where spice and sourness meet perfectly.cast 2 large firm raw mangoes,4 tablespoons red chili powder,1 tablespoon fenugreek (methi) seeds,2 tablespoons mustard seeds,1/2 cup sesame oil or groundnut oil,Salt to taste,A pinch of asafoetida (hing)songs First, wash the mangoes thoroughly under cold water to remove any dirt.,Next, dry them completely with a clean kitchen towel because moisture ruins the pickle.,Chop the mangoes into very small, bite-sized pieces using a sharp knife.,Meanwhile, dry roast the fenugreek seeds in a pan until they turn golden brown.,After roasting the seeds, grind them into a fine powder once they cool down.,Then, mix the chopped mango pieces with salt and red chili powder in a large bowl.,In addition, add the freshly ground fenugreek powder and mustard powder to the mix.,Finally, heat the oil in a small pan, add hing, and pour the hot oil over the mango mixture.,Stir everything well until the oil coats every piece of mango perfectly.about The Magic of Mamidikaya Menthi Pachadi Recipe lies in its simplicity and balance. This dish focuses on the raw, tart nature of green mangoes combined with the earthy bitterness of fenugreek. Consequently, the flavors evolve as the pickle sits for a few hours. Furthermore, this Mamidikaya Menthi Pachadi Recipe uses simple ingredients that you likely already have in your pantry. It is a staple in many households because it provides a quick fix when vegetable side dishes are unavailable. Similarly, it serves as a wonderful condiment for breakfast items like idli or dosa.themes Always choose firm, sour mangoes for the best texture and taste.,If the mangoes are too soft, the pickle might become mushy very quickly.,However, if you prefer a softer texture, you can let it sit at room temperature for a day.,In addition, always use a completely dry spoon to serve the pickle to prevent spoilage.,Furthermore, store the pickle in a glass jar to maintain its freshness and flavor profile.,If the heat is too high, you can reduce the amount of chili powder slightly.,Therefore, always taste a small piece of mango before adding all the salt.whyWatch This dish offers a unique balance of bitter, sour, and spicy notes. Because it uses fresh ingredients, the flavors remain vibrant and exciting for your palate. Moreover, it pairs perfectly with simple curd rice, making it a comfort food hero. You should try this Mamidikaya Menthi Pachadi Recipe because it adds a spark of excitement to every meal. Furthermore, the satisfaction of making your own pickle at home is unmatched. Consequently, your family will surely ask for a second serving once they taste this tangy delight.

Read More »

Dosakaya Kura

intro Have you ever tasted the tangy goodness of a traditional Andhra meal? If not, you must try this Dosakaya Kura Recipe. This dish features the yellow cucumber, which adds a unique crunch to your plate. Additionally, it provides a cooling effect during hot summer days. Therefore, many families in South India prepare it regularly. You will find that this simple curry pairs beautifully with steamed rice and a dollop of ghee.story/description Dosakaya Kura is a staple in many Telugu households. The yellow cucumber, or ‘Dosakaya’, has a distinct sourness that sets it apart from regular cucumbers. People often make it as a quick lunch because it requires minimal preparation. Historically, farmers grew these cucumbers in their backyards. Consequently, they developed many variations of this recipe. Some people add lentils, while others prefer this simple stir-fry version. Furthermore, the dish represents the simplicity of rural Indian cooking. It focuses on fresh produce and basic spices. Because it is light on the stomach, it serves as a perfect comfort food.cast/ingredients 1 medium Yellow Cucumber (Dosakaya), 2 tablespoons Oil, 1/2 teaspoon Mustard seeds, 1/2 teaspoon Cumin seeds, 2 Green chilies (slit), 1 sprig Curry leaves, 1/4 teaspoon Turmeric powder, 1 teaspoon Red chili powder, Salt to taste, Fresh coriander for garnish.songs/steps First, peel the cucumber and remove the seeds carefully. Second, chop the cucumber into small, even cubes. Third, heat oil in a pan over a medium flame. Fourth, add mustard seeds and let them splutter. Fifth, stir in the cumin seeds, green chilies, and fresh curry leaves. Sixth, add the cucumber cubes and turmeric powder to the pan. Seventh, sauté the mixture for about five minutes until the pieces are slightly tender. Eighth, sprinkle the red chili powder and salt over the pieces. Ninth, mix everything well and cook for another three minutes. Finally, turn off the heat and garnish the dish with fresh coriander.about This Dosakaya Kura Recipe offers a nutritious way to enjoy seasonal vegetables. The yellow cucumber is rich in fiber and water content. Therefore, it helps with hydration and digestion. Additionally, the spices used in the tempering have medicinal properties. For example, turmeric acts as an anti-inflammatory agent. Similarly, cumin seeds aid in better digestion. Because this recipe uses very little oil, it is a heart-healthy choice for everyone. You can enjoy it with roti or rice without any guilt. Furthermore, the tangy flavor helps to stimulate the appetite.themes/tips Always taste the raw cucumber before you start the Dosakaya Kura Recipe. Occasionally, these cucumbers can be bitter. If you find a bitter one, discard it immediately. Additionally, do not overcook the cucumber. The crunch is the best part of this dish. Therefore, keep the flame on medium to maintain the texture. You can also add a teaspoon of tamarind paste if you want extra sourness. However, the natural tang is usually enough. Furthermore, using peanut oil for tempering adds an extra layer of nutty aroma to the final dish.whyWatch/whyTry You should try this dish because it is incredibly fast to prepare. Most people finish the entire process in less than twenty minutes. Additionally, it introduces you to the authentic flavors of Andhra cuisine. The combination of sour, spicy, and salty notes is truly addictive. Furthermore, it is a budget-friendly meal that uses common pantry items. If you want a healthy, vegan, and gluten-free option, this recipe is perfect for you. Therefore, grab a yellow cucumber today and start cooking!

Read More »

Onion Pakodi

intro Are you looking for the perfect snack for a rainy afternoon? This Onion Pakodi Recipe provides the ultimate crunch and flavor in every single bite. Therefore, you can skip the store-bought snacks and make something fresh at home. Furthermore, the aroma of frying onions will fill your home with warmth. Additionally, this recipe uses simple ingredients from your pantry. Consequently, you can prepare it in just a few minutes.story/description In India, street vendors sell these crispy fritters on almost every corner. People love them because they are affordable and delicious. Specifically, people call them ‘Kanda Bhaji’ in many regions. However, the basic technique remains the same everywhere. Additionally, families gather around the table to enjoy these with hot tea. Therefore, it is more than just food; it is a tradition. Moreover, the crispy texture makes it a favorite for all ages. Because it is so popular, every household has its own special version.cast/ingredients To make this dish, you will need 2 large onions (thinly sliced), 1 cup gram flour (besan), 2 tablespoons rice flour for extra crunch, 1 teaspoon red chili powder, 1/2 teaspoon turmeric powder, salt to taste, a handful of chopped coriander leaves, and oil for deep frying.songs/steps 1. Firstly, slice the onions thinly and place them in a large mixing bowl. 2. Add salt to the onions and let them sit for five minutes. Consequently, the onions will release their natural moisture. 3. Add the chili powder, turmeric, and chopped coriander to the bowl. 4. Gradually mix in the gram flour and rice flour. However, do not add extra water yet. 5. Heat the oil in a deep pan until it is hot. 6. Drop small, irregular portions of the mixture into the oil. 7. Fry the pakodis until they turn a deep golden brown and feel crispy. 8. Finally, remove them and drain the excess oil on a paper towel.about How to Master the Onion Pakodi Recipe: Making the perfect fritter requires patience and the right technique. Furthermore, the ratio of flour to onions must be perfect. If you add too much flour, the pakodas become doughy and soft. However, if you keep the flour light, you get that signature crunch. Additionally, the rice flour adds a professional touch that keeps them crispy for longer. Therefore, always aim for a light coating rather than a thick batter.themes/tips Secret Tips for the Onion Pakodi Recipe: Many people wonder why their fritters turn soggy. However, you can avoid this by following a few simple rules. Firstly, do not add water to the mixture unless absolutely necessary. Because onions release moisture when salted, they create their own binder. Additionally, fry the pakodis in small batches. If you crowd the pan, the temperature drops. Therefore, the fritters absorb too much oil and lose their crunch. Furthermore, always use medium-high heat to ensure the inside cooks properly while the outside crisps up.whyWatch/whyTry You should try this recipe because it is the ultimate comfort food for any occasion. Furthermore, it requires very little effort and minimal cleanup. Additionally, it pairs perfectly with green chutney, tamarind sauce, or simple tomato ketchup. Therefore, it is the ideal choice for unexpected guests or late-night cravings. Because it is so versatile, you can even add chopped green chilies for an extra kick. Consequently, this snack will quickly become a staple in your household.

Read More »

Curry Leaf Powder

intro Curry Leaf Powder brings a burst of traditional flavor to your modern kitchen. Many home cooks prefer making it fresh because store-bought versions often lose their aroma. Consequently, this vibrant green powder adds significant health benefits to every meal. Therefore, you should learn this simple method to elevate your daily cooking.story/description South Indian cooking relies heavily on these aromatic green leaves for their unique scent. However, fresh leaves do not last long in the refrigerator. Therefore, turning them into a dry spice mix is a practical solution. Additionally, the roasted lentils in this recipe provide a wonderful nutty texture. This Curry Leaf Powder Recipe transforms simple meals into gourmet experiences within seconds. Furthermore, the powder pairs perfectly with hot ghee and steamed rice. Because it is homemade, you control the spice level and salt content perfectly.cast/ingredients To begin, gather two cups of fresh curry leaves. You will also need two tablespoons of urad dal and one tablespoon of chana dal for texture. Additionally, prepare six to eight dried red chilies and one teaspoon of cumin seeds. Finally, include a pinch of asafoetida and salt to taste to balance the flavors.songs/steps First, wash the curry leaves thoroughly and pat them completely dry. Then, roast the leaves in a heavy-bottomed pan on low heat until they turn crisp. Furthermore, remove them and set them aside to cool. Next, roast the urad dal, chana dal, and red chilies until they become fragrant and golden. Additionally, add cumin and asafoetida during the last minute of roasting. Finally, let all ingredients cool completely before placing them in a blender. Grind the mixture into a fine or slightly coarse powder. Consequently, your aromatic spice blend is ready for storage.about This Curry Leaf Powder Recipe focuses on preserving the natural nutrients of the leaves. Since curry leaves contain high amounts of antioxidants, they are great for digestion and hair health. Moreover, the addition of roasted lentils provides a plant-based protein boost. Consequently, this powder is both a tasty condiment and a functional superfood.themes/tips Always use low heat while roasting the ingredients. Otherwise, you might burn the delicate leaves and ruin the flavor profile. Additionally, store the finished powder in an airtight glass jar. This ensures the aroma stays fresh for several weeks. Furthermore, you can add a few cloves of garlic during roasting for an extra savory punch.whyWatch/whyTry You should try this Curry Leaf Powder Recipe because it is incredibly versatile. For instance, it works as a delicious seasoning for popcorn, roasted vegetables, or salads. Additionally, it saves time on busy weeknights when you need a quick flavor boost. Therefore, it is a must-have staple for any health-conscious pantry.

Read More »

Potato Fry

intro Everyone loves a good Potato Fry Recipe because it brings comfort to any meal. This dish transforms simple tubers into golden, crispy delights. Therefore, you should learn this easy method to upgrade your dinner game instantly. Many families enjoy this dish alongside rice or flatbreads for a complete experience. story/description Potatoes are the world’s most versatile vegetable. Furthermore, they absorb spices beautifully while maintaining a soft interior. This recipe focuses on getting that perfect crunch without deep frying. Consequently, you save time and oil while preparing a healthier version. However, the flavor remains intense and satisfying. You will find that simple ingredients often produce the best results in the kitchen. Additionally, this dish works for any meal of the day, including breakfast.cast/ingredients To begin, gather three large potatoes, peeled and cubed into small pieces. You will also need two tablespoons of cooking oil and one teaspoon of cumin seeds. Additionally, prepare one-half teaspoon of turmeric powder and one teaspoon of red chili powder. Finally, keep salt to taste and fresh cilantro for a bright garnish.songs/steps First, heat the oil in a large pan over medium heat. Next, add the cumin seeds until they begin to sizzle. Furthermore, add the potato cubes and turmeric powder to the pan. Stir them well so the oil coats every single piece. Subsequently, cover the pan for five minutes to soften the potatoes. After that, remove the lid and increase the heat slightly. Sprinkle the chili powder and salt over the potatoes. Consequently, sauté them until they turn golden brown and crispy. Finally, garnish with fresh cilantro and serve the dish while it is hot.about ## Mastering the Crispy Potato Fry Recipe This dish is a staple in many households across the globe. Additionally, it pairs perfectly with lentils, yogurt, or even simple sandwiches. Because it requires minimal ingredients, it is a budget-friendly option for everyone. Furthermore, the preparation takes less than twenty minutes from start to finish. Therefore, it is ideal for busy weeknights when you need a quick side dish. You can serve it as a snack or a main course accompaniment. Most people find the texture irresistible when cooked correctly.themes/tips ## Why This Potato Fry Recipe Works Use starchy potatoes like Russets for the best crunch. Additionally, do not crowd the pan during the cooking process; otherwise, the potatoes will steam instead of fry. Furthermore, soak the cut potatoes in cold water first. Consequently, you remove excess starch, which helps with the final crisping. However, ensure you dry them thoroughly before adding them to the hot oil. You might also add a pinch of garlic powder for extra depth. Consequently, your kitchen will smell amazing as the potatoes brown.whyWatch/whyTry You should try this Potato Fry Recipe because it is incredibly versatile and easy to master. Moreover, children and adults alike adore the salty, crispy flavor of well-seasoned potatoes. Additionally, you can customize the spices to suit your personal preference. Therefore, this Potato Fry Recipe will likely become a recurring favorite in your kitchen rotation. Start cooking now and enjoy a plate of crispy goodness!

Read More »

Jaggery Peanut Brittle 

intro If you love sweet and crunchy snacks, you must try this Jaggery Peanut Brittle. This traditional treat combines roasted peanuts with rich, golden jaggery syrup. Furthermore, it is much healthier than candies made with refined sugar. Consequently, families often prepare this during winter months for a quick energy boost. Moreover, you can make it at home with just a few simple ingredients.story This snack, also known as Chikki in India, has a long and delicious history. People originally made it to provide warmth and nutrition during cold weather. Therefore, it remains a staple in many households today. The combination of earthy peanuts and caramel-like jaggery creates a unique flavor profile. Additionally, the texture provides a satisfying snap when you bite into it. However, the secret lies in achieving the perfect syrup consistency. Once you master the syrup, you will enjoy the best homemade candy ever.cast 2 cups of roasted peanuts, 1.5 cups of grated jaggery, 1 tablespoon of ghee (clarified butter), 1/2 teaspoon of cardamom powder, 1 tablespoon of water.songs 1. Grease a flat tray or parchment paper with ghee and set it aside carefully. 2. Roast the peanuts in a pan until they are crunchy and then remove the skins. 3. Heat the grated jaggery in a heavy-bottomed pan with one tablespoon of water. 4. Stir the mixture continuously until the jaggery melts and begins to bubble. 5. Check the consistency by dropping a bit of syrup into cold water; it should turn brittle and snap immediately. 6. Add the roasted peanuts and cardamom powder to the syrup very quickly. 7. Mix well to coat every peanut thoroughly and then pour the mixture onto the greased tray. 8. Flatten it with a greased rolling pin while the mixture is still hot. 9. Cut the sheet into squares while warm and let it cool completely before snapping the pieces apart.about ### Why Choose This Jaggery Peanut Brittle Recipe? Choosing this Jaggery Peanut Brittle Recipe means you are opting for a nutrient-dense snack. Jaggery contains essential minerals like iron and magnesium that sugar lacks. Moreover, peanuts provide a high amount of protein and healthy fats for your body. Therefore, this snack is perfect for children and adults who need a natural energy source during the day. Additionally, it contains no artificial preservatives or colors. Consequently, it is a clean-label treat that you can trust for your family. Furthermore, the preparation time is very short, so you can make it anytime a craving hits.themes ### Tips for the Perfect Jaggery Peanut Brittle Recipe To ensure success, always use high-quality jaggery for the best flavor and deep color. Furthermore, roasting the peanuts properly is vital for the final crunch. If you do not roast them enough, the brittle will feel soft or chewy instead of crisp. Additionally, work very fast once the syrup reaches the hard-ball stage because it sets quickly. However, be careful as the molten sugar mixture is extremely hot. Consequently, keep all your tools ready before you start the cooking process. Finally, store the cooled pieces in an airtight container to keep them crisp for several weeks.whyWatch You should try this recipe because it is simple, healthy, and very cost-effective. Furthermore, it allows you to control the quality of ingredients in your food. Consequently, you can enjoy a guilt-free dessert whenever you have a sweet craving. Additionally, it makes for a wonderful homemade gift for friends and family during festive seasons. Therefore, start cooking today and enjoy the classic, nostalgic taste of homemade brittle.

Read More »

Urad Dal Laddu

intro Are you searching for a nutritious snack that tastes amazing? You should try this Urad Dal Laddu Recipe. Traditionally, Indian families prepare these treats to boost strength and immunity. Furthermore, they are very easy to make at home with minimal effort. Consequently, you will love the earthy taste of roasted lentils mixed with sweet jaggery. Therefore, let us start cooking this healthy snack together!story/description This sweet originates from the southern parts of India, where people call it Sunnundalu. Moreover, it holds a special place in traditional Ayurvedic medicine because it strengthens the bones. However, modern families enjoy it mostly as a tasty dessert. You only need a few pantry staples for this dish. Additionally, the high protein content makes it great for growing children and athletes. Similarly, the jaggery adds essential iron to your diet. Therefore, it is much better than processed candy or store-bought biscuits. You can prepare a large batch and store it for weeks. Because it uses ghee, the aroma will fill your kitchen instantly. Consequently, everyone in your house will ask for more.cast/ingredients 1. Two cups of whole white urad dal (husked black gram). 2. One cup of organic grated jaggery or palm sugar. 3. Half a cup of pure melted ghee (clarified butter). 4. One teaspoon of fresh cardamom powder. 5. A handful of chopped cashews or almonds for extra crunch.songs/steps 1. Firstly, clean the white urad dal to remove any dust or stones. 2. Secondly, place the dal in a heavy-bottomed pan and roast it on low heat. 3. Moreover, stir the dal continuously until it turns golden brown and smells nutty. 4. However, do not burn the lentils as they will taste bitter. 5. Once roasted, let the dal cool completely on a plate. 6. Subsequently, grind the roasted dal into a fine powder using a dry blender. 7. Additionally, add the grated jaggery and cardamom powder into the blender. 8. Pulse the mixture again so the jaggery blends perfectly with the lentil flour. 9. Therefore, transfer this sweet mixture to a wide mixing bowl. 10. Gradually, pour warm melted ghee over the powder. 11. Finally, mix everything well and shape the mixture into small round balls while it is still warm.about This Urad Dal Laddu Recipe provides a significant amount of energy for your daily activities. Because urad dal contains high levels of fiber, it helps your digestion. However, you must eat them in moderation since they are calorie-dense. Furthermore, the ghee provides healthy fats that are good for your brain and joints. Consequently, many mothers give these to their kids for lunchboxes. Additionally, you can store these laddus for up to three weeks in an airtight jar. They remain fresh and tasty without any refrigeration. Similarly, you can gift these to friends during festivals as a healthy homemade option.themes/tips Always roast the dal on a very low flame to ensure even cooking. Furthermore, if the mixture is too dry to form balls, add another tablespoon of warm ghee. However, do not add water as it will spoil the shelf life. Additionally, you can add dry ginger powder to improve digestion. If you prefer a crunchier texture, you can grind the dal slightly coarse. Therefore, customize the sweetness by adjusting the amount of jaggery according to your preference.whyWatch/whyTry You should try the Urad Dal Laddu Recipe because it combines health and taste perfectly. Unlike other sweets, it uses no refined sugar or flour. Moreover, it takes less than thirty minutes to prepare. Consequently, it is the best solution for your sudden sugar cravings. Therefore, grab your ingredients and make these protein-packed laddus today!

Read More »

Green Gram Dosa

intro Are you looking for a healthy and delicious breakfast? You must try this Green Gram Dosa Recipe. It provides an excellent amount of protein for your body. Therefore, it keeps you full for a long time. Furthermore, it is very easy to prepare at home.story People in Andhra Pradesh call this traditional dish Pesarattu. This Green Gram Dosa Recipe has been popular for generations in many households. People traditionally eat it with spicy ginger chutney. Consequently, the flavors balance perfectly on your palate. However, you can enjoy it with any side dish of your choice. It serves as a staple because it is light on the stomach. Furthermore, it represents the simplicity of traditional Indian cooking.cast 1 cup whole green gram (moong dal), 2 tablespoons rice, 2 green chilies, 1-inch fresh ginger, 1 teaspoon cumin seeds, Salt to taste, Water as needed, Oil or ghee for cooking.songs 1. Soak the whole green gram and rice for at least six hours. 2. Drain the water completely and transfer the ingredients to a blender. 3. Add green chilies, ginger, and cumin seeds to the mix. 4. Grind the mixture into a very smooth batter. 5. Heat a flat tawa and spread a ladle of batter thinly. 6. Cook until the edges are crispy and serve immediately.about ### Nutritional Benefits of the Green Gram Dosa Recipe This dish provides a massive boost of plant-based protein. Additionally, it contains high amounts of dietary fiber. Therefore, it helps with muscle repair and improves your digestive health. Moreover, it is low in calories compared to regular rice-based dosas. The Green Gram Dosa Recipe is not just tasty but also scientifically beneficial for your diet. It has a low glycemic index. Consequently, it is suitable for people managing blood sugar levels. Furthermore, the antioxidants in moong dal protect your cells from damage.themes ### Expert Tips for a Perfect Green Gram Dosa Recipe You should use a non-stick pan to ensure you use less oil. Similarly, keep the heat on medium to ensure even cooking across the surface. Furthermore, you can add finely chopped onions on top for extra crunch. However, ensure the batter is not too watery before you start. Adding a pinch of asafoetida can significantly improve your digestion. Moreover, you can stuff the dosa with spiced mashed potatoes for a meal. Consequently, you turn a simple breakfast into a heavy lunch. However, always serve it hot for the best experience.whyWatch You should try this recipe because it is incredibly quick and nutritious. Additionally, it requires no fermentation time at all. Consequently, it is the perfect solution for busy weekday mornings. You will love the taste and the health benefits. Try it today!

Read More »
కావలసిన పదార్ధాలు
  • మామిడికాయ ముక్కలు Raw Mango Pieces (chopped into small cubes) 2 cups
  • మెంతులు Fenugreek Seeds (Mentulu) 2 teaspoon
  • ఆవాలు Mustard Seeds (for tempering) 1 teaspoon
  • ఆవపిండి Mustard Powder 4 tablespoon
  • కారం Red Chili Powder 4 tablespoon
  • ఉప్పు Salt 3 tablespoon
  • పసుపు Turmeric Powder 1/2 teaspoon
  • వేరుశెనగ నూనె Groundnut Oil 1/2 cup
  • ఇంగువ Asafoetida (Hing) 1/2 teaspoon
  • ఎండు మిరపకాయలు Dried Red Chilies 3
తయారి విధానం
  1. ముందుగా మామిడికాయను కడిగి, తడి లేకుండా తుడిచి, చిన్న చిన్న ముక్కలుగా కోసి పక్కన పెట్టుకోండి.
    Wash the raw mangoes thoroughly, wipe them completely dry with a cloth, and chop them into small bite-sized cubes.
  2. స్టవ్ మీద ఒక చిన్న బాణలి పెట్టి మెంతులను తక్కువ మంట మీద దోరగా వేయించి చల్లారిన తర్వాత మెత్తని పొడిగా మిక్సీ పట్టుకోండి.
    In a small pan, dry roast the fenugreek seeds on low heat until they turn golden brown and fragrant, then let them cool and grind into a fine powder.
  3. ఒక పెద్ద గిన్నెలో మామిడికాయ ముక్కలు తీసుకుని అందులో ఉప్పు, కారం, పసుపు, ఆవపిండి మరియు సిద్ధం చేసుకున్న మెంతి పొడి వేసి బాగా కలపండి.
    In a large mixing bowl, combine the mango pieces with salt, red chili powder, turmeric powder, mustard powder, and the freshly ground fenugreek powder.
  4. ఇప్పుడు పోపు కోసం మరొక బాణలిలో నూనె వేడి చేసి, ఆవాలు, ఎండు మిరపకాయలు మరియు ఇంగువ వేసి చిటపటలాడనివ్వండి.
    For the tempering, heat oil in a pan and add mustard seeds, dried red chilies, and asafoetida, allowing them to splutter.
  5. పోపు చల్లారిన తర్వాత దానిని మామిడికాయ మిశ్రమంలో వేసి బాగా కలిపి ఒక గంట సేపు పక్కన పెట్టండి.
    Wait for the tempering oil to cool down completely before pouring it over the spiced mango mixture.
  6. ఒక గంట తర్వాత మామిడికాయ ముక్కలు ఉప్పు, కారాన్ని పీల్చుకుని నూనె పైకి తేలుతుంది. అప్పుడు ఈ పచ్చడిని గాజు సీసాలో భద్రపరుచుకోండి.
    Mix everything thoroughly and let the pickle rest for at least one hour so the flavors meld and the oil begins to float on top before transferring to a glass jar.
[real3dflipbook id='1']