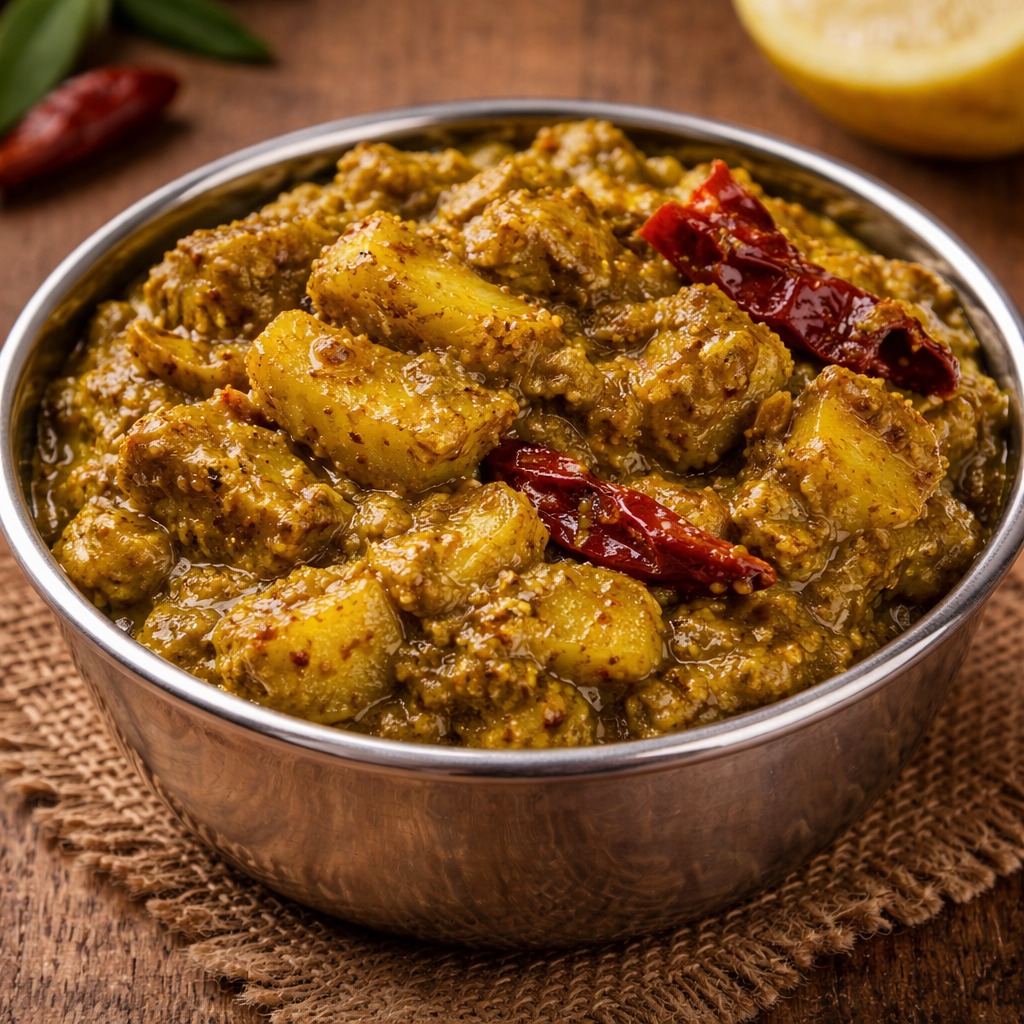
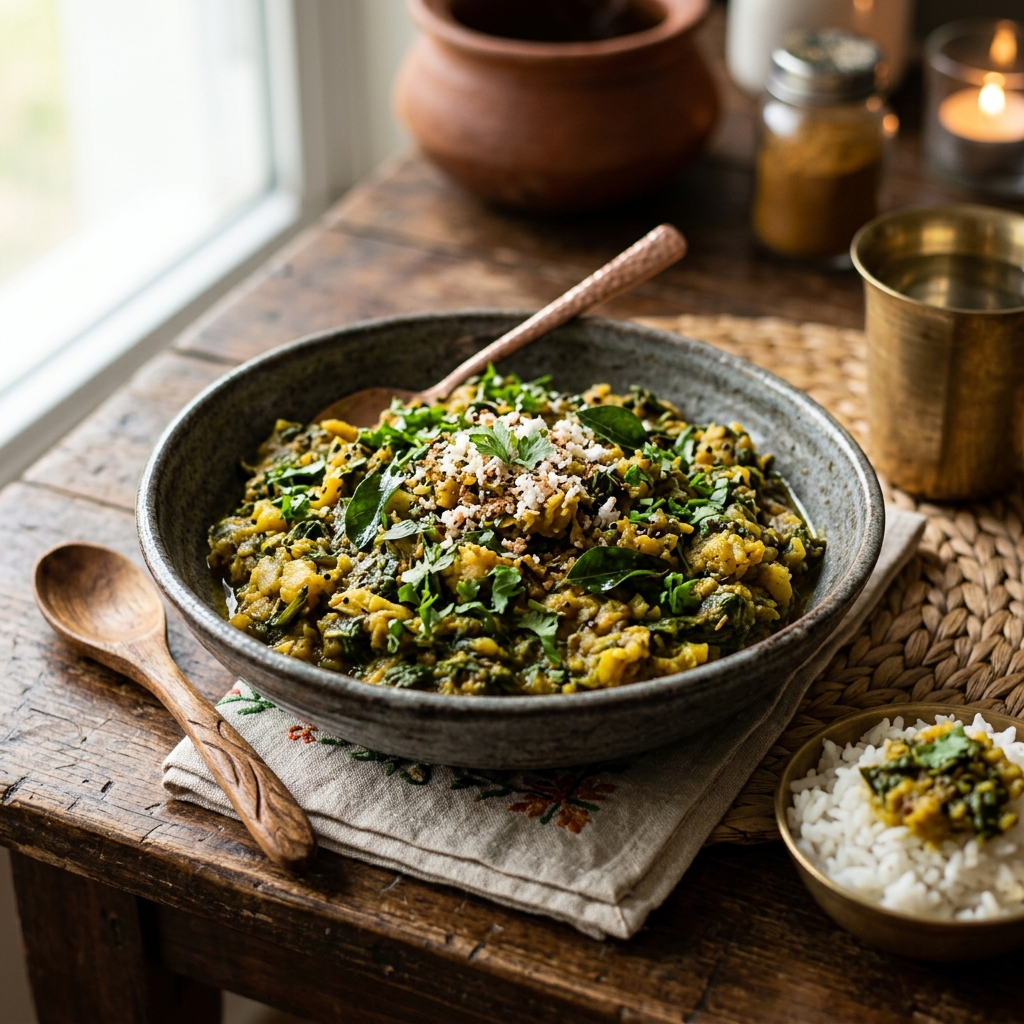
Edit Template

Recipe Tag: Traditional

Masala Dosa

intro The Masala Dosa Recipe brings the vibrant flavors of South India straight to your kitchen table. Furthermore, this dish combines a thin, crispy fermented crepe with a savory potato filling. Therefore, food enthusiasts worldwide cherish this meal for its unique texture and bold spices. Additionally, you can easily master this dish with the right techniques. Because it is highly nutritious, many families serve it for breakfast or dinner.story Masala Dosa originated in the historic streets of Karnataka many decades ago. Local chefs perfected the art of fermenting the batter over generations. Consequently, the dish became a staple in South Indian households. Initially, people ate plain dosas with simple chutneys. However, someone eventually added the spiced potato filling, creating the legendary Masala Dosa Recipe. Nowadays, you can find various versions of this recipe in every corner of the globe. It represents the rich heritage of Indian vegetarian cooking.cast 1. 2 cups of Sona Masuri rice. 2. 1/2 cup of Urad dal (black gram). 3. 1/4 teaspoon of Fenugreek seeds. 4. 4 large boiled potatoes. 5. 2 sliced onions. 6. 1 teaspoon of mustard seeds. 7. 2 green chilies. 8. A pinch of turmeric powder. 9. Salt to taste. 10. Ghee or oil for frying.songs ## Step-by-Step Masala Dosa Recipe Instructions First, soak the rice, dal, and fenugreek seeds for six hours. Subsequently, grind the mixture into a smooth batter and add salt. You must let the batter ferment overnight in a warm place. Next, mash the boiled potatoes for the filling. Sauté mustard seeds, onions, and chilies in a pan with some oil. Additionally, add turmeric and salt to the mashed potatoes and mix well. Heat a non-stick griddle and pour a ladle of batter. Spread the batter in a circular motion until it is very thin. Drizzle oil and cook until the bottom turns golden. Finally, place the potato filling in the center and fold the dosa carefully.about ## The Heritage of the Masala Dosa Recipe Moreover, the dish is more than just food; it is a cultural icon. Historically, the Tuluva community popularized this dish through their Udupi restaurants. Therefore, the recipe traveled across India and eventually reached international shores. Additionally, the fermentation process makes the dish very easy to digest. Consequently, health-conscious eaters often choose this recipe over other heavy breakfast options. Furthermore, the combination of carbohydrates and proteins provides a balanced start to your day. You will surely appreciate the depth of flavor that traditional methods provide.themes ## Pro Tips for Your Masala Dosa Recipe However, achieving the perfect crunch requires specific attention to detail. Initially, you should ensure your batter consistency is thin enough to pour. Furthermore, you must maintain a consistent heat on the griddle. If the pan becomes too hot, you should wipe it with a damp cloth immediately. Consequently, this lowers the temperature for the next crepe. Additionally, use a seasoned cast-iron skillet for the most authentic texture. Moreover, do not rush the fermentation process because time develops the flavor. Therefore, plan your preparation at least a day in advance for the best results.whyWatch You should try this recipe because it offers a restaurant-quality experience at home. Furthermore, the ingredients are simple and very affordable. Therefore, you can feed a large family without spending too much money. Additionally, the cooking process is incredibly rewarding and fun for beginners. You will love the satisfaction of peeling a perfectly crispy dosa off the pan!

Read More »

Poha Mixture

intro Searching for a quick bite? The Poha Mixture Recipe provides an amazing crunch for your tea time. Specifically, this recipe uses thin flattened rice and various nuts. Furthermore, you can prepare it in under twenty minutes. Therefore, it serves as the ultimate homemade snack for your family. Instead of buying packaged snacks, try this healthy version today. story People across India love this traditional snack deeply. Specifically, many regions call it ‘Chivda’. However, every household adds its own unique twist to the flavors. Some people prefer a sweet hint, while others like it extremely spicy. Consequently, the flavor profile varies significantly from kitchen to kitchen. Furthermore, the light texture makes it a much healthier alternative to greasy potato chips. Families often prepare large batches during festivals to share with neighbors. Moreover, the wonderful aroma of fried curry leaves brings everyone to the kitchen immediately. It represents the heart of Indian hospitality and homemade goodness.cast The Poha Mixture Recipe requires simple pantry staples. You will need thin poha (flattened rice), peanuts, and roasted gram. Additionally, gather some cashews, dry coconut slices, and fresh curry leaves for extra flavor. For the spices, prepare turmeric powder, red chili powder, and salt. Finally, ensure you have enough vegetable oil for deep frying the components to perfection.songs ## How to Master the Poha Mixture Recipe Initially, you must heat oil in a deep pan or kadai. Furthermore, fry the peanuts until they turn golden brown. Similarly, roast the roasted gram and cashews for a rich, nutty taste. Therefore, the mixture gains a delightful crunch in every single bite. After that, fry the thin poha in small batches using a metal strainer. This technique prevents the poha from burning quickly. Consequently, the poha remains light and perfectly crispy. Place the fried ingredients on a paper towel to absorb excess oil. Finally, transfer everything to a large mixing bowl. While the ingredients are still warm, add the spices. Mix them thoroughly so the turmeric and chili powder coat every flake. Your snack is now ready to serve.about ## Perfecting Your Poha Mixture Recipe This snack is essentially a savory granola. Specifically, it combines textures from nuts, seeds, and grains. Because it is homemade, you control the quality of the oil and spices. Furthermore, it is naturally gluten-free and vegan-friendly. Consequently, it suits almost every dietary preference. You can easily serve it to guests with a hot cup of masala chai or coffee. Additionally, the shelf life is quite long if you store it correctly in an airtight container.themes Always use thin poha instead of thick poha for a lighter crunch. However, you must fry it very quickly because it burns easily. Therefore, keep your strainer ready. Additionally, you can add a pinch of citric acid or lemon powder for a tangy kick. Moreover, if you enjoy a sweet and salty contrast, add a teaspoon of powdered sugar at the end. These small adjustments will elevate your snack to a professional level.whyWatch You should try this Poha Mixture Recipe because it is cost-effective and delicious. Instead of consuming preservatives, you will enjoy a fresh and crispy treat. Furthermore, the preparation process is incredibly satisfying and fast. Therefore, it is the perfect solution for sudden hunger pangs. Consequently, once you taste this homemade version, you will never go back to store-bought mixtures again. Give your family the best snack experience today!

Read More »

Sanna Kaarapoosa

intro Making the perfect Sanna Kaarapoosa Recipe at home brings a delightful crunch to your tea time. Furthermore, this traditional South Indian snack is quite simple to prepare with just a few pantry staples. Consequently, many families make large batches during festivals like Diwali. However, you must follow specific steps to get that thin, crispy texture.story Sanna Kaarapoosa is a very thin, noodle-like snack that tastes delicious. It primarily uses besan and rice flour for that signature crispness. Additionally, the spice level depends on your personal preference for red chili powder. Therefore, you can customize it for children or adults. Many people enjoy it with hot tea. Specifically, the name ‘Sanna’ refers to the thinness of the strands.cast 2 cups Gram Flour (Besan), 1 cup Rice Flour, 2 tsp Red Chili Powder, 1 tsp Salt, 1/2 tsp Ajwain (Carom seeds), 2 tbsp Hot Oil, Oil for deep frying, Water as needed.songs 1. Initially, sift the gram flour and rice flour together in a large bowl. 2. Add the red chili powder, salt, and ajwain to the mixture. 3. Pour two tablespoons of hot oil over the flour to ensure crispness. 4. Gradually add water and knead it into a soft, smooth dough. 5. Meanwhile, heat oil in a deep frying pan on medium heat. 6. Place a portion of the dough into the Murukku maker using the small-hole plate. 7. Press the maker in a circular motion directly over the hot oil. 8. Fry the strands until they turn light golden brown. 9. Finally, remove the kaarapoosa and drain the excess oil on a paper towel.about ## Mastering the Sanna Kaarapoosa Recipe Initially, you need a special kitchen tool called a ‘Murukku maker’ with the finest hole plate. This tool allows the dough to flow in thin strands into the hot oil. Moreover, using high-quality oil ensures a long shelf life. Although it looks complex, the process is actually very fast. Therefore, you can prepare this snack in less than thirty minutes without much effort.themes ## Secrets of the Sanna Kaarapoosa Recipe To get the best texture, ensure you add hot oil to the dough before kneading. Similarly, do not over-knead the dough, or the snack might become hard. Furthermore, store it in an airtight container once it cools down completely. Consequently, the snack stays fresh for weeks. Always fry on medium heat so it cooks evenly and remains golden.whyWatch You should try this recipe because it is healthier than store-bought snacks. Additionally, the flavor of homemade kaarapoosa is unmatched. Finally, your family will love the crispy texture and savory taste of this traditional treat. It makes every tea break special.

Read More »

Mirchi Bajji

intro Are you looking for a spicy and crunchy snack? This Mirchi Bajji Recipe will satisfy your cravings immediately. Furthermore, it brings the authentic taste of Indian street food right to your kitchen. Consequently, many people love this snack during the monsoon season. You can prepare it quickly if you have the right ingredients. Therefore, let us explore how to make these delicious fritters today.story/description Mirchi Bajji is a beloved snack across India, especially in the southern regions. Vendors often sell these crispy treats near beaches or busy markets. Additionally, families enjoy them with hot chai on rainy evenings. The dish features large green chilies dipped in a spiced gram flour batter. Although the chilies look intimidating, they are usually mild in heat. However, the tangy stuffing adds a kick that creates a perfect flavor balance. Consequently, every bite offers a delightful mix of crunch and spice.cast/ingredients To prepare this dish, you will need 6-8 large green chilies (Bhavnagri variety). For the batter, gather 1 cup of gram flour (besan) and 2 tablespoons of rice flour. Additionally, prepare 1 teaspoon of red chili powder and 1/4 teaspoon of turmeric powder. You also need a pinch of baking soda and salt to taste. For the tangy stuffing, collect 1 tablespoon of tamarind pulp and 1 teaspoon of cumin powder. Finally, ensure you have plenty of oil for deep frying.songs/steps 1. First, wash the green chilies and pat them dry with a towel. 2. Carefully slit each chili lengthwise and remove the seeds to reduce heat. 3. Mix the tamarind pulp, cumin powder, and a little salt in a small bowl. 4. Stuff this tangy mixture into the slit chilies to enhance the flavor. 5. In a separate bowl, combine the gram flour, rice flour, spices, and baking soda. 6. Add water gradually to the flour mixture to form a thick, smooth batter. 7. Heat the oil in a deep pan until it reaches a high temperature. 8. Dip each stuffed chili into the batter until you coat it completely. 9. Drop the chilies gently into the hot oil one by one. 10. Fry them on medium heat until they turn golden brown and crispy.about This snack is more than just food; it is a cultural experience found in every Indian street corner. People often serve it with chopped onions and lemon juice to add extra zing. Furthermore, different regions have their own variations of the stuffing. Some people use mashed potatoes, while others prefer simple spices. Regardless of the version, the Mirchi Bajji Recipe remains a timeless favorite for all age groups.themes/tips Tips for the Perfect Mirchi Bajji Recipe: You should always use fresh, firm chilies for the best texture. Furthermore, adding rice flour makes the bajji extra crunchy and light. If the batter is too thin, it will not stick to the chili properly. Consequently, you must ensure the consistency is thick like pancake batter. Additionally, frying on medium heat ensures the chili inside cooks thoroughly without burning the exterior. Therefore, do not rush the frying process to maintain the perfect crunch.whyWatch/whyTry You should try this Mirchi Bajji Recipe because it is versatile, flavorful, and easy to make. Moreover, it allows you to bring the authentic street food experience into your home. Consequently, your guests will appreciate the bold flavors and professional results. Furthermore, it pairs perfectly with mint chutney or sweet tomato ketchup. Therefore, start cooking now and enjoy this spicy delight with your friends and family.

Read More »

Chintakaya Pachadi

intro Welcome to the world of South Indian pickles. If you love tanginess, the Chintakaya Pachadi Recipe is perfect for you. This dish uses raw green tamarind as its main ingredient. Consequently, it delivers a sharp and refreshing taste. Furthermore, it pairs beautifully with hot rice and ghee. You will surely enjoy this traditional flavor in your kitchen. story/description This pickle comes from the heart of Andhra Pradesh. Therefore, it carries the soul of traditional village cooking. Grandmothers usually make this during the tamarind season. First, they pick raw green tamarind directly from the trees. Then, they crush it with sea salt and turmeric powder. Additionally, this process preserves the tamarind for many months. However, the fresh version always tastes even better. People love it because it evokes warm childhood memories. Moreover, the aroma of the hot tempering fills the whole house. Since it is homemade, it feels very special to everyone.cast/ingredients To make this dish, you will need the following items. Specifically, gather these ingredients: – 250g Raw Green Tamarind – 10-12 Green Chilies – 2 tsp Salt – 1/2 tsp Turmeric Powder – 2 tbsp Oil – 1 tsp Mustard Seeds – 1/4 tsp Fenugreek Seeds – 2 Dry Red Chilies – A pinch of Asafoetida – A few Curry Leavessongs/steps ### Preparation Steps for the Chintakaya Pachadi Recipe 1. Clean and dry the raw tamarind thoroughly before starting. 2. Then, crush the tamarind roughly and remove any large seeds. 3. Grind the green chilies with salt and turmeric in a blender. 4. Next, add the crushed tamarind to the grinder jar. 5. Grind everything until you get a coarse and thick paste. 6. Heat oil in a small pan for the tempering. 7. Additionally, add mustard seeds and fenugreek seeds to the hot oil. 8. Toss in the dry red chilies and fresh curry leaves. 9. Finally, pour this hot tempering over the tamarind paste. 10. Mix the contents well and serve it immediately with rice.about This Chintakaya Pachadi Recipe is a staple in Telugu households. Specifically, it represents the bold and spicy nature of authentic Andhra cuisine. While many people buy store-bought pickles, nothing beats the fresh homemade version. Furthermore, the natural acidity of green tamarind acts as a natural preservative. Consequently, this pickle stays fresh for a long time if you handle it properly. Instead of using vinegar, we rely on the natural juices. Thus, the flavor remains authentic and robust. Especially when served with mudda pappu, it tastes absolutely divine.themes/tips Always use fresh and firm green tamarind for the best results. Additionally, you should adjust the number of green chilies according to your spice preference. Furthermore, ensure you use a completely dry spoon to avoid spoilage. Therefore, the pickle will last much longer in storage. You can also store it in a glass jar. Moreover, adding a little extra oil helps in preservation.whyWatch/whyTry ### Why You Should Try This Chintakaya Pachadi Recipe You should try this recipe because it offers a massive burst of flavors. It is sour, spicy, and salty all at once. Moreover, it is very healthy due to the high vitamin C content in tamarind. Since it requires minimal ingredients, it is easy to prepare for any beginner. Thus, you can enjoy a piece of Indian tradition right in your own home. Additionally, it significantly improves your digestion after a heavy meal. Therefore, it is a great addition to your daily lunch. You will love how it changes a simple meal into a wonderful feast.

Read More »

Curry Leaf Powder

intro Curry Leaf Powder brings a burst of traditional flavor to your modern kitchen. Many home cooks prefer making it fresh because store-bought versions often lose their aroma. Consequently, this vibrant green powder adds significant health benefits to every meal. Therefore, you should learn this simple method to elevate your daily cooking.story/description South Indian cooking relies heavily on these aromatic green leaves for their unique scent. However, fresh leaves do not last long in the refrigerator. Therefore, turning them into a dry spice mix is a practical solution. Additionally, the roasted lentils in this recipe provide a wonderful nutty texture. This Curry Leaf Powder Recipe transforms simple meals into gourmet experiences within seconds. Furthermore, the powder pairs perfectly with hot ghee and steamed rice. Because it is homemade, you control the spice level and salt content perfectly.cast/ingredients To begin, gather two cups of fresh curry leaves. You will also need two tablespoons of urad dal and one tablespoon of chana dal for texture. Additionally, prepare six to eight dried red chilies and one teaspoon of cumin seeds. Finally, include a pinch of asafoetida and salt to taste to balance the flavors.songs/steps First, wash the curry leaves thoroughly and pat them completely dry. Then, roast the leaves in a heavy-bottomed pan on low heat until they turn crisp. Furthermore, remove them and set them aside to cool. Next, roast the urad dal, chana dal, and red chilies until they become fragrant and golden. Additionally, add cumin and asafoetida during the last minute of roasting. Finally, let all ingredients cool completely before placing them in a blender. Grind the mixture into a fine or slightly coarse powder. Consequently, your aromatic spice blend is ready for storage.about This Curry Leaf Powder Recipe focuses on preserving the natural nutrients of the leaves. Since curry leaves contain high amounts of antioxidants, they are great for digestion and hair health. Moreover, the addition of roasted lentils provides a plant-based protein boost. Consequently, this powder is both a tasty condiment and a functional superfood.themes/tips Always use low heat while roasting the ingredients. Otherwise, you might burn the delicate leaves and ruin the flavor profile. Additionally, store the finished powder in an airtight glass jar. This ensures the aroma stays fresh for several weeks. Furthermore, you can add a few cloves of garlic during roasting for an extra savory punch.whyWatch/whyTry You should try this Curry Leaf Powder Recipe because it is incredibly versatile. For instance, it works as a delicious seasoning for popcorn, roasted vegetables, or salads. Additionally, it saves time on busy weeknights when you need a quick flavor boost. Therefore, it is a must-have staple for any health-conscious pantry.

Read More »

Dosakaya Roti Pachadi

intro Dosakaya Roti Pachadi is a beloved side dish in many Telugu households. Furthermore, it offers a refreshing crunch that few other chutneys provide. Therefore, learning the authentic Dosakaya Roti Pachadi Recipe is essential for any Indian food lover. This recipe combines the coolness of yellow cucumber with the heat of green chilies. Additionally, it serves as the perfect accompaniment to hot steamed rice and ghee. Consequently, it has become a staple in traditional South Indian kitchens.story/description The Dosakaya, or yellow cucumber, is a versatile vegetable commonly found in Southern India. However, its culinary use is quite specific to regional tastes. People usually make dal or these famous stone-ground chutneys with it. Specifically, the ‘Roti’ in the name refers to the stone mortar used for grinding. This traditional method preserves the natural texture of the ingredients. Furthermore, the crunch of the raw cucumber creates a unique mouthfeel. Consequently, this dish is a celebration of rustic village cooking and fresh seasonal produce.cast/ingredients To begin, you will need one medium-sized yellow cucumber (Dosakaya). Additionally, gather six to eight green chilies depending on your spice preference. You also need a small ball of tamarind, salt to taste, and a teaspoon of turmeric. For the tempering, prepare one tablespoon of oil, mustard seeds, cumin seeds, and a few fresh curry leaves. Furthermore, a pinch of asafoetida (hing) can enhance the aroma. Finally, some freshly chopped coriander leaves can be used for an extra burst of freshness.songs/steps First, wash the yellow cucumber thoroughly and peel the skin. Next, cut it open and remove the seeds if they are tough. Moreover, taste a small piece to ensure the cucumber is not bitter. Then, dice the vegetable into very tiny cubes. Meanwhile, heat a little oil in a pan and fry the green chilies until they blister. After they cool, grind the chilies with tamarind, turmeric, and salt into a coarse paste. Furthermore, add the diced cucumber to this paste. However, do not blend it into a smooth puree. Instead, pulse it gently so the cucumber stays crunchy. Finally, prepare a tempering by heating oil and adding mustard, cumin, and curry leaves. Pour this hot tempering over the chutney and mix well.about This recipe is more than just a side dish; it is a cultural icon of Andhra cuisine. Moreover, the balance of sourness from tamarind and heat from chilies is perfect. Because the cucumber is not fully cooked, it retains its nutritional value. Therefore, it is a healthy addition to any meal. Traditionally, people enjoy this with a dollop of ghee on hot rice. Additionally, it pairs surprisingly well with breakfast items like idli or dosa.themes/tips Tips for a Perfect Dosakaya Roti Pachadi Recipe: Always check for bitterness in the cucumber before you start. Furthermore, use a mortar and pestle if possible for the best texture. If you use a mixer, use the pulse function carefully. Additionally, adding a teaspoon of roasted sesame powder can provide a nutty depth to the flavor. Moreover, ensure the tempering is fresh and hot when you add it to the chutney. Finally, store any leftovers in a glass container in the refrigerator to keep it fresh for another day.whyWatch/whyTry You should try this recipe because it is incredibly quick and easy to make. Furthermore, it requires very few ingredients that are likely already in your pantry. Specifically, it is the best way to enjoy the cooling properties of yellow cucumber during hot summer months. Additionally, the spicy and tangy profile will wake up your taste buds instantly. Consequently, you will find yourself making this Dosakaya Roti Pachadi Recipe again and again for your family.

Read More »

Amla Pickle

intro Do you love tangy and spicy flavors? If so, this Amla Pickle Recipe is the perfect addition to your pantry. Moreover, it offers a massive boost of Vitamin C to your daily diet. Consequently, you will enjoy both great taste and excellent health benefits. Additionally, the preparation process is quite simple for beginners. Therefore, you can make a fresh batch whenever you desire.story/description Indian households have cherished gooseberry pickles for generations. Specifically, this Amla Pickle Recipe follows a traditional method that preserves the fruit’s natural goodness. Most families serve it with hot parathas or simple rice and dal. Furthermore, the combination of sour amla and pungent mustard oil creates a unique profile. However, you must follow the steps carefully to ensure the pickle stays fresh for months. Similarly, using high-quality spices will elevate the final result significantly.cast/ingredients To begin, gather 500 grams of fresh Indian gooseberries (Amla). Additionally, you will need 1 cup of mustard oil. Furthermore, collect 2 tablespoons of mustard seeds and 1 teaspoon of fenugreek seeds. For the spice mix, prepare 2 tablespoons of red chili powder, 1 tablespoon of turmeric, and salt as per taste. Moreover, keep a pinch of asafoetida (hing) ready for that classic aroma. Finally, ensure you have a clean, dry glass jar for storage purposes.songs/steps First, wash the gooseberries thoroughly and pat them dry. Then, steam the amla for 10 minutes until they become soft. Consequently, you can easily remove the seeds and separate the segments. Second, heat the mustard oil in a pan until it reaches the smoking point. Therefore, the raw smell of the oil disappears. Third, lower the heat and add the mustard seeds and fenugreek seeds. Furthermore, stir in the asafoetida and turmeric powder quickly. Next, add the amla segments to the pan and mix well. Subsequently, add the chili powder and salt to the mixture. Moreover, cook everything on a low flame for five minutes. Thus, the spices will coat the fruit evenly. Finally, let the mixture cool down completely before transferring it to your glass jar.about This Amla Pickle Recipe is more than just a side dish. Indeed, it acts as a powerful digestive aid after heavy meals. Furthermore, the antioxidants in the gooseberries help improve skin health. Similarly, the spices used in the recipe provide warmth and immunity. Consequently, many people consume a small portion every single day. Therefore, it is a staple in many traditional kitchens across India.themes/tips Preparing the Amla Pickle Recipe Ingredients requires focus on moisture control. Specifically, you must ensure that every utensil and the amla itself are completely dry. Otherwise, the pickle might develop mold quickly. Furthermore, always use a dry spoon when taking the pickle out of the jar. Additionally, you can add a bit of jaggery if you prefer a sweet and sour version. However, the traditional spicy version remains the most popular choice. Moreover, keep the jar in sunlight for two days to enhance the fermentation process.whyWatch/whyTry You should try this recipe because it combines health and flavor effortlessly. Moreover, it requires very little active cooking time. Consequently, even busy professionals can make this at home. Furthermore, it saves you from buying store-bought pickles that contain preservatives. Therefore, you can provide your family with a clean and nutritious condiment. Start your pickling journey today and enjoy the tangy goodness!

Read More »

Tomato Roti Pachadi

intro Are you looking for a tangy and spicy side dish? Then, the Tomato Roti Pachadi Recipe is perfect for you. This traditional South Indian chutney brings a burst of flavor to your dining table. Furthermore, it pairs beautifully with steaming hot rice or crispy dosas. Many people love this dish because it is simple to make. Consequently, you can prepare it in just a few minutes with basic kitchen staples. Furthermore, it uses healthy ingredients that nourish your body.story/description Traditionally, families in Andhra Pradesh grind this chutney using a stone mortar and pestle. This method creates a coarse texture that tastes amazing. However, you can also use a blender if you are in a hurry. Similarly, the combination of tangy tomatoes and spicy chilies creates a perfect balance. Additionally, the smoky aroma from tempered spices makes this dish irresistible. Therefore, you should definitely add this recipe to your weekly meal plan because it is both healthy and delicious. Moreover, children and adults alike enjoy the zesty kick of this chutney. For instance, you can serve it during breakfast or lunch to elevate a simple meal. Consequently, your guests will always ask for the secret behind this flavorful dip.cast/ingredients To make the Tomato Roti Pachadi Recipe, you will need 4 large ripe tomatoes, 5-6 green chilies, and 3 cloves of garlic. Additionally, gather 1 teaspoon of cumin seeds and 1 tablespoon of oil. Furthermore, you will need salt to taste and a small piece of tamarind. Finally, keep some fresh coriander leaves ready for the perfect finish.songs/steps First, heat oil in a pan and add cumin seeds. Next, add chopped green chilies and garlic cloves. Sauté them until they turn golden and fragrant. After that, add the chopped tomatoes and salt. Cook them until they become soft and mushy. Furthermore, add the tamarind piece and let it soften with the tomatoes. Once the mixture cools down, grind it into a coarse paste using a blender or mortar. Finally, garnish the chutney with fresh coriander. Moreover, you can add a tempering of mustard seeds and curry leaves for extra crunch.about This Tomato Roti Pachadi Recipe is a staple in many South Indian households. It represents the heart of rustic village cooking perfectly. Additionally, it highlights how simple ingredients can create complex and bold flavors. Therefore, it is a must-try for any food lover who enjoys authentic ethnic cuisine. Furthermore, the dish is completely vegan and gluten-free.themes/tips ### Mastering the Tomato Roti Pachadi Recipe Mastering this dish requires attention to texture. For instance, do not over-grind the tomatoes into a smooth puree. Instead, keep the texture slightly chunky for an authentic feel. Furthermore, adjust the number of green chilies based on your spice preference. Additionally, you can add a pinch of jaggery to balance the acidity of the tomatoes. Consequently, the flavor profile will become much deeper. Moreover, always use ripe tomatoes for the best results.whyWatch/whyTry You should try this recipe because it is versatile, quick, and incredibly tasty. Moreover, it saves time on busy weekdays when you want something healthy. Consequently, you get a gourmet taste with minimal effort. Try it today and enjoy the tangy goodness!

Read More »

Gongura Pachadi

intro If you love bold and rustic flavors, you must try this Gongura Pachadi Recipe. This traditional dish highlights the unique sourness of sorrel leaves. Furthermore, the addition of dry red chilies brings a fiery kick to the palate. Therefore, many people in Andhra Pradesh consider it a staple food. Additionally, you can store this chutney for several days without any issues. However, you should use fresh leaves for the best possible taste. As a result, every bite will burst with authentic flavor.story/description Gongura, or sorrel leaves, defines the soul of Andhra cuisine. People often call it the ‘Andhra Matha’ because of its deep cultural importance. Consequently, every household has its own secret version of this chutney. This specific Gongura Pachadi Recipe balances the natural tartness of the leaves with earthy spices. Because the leaves are naturally very sour, the oil and chilies act as perfect balancing agents. As a result, you get a complex flavor profile that dances on your tongue. Moreover, the aroma of roasted garlic adds another layer of depth to this spicy condiment.cast/ingredients To prepare this dish, you need 2 bunches of fresh Gongura (Sorrel) leaves. Additionally, gather 10-12 dry red chilies and 1 tablespoon of coriander seeds. You will also need 1 teaspoon of cumin seeds and 5-6 garlic cloves. Salt is essential to taste. Furthermore, prepare 3 tablespoons of vegetable oil. For the final touch, keep 1 teaspoon of mustard seeds and a few curry leaves ready for tempering.songs/steps ## The Magic of Gongura Pachadi Recipe First, wash the leaves thoroughly and dry them completely on a cloth. Next, heat a little oil in a pan and roast the red chilies, coriander seeds, and cumin seeds until they become fragrant. After the spices cool down, grind them into a coarse powder. In the same pan, add more oil and sauté the leaves until they wilt and turn soft. Furthermore, add the wilted leaves and fresh garlic to the spice mix in the grinder. Grind everything together until you reach a smooth or slightly coarse texture. Finally, heat oil for tempering and add mustard seeds and curry leaves. Pour this hot tempering over the chutney to finish the Gongura Pachadi Recipe perfectly.about This dish represents the rustic and bold flavors of South India. Traditionally, families serve it with hot steamed rice and a dollop of ghee. Moreover, the high iron content in the leaves makes it a healthy choice. Because it uses simple ingredients, you can make it quickly on any busy weekday. Consequently, it remains a favorite for both home cooks and professional chefs. Therefore, it is a versatile addition to any dining table.themes/tips ## Tips for the Perfect Gongura Pachadi Recipe Always pick the red-stemmed gongura leaves for a sharper and more traditional tang. Furthermore, ensure the leaves are completely moisture-free before cooking to increase the shelf life. Additionally, do not over-grind the leaves; a slightly coarse texture usually tastes better with rice. If the chutney feels too sour, you can add a tiny piece of jaggery to balance the acidity. Therefore, use plenty of oil during the tempering stage to keep the chutney fresh for weeks. However, always store it in a dry glass jar for the best results.whyWatch/whyTry You should try this recipe because it offers an incredible explosion of flavors in every single bite. Moreover, it is a healthy way to include leafy greens in your daily diet. Additionally, it pairs perfectly with almost any South Indian meal, from idlis to full thalis. Thus, it adds a gourmet touch to your regular dining experience without requiring expensive ingredients. Finally, making it at home ensures you enjoy a preservative-free version of this classic delicacy.

Read More »
కావలసిన పదార్ధాలు
  • బియ్యం Rice (Sona Masuri or Raw Rice) 2 cups
  • మినపప్పు Urad Dal (Skinless Black Gram) 1/2 cup
  • శనగ పప్పు Chana Dal (Bengal Gram) 2 tablespoons
  • మెంతులు Fenugreek Seeds 1/2 teaspoon
  • అటుకులు Poha (Flattened Rice) 1/4 cup
  • బంగాళదుంపలు Potatoes (Boiled and mashed) 4 medium
  • ఉల్లిపాయ Onion (Thinly sliced) 1 large
  • పచ్చిమిర్చి Green Chilies (Slit) 3
  • ఆవాలు Mustard Seeds 1 teaspoon
  • పసుపు Turmeric Powder 1/2 teaspoon
  • ఉప్పు Salt (To taste) 1 teaspoon
  • నూనె Oil (For cooking masala) 2 tablespoons
  • నెయ్యి Ghee (For roasting dosa) 1/2 cup
  • అల్లం Ginger (Finely chopped) 1/2 inch
  • కరివేపాకు Curry Leaves 1 sprig
తయారి విధానం
  1. బియ్యం, మినపప్పు, శనగపప్పు మరియు మెంతులను శుభ్రంగా కడిగి 5 నుండి 6 గంటల పాటు తగినంత నీటిలో నానబెట్టండి.
    Wash and soak the rice, urad dal, chana dal, and fenugreek seeds in enough water for 5 to 6 hours.
  2. గ్రైండింగ్ చేయడానికి 10 నిమిషాల ముందు అటుకులను కడిగి నానబెట్టండి.
    Wash and soak the poha for 10 minutes just before you start grinding.
  3. నానబెట్టిన దినుసులను మరియు అటుకులను కలిపి మెత్తని పిండిలా గ్రైండ్ చేయండి. పిండి మరీ జారుగా ఉండకూడదు.
    Grind the soaked ingredients and poha into a very smooth batter using a little water at a time.
  4. పిండిలో తగినంత ఉప్పు కలిపి, కనీసం 8 గంటల పాటు లేదా రాత్రంతా వెచ్చని ప్రదేశంలో పులియబెట్టండి.
    Add salt to the batter, mix well, and let it ferment in a warm place for at least 8 hours or overnight.
  5. ఆలుగడ్డ మసాలా కోసం, ఒక బాణలిలో నూనె వేడి చేసి ఆవాలు, కరివేపాకు, పచ్చిమిర్చి మరియు అల్లం వేసి వేయించండి.
    To make the potato masala, heat oil in a pan and add mustard seeds, curry leaves, green chilies, and ginger.
  6. అందులో ఉల్లిపాయ ముక్కలు వేసి దోరగా వేయించిన తర్వాత పసుపు మరియు ఉప్పు కలపండి.
    Add sliced onions and sauté until they turn translucent, then stir in turmeric powder and salt.
  7. ముందుగా ఉడికించి మెదిపి ఉంచిన బంగాళదుంపలను వేసి బాగా కలిపి 2 నిమిషాలు ఉంచి స్టవ్ ఆఫ్ చేయండి.
    Add the boiled and mashed potatoes to the pan, mix thoroughly, and cook for 2 minutes before turning off the heat.
  8. దోస పెనం వేడి చేసి, కొద్దిగా నీళ్లు చల్లి శుభ్రం చేయండి. ఒక గరిటెడు పిండిని పోసి పల్చగా వృత్తాకారంలో రుద్దండి.
    Heat a non-stick tawa or cast iron griddle and sprinkle some water to season it. Wipe with a cloth.
  9. అంచుల చుట్టూ కొద్దిగా నెయ్యి వేసి, దోస బంగారు రంగులోకి మారి కరకరలాడే వరకు కాల్చండి.
    Pour a ladle of batter in the center and spread it in a thin circular motion to form a large crepe.
  10. దోస మధ్యలో సిద్ధం చేసిన ఆలుగడ్డ మసాలాను ఉంచి మడతపెట్టండి. వేడివేడి మసాలా దోసను కొబ్బరి చట్నీ మరియు సాంబార్‌తో వడ్డించండి.
    Drizzle ghee around the edges and cook on medium heat until the bottom is golden brown and crispy.
[real3dflipbook id='1']