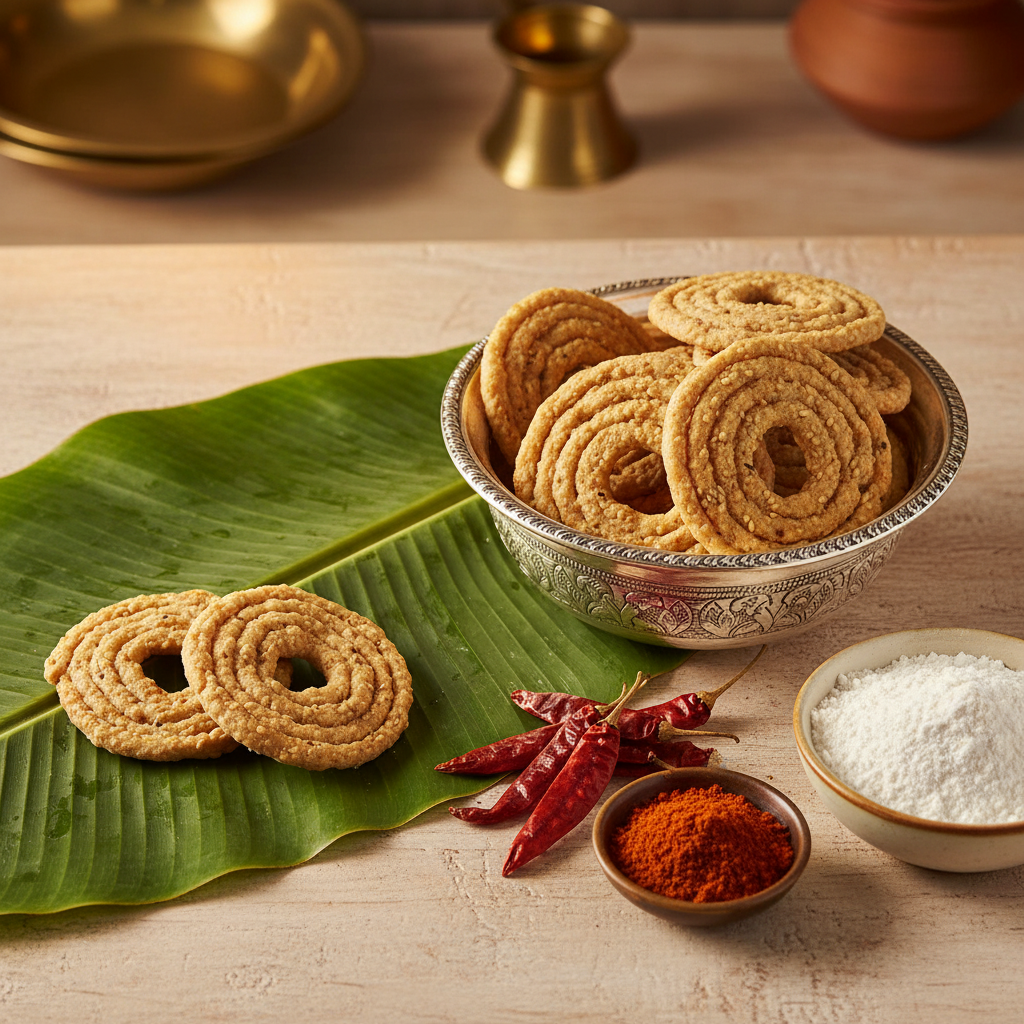
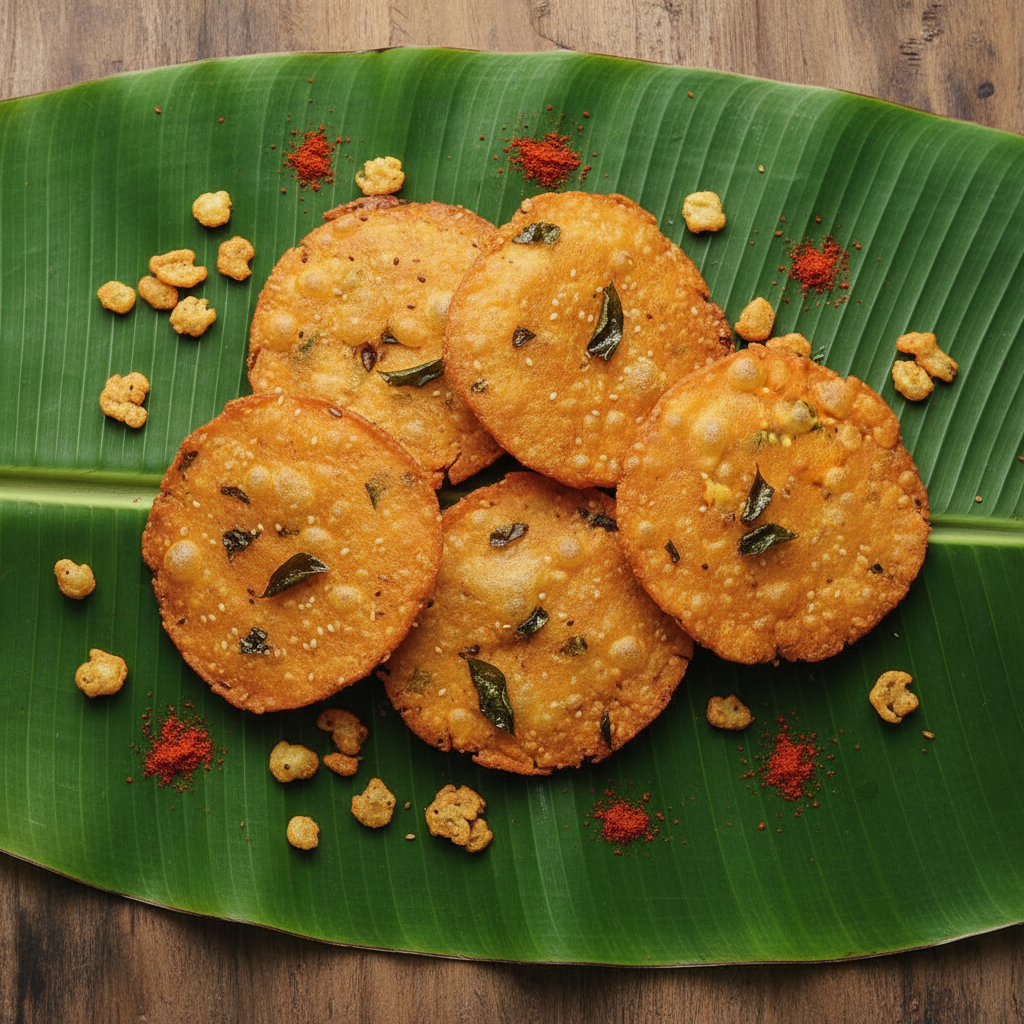
Edit Template

Recipe Tag: Traditional

Poornam Burelu

intro Are you looking for a traditional festive treat? Additionally, the Poornam Burelu Recipe offers a perfect blend of sweet and savory flavors. These golden fried dumplings are a staple in Andhra cuisine. Therefore, families prepare them during festivals like Ugadi or Sankranti. However, achieving the perfect texture requires some care. Furthermore, you will love how the crispy outer layer complements the soft, sweet chana dal filling inside.story/description This dish represents the heart of South Indian celebrations. Because it uses jaggery and lentils, it provides a nutritious yet indulgent experience. Consequently, everyone waits for these treats during special occasions. You must prepare the stuffing with patience. Moreover, you should ensure the batter consistency is right. Traditionally, mothers pass this knowledge down to their daughters to keep the heritage alive. It is more than just food; it is a memory of home.cast/ingredients For this recipe, you need one cup of chana dal and one cup of jaggery. Additionally, gather two cups of rice and one cup of urad dal. You also require cardamom powder, a pinch of salt, and oil for deep frying. Furthermore, ensure the water you use is clean and filtered for the best results.songs/steps ### Preparing the Poornam Burelu Recipe First, soak the rice and urad dal overnight to create the shell. Then, grind them into a thick, smooth batter. Meanwhile, boil the chana dal until it reaches a soft texture. Next, drain the excess water so the stuffing remains firm. Additionally, mash the dal thoroughly before adding the sweet jaggery. Consequently, the mixture will thicken as you cook it on a low flame. Add cardamom powder to enhance the aroma. Once the mixture cools, shape it into small, round balls. Heat the oil in a large deep pan. Finally, dip the balls into the batter and fry them carefully until they turn golden brown.about This sweet treat symbolizes prosperity and joy in many households. It combines ancient culinary techniques with simple pantry staples. Therefore, the recipe remains popular across many generations. Many people serve it with a dollop of fresh ghee. Furthermore, the combination of a crunchy exterior and a melt-in-the-mouth interior makes it unforgettable. It usually holds a place of honor during religious ceremonies as an offering.themes/tips ### Pro Tips for Poornam Burelu Recipe Using aged rice makes the outer shell much crispier. Additionally, do not make the batter too thin or watery. Otherwise, the sweet filling might leak into the hot oil. Similarly, cook the jaggery mixture until it leaves the sides of the pan. This ensures you can shape the balls without any mess. Therefore, you will achieve professional results every time. However, always fry them on medium heat to ensure the inside cooks properly without burning the outside.whyWatch/whyTry You should try this dish because it brings a taste of tradition to your kitchen. Moreover, the contrast of textures is truly delightful for the palate. Therefore, you can easily impress your guests with this authentic sweet treat today! It is a rewarding experience for any home cook. Furthermore, the ingredients are simple and easy to find in any pantry.

Read More »

Bobbatlu

intro The Bobbatlu Recipe stands as a hallmark of South Indian festive traditions. Consequently, many families prepare this sweet flatbread during Ugadi and other celebrations. Moreover, the combination of sweet lentils and soft dough creates a heavenly taste. Therefore, learning this recipe allows you to bring authentic flavors into your own kitchen today.story People across India cherish this dish under various names like Puran Poli or Holige. Furthermore, the history of this sweet dates back centuries. Although ingredients are simple, the technique requires patience. However, the result is always worth the effort. Additionally, mothers pass this skill down to their children. Consequently, the legacy of this traditional sweet continues to thrive in modern homes.cast To begin, you will need one cup of chana dal and one cup of jaggery. Additionally, gather two cups of all-purpose flour for the dough. Furthermore, keep cardamom powder, turmeric, and plenty of pure ghee ready. These simple ingredients combine to create something truly magical. Consequently, you should ensure every ingredient is fresh for the best flavor.songs ## Step-by-Step Bobbatlu Recipe Guide First, soak the chana dal for four hours. Then, pressure cook the dal until it becomes soft. Additionally, drain all excess water from the cooked dal. Moreover, grind the dal with jaggery into a smooth paste. Consequently, this becomes your sweet filling. Similarly, prepare a soft dough using flour and oil. Furthermore, let the dough rest for at least two hours. Afterward, place a ball of filling inside a small disc of dough. Finally, roll it out thinly and cook it on a hot griddle with ghee.about ## Why People Love the Bobbatlu Recipe This dish consists of a thin outer layer made of flour. Inside, you find a rich filling of cooked chana dal and jaggery. Therefore, it provides a perfect balance of texture. Additionally, ghee enhances the flavor significantly. Because of its long shelf life, you can enjoy it for several days. Moreover, the soft texture makes it a favorite among people of all ages. Although it is a dessert, many enjoy it as a breakfast item.themes ## Master Tips for Success Firstly, ensure the dough is very soft and pliable. Furthermore, use plenty of ghee while roasting on the tawa. If you prefer a healthier version, you can substitute wheat flour for all-purpose flour. However, the traditional texture might change slightly. Additionally, mash the dal well to avoid lumps in the filling. Consequently, the flatbread will not tear while you roll it out. Similarly, keep the heat on medium to avoid burning the outer layer.whyWatch You should try this recipe because it brings a sense of nostalgia. Furthermore, it is a healthy alternative to store-bought sweets. Therefore, it serves as a great snack for children. Additionally, the process of making it is quite meditative. Consequently, you will feel proud of creating such a masterpiece from scratch. Moreover, your guests will absolutely love the authentic taste. Finally, it allows you to celebrate culture in your own kitchen.

Read More »

Urad Dal Laddu

intro Are you searching for a nutritious snack that tastes amazing? You should try this Urad Dal Laddu Recipe. Traditionally, Indian families prepare these treats to boost strength and immunity. Furthermore, they are very easy to make at home with minimal effort. Consequently, you will love the earthy taste of roasted lentils mixed with sweet jaggery. Therefore, let us start cooking this healthy snack together!story/description This sweet originates from the southern parts of India, where people call it Sunnundalu. Moreover, it holds a special place in traditional Ayurvedic medicine because it strengthens the bones. However, modern families enjoy it mostly as a tasty dessert. You only need a few pantry staples for this dish. Additionally, the high protein content makes it great for growing children and athletes. Similarly, the jaggery adds essential iron to your diet. Therefore, it is much better than processed candy or store-bought biscuits. You can prepare a large batch and store it for weeks. Because it uses ghee, the aroma will fill your kitchen instantly. Consequently, everyone in your house will ask for more.cast/ingredients 1. Two cups of whole white urad dal (husked black gram). 2. One cup of organic grated jaggery or palm sugar. 3. Half a cup of pure melted ghee (clarified butter). 4. One teaspoon of fresh cardamom powder. 5. A handful of chopped cashews or almonds for extra crunch.songs/steps 1. Firstly, clean the white urad dal to remove any dust or stones. 2. Secondly, place the dal in a heavy-bottomed pan and roast it on low heat. 3. Moreover, stir the dal continuously until it turns golden brown and smells nutty. 4. However, do not burn the lentils as they will taste bitter. 5. Once roasted, let the dal cool completely on a plate. 6. Subsequently, grind the roasted dal into a fine powder using a dry blender. 7. Additionally, add the grated jaggery and cardamom powder into the blender. 8. Pulse the mixture again so the jaggery blends perfectly with the lentil flour. 9. Therefore, transfer this sweet mixture to a wide mixing bowl. 10. Gradually, pour warm melted ghee over the powder. 11. Finally, mix everything well and shape the mixture into small round balls while it is still warm.about This Urad Dal Laddu Recipe provides a significant amount of energy for your daily activities. Because urad dal contains high levels of fiber, it helps your digestion. However, you must eat them in moderation since they are calorie-dense. Furthermore, the ghee provides healthy fats that are good for your brain and joints. Consequently, many mothers give these to their kids for lunchboxes. Additionally, you can store these laddus for up to three weeks in an airtight jar. They remain fresh and tasty without any refrigeration. Similarly, you can gift these to friends during festivals as a healthy homemade option.themes/tips Always roast the dal on a very low flame to ensure even cooking. Furthermore, if the mixture is too dry to form balls, add another tablespoon of warm ghee. However, do not add water as it will spoil the shelf life. Additionally, you can add dry ginger powder to improve digestion. If you prefer a crunchier texture, you can grind the dal slightly coarse. Therefore, customize the sweetness by adjusting the amount of jaggery according to your preference.whyWatch/whyTry You should try the Urad Dal Laddu Recipe because it combines health and taste perfectly. Unlike other sweets, it uses no refined sugar or flour. Moreover, it takes less than thirty minutes to prepare. Consequently, it is the best solution for your sudden sugar cravings. Therefore, grab your ingredients and make these protein-packed laddus today!

Read More »

Chimmiri

intro Are you looking for a quick and nutritious snack? This Chimmiri Recipe offers a perfect blend of health and traditional flavor. Many families in South India prepare this sweet during special festivals like Nagula Chavithi. Consequently, it remains a beloved treat for both kids and adults. You only need two primary ingredients to start your journey with this dish. Furthermore, the preparation requires very little effort or time.story Chimmiri, also known as Chimili or Nuvvula Undalu, carries deep roots in Andhra heritage. Traditionally, mothers would pound sesame seeds and jaggery in a stone mortar. This process releases natural oils, making the mixture moist and flavorful. Therefore, the sweet gains a unique, earthy aroma that modern blenders cannot always replicate. However, the modern Chimmiri Recipe adapts easily to today’s fast-paced kitchens. It serves as a reminder of how simple ingredients can create powerful nourishment. Many people believe that this snack provides essential energy during the changing seasons. Additionally, the recipe symbolizes the importance of using local, unrefined ingredients for better health.cast 1 cup Sesame seeds (White or Black),3/4 cup Grated Jaggery,1/2 teaspoon Cardamom powder (optional for aroma),1 tablespoon Chopped dry fruits (optional for crunch)songs First, clean the sesame seeds thoroughly to remove any small stones or grit.,Next, you can choose to roast the seeds lightly on low heat for a nutty flavor, or leave them raw for maximum nutrition.,Place the sesame seeds in a blender or a mortar and pulse them coarsely.,Add the grated jaggery to the seeds and blend again until the mixture sticks together.,Consequently, the oils from the sesame will help form a soft dough.,Transfer the mixture to a bowl and add cardamom powder if you desire more fragrance.,Finally, take small portions and roll them into firm, round balls or laddus.,Serve immediately or store them in an airtight container for later use.about This Chimmiri Recipe is a nutritional powerhouse disguised as a dessert. Sesame seeds provide a massive amount of calcium and healthy fats. Meanwhile, jaggery acts as a natural sweetener that supplies iron to the body. Therefore, this snack is particularly beneficial for women and growing children. It improves bone density and boosts hemoglobin levels naturally. Additionally, because it contains no refined sugar or preservatives, it fits perfectly into a clean-eating lifestyle. You can enjoy it as a post-workout snack or a mid-day energy booster.themes To achieve the best results with your Chimmiri Recipe, always use high-quality jaggery. If the jaggery is too dry, the balls might crumble; however, adding a teaspoon of ghee can fix this issue. Furthermore, you should avoid over-blending the sesame seeds. If you grind them too much, they will turn into a paste rather than a coarse mixture. Similarly, keep the heat low if you decide to roast the seeds. Burnt seeds will make the sweet taste bitter. Finally, store your Chimmiri in a dry place to maintain its freshness for up to two weeks.whyWatch You should try this Chimmiri Recipe because it is incredibly efficient and healthy. It requires no cooking or elaborate equipment. Consequently, even beginners can master this recipe in minutes. It offers a gluten-free and vegan alternative to processed snacks. Moreover, the rich taste of sesame paired with the sweetness of jaggery creates a satisfying flavor profile. If you want to honor tradition while staying fit, this recipe is the ultimate choice for your kitchen.

Read More »

Rava Laddu

intro Are you looking for a fast way to satisfy your sweet tooth? This Rava Laddu Recipe provides a simple and effective solution for every home cook. Furthermore, you can prepare these delicious semolina balls in less than thirty minutes. Consequently, this dish remains a staple during Indian festivals like Diwali and Ganesh Chaturthi. Additionally, the ingredients are likely already sitting in your kitchen pantry. Therefore, you should start cooking right now.story The history of Indian sweets often focuses on rich milk solids or complex syrups. However, the Rava Laddu stands out because of its elegant simplicity. Families have passed down this tradition for generations. Specifically, mothers often prepare these treats for their children after school. Moreover, the sweet nutty aroma of roasting semolina creates a nostalgic atmosphere in every household. Because the recipe uses ghee and sugar, it offers an instant energy boost. Therefore, people often gift these laddus to friends and relatives during special occasions. You will find that every bite brings a sense of comfort and celebration.cast To make this Rava Laddu Recipe, you will need one cup of fine semolina (rava). Additionally, gather half a cup of granulated sugar and four tablespoons of pure ghee. You should also prepare a few cashews and raisins for texture. Furthermore, half a teaspoon of cardamom powder will add a lovely fragrance. Finally, keep two tablespoons of warm milk or coconut milk ready to bind the mixture.songs First, heat two tablespoons of ghee in a heavy-bottomed pan. Next, add the cashews and raisins until they turn golden brown. Consequently, you should remove them and set them aside for later. In the same pan, add the semolina. You must roast the rava on a low flame until it releases a nutty aroma. However, ensure that you do not burn the grains. Therefore, stir the mixture constantly for about five to seven minutes. Furthermore, blend the sugar into a fine powder and add it to the roasted rava. Mix in the cardamom powder and the fried nuts. Subsequently, drizzle the remaining ghee and warm milk over the mixture. Finally, take small portions and roll them into firm, round balls while the mixture is still warm.about This Rava Laddu Recipe is famous for its long shelf life and portability. Unlike milk-based sweets, these laddus stay fresh for several days at room temperature. Additionally, the texture provides a unique contrast between the grainy semolina and the smooth sugar. Moreover, you can customize the sweetness level to suit your personal preference. Therefore, it is a versatile dish for any party menu.themes You should use fine semolina to achieve the best texture for your Rava Laddu Recipe. Specifically, coarse rava might make the balls feel too gritty. Furthermore, always roast the semolina on low heat to preserve its color. If the mixture feels too dry to roll, you can add a teaspoon of warm ghee. However, do not add too much milk if you plan to store the laddus for a long time. Consequently, using only ghee for binding will extend their freshness for up to two weeks.whyWatch You should try this recipe because it is foolproof and beginner-friendly. Additionally, it requires very little active cooking time compared to other traditional sweets. Therefore, you can save time while still producing a gourmet-quality dessert. Specifically, your guests will appreciate the homemade touch and the authentic flavor. Consequently, this Rava Laddu Recipe will likely become your go-to dessert for every festive season.

Read More »

Sweet Jaggery Shells

intro Experience the joy of creating a classic treat with this Sweet Jaggery Shells Recipe. This snack offers a perfect crunch that everyone loves. Moreover, it satisfies your sweet cravings instantly. Therefore, let us dive into the kitchen to make this magic happen. Additionally, the simple ingredients make it a very accessible dessert for beginners. story This snack, also known as ‘Gavvalu’, originated in the heart of South Indian homes. Traditionally, families gathered during festivals to shape these little shells by hand. Furthermore, the golden color of the fried dough signals a perfect cook. However, the real magic happens when you toss them in the warm syrup. Consequently, each bite releases a burst of deep, earthy sweetness. Additionally, you can store these treats for several weeks in an airtight jar, making them the perfect make-ahead snack for busy holidays. Ingredients 1. 2 cups All-purpose flour or Wheat flour. 2. 1/2 cup Jaggery powder. 3. 2 tablespoons Ghee. 4. A pinch of Salt. 5. Oil for deep frying. 6. 1/2 teaspoon Cardamom powder. 7. Water as needed. Process Step 1: Mix the flour, salt, and ghee in a large bowl. Step 2: Add water gradually to form a stiff dough. Step 3: Pinch small balls of dough and roll them over a shell-shaping board or a fork. Step 4: Heat oil in a pan and fry the shells until they turn golden brown. Step 5: In a separate pot, melt the jaggery with a little water to make a thick syrup. Step 6: Add cardamom powder to the syrup for extra flavor. Step 7: Toss the fried shells into the syrup and coat them thoroughly. about ### The Tradition Behind the Sweet Jaggery Shells Recipe This dish represents more than just food; it represents tradition and family love. Specifically, mothers often prepare these for their children during the holiday season. Thus, the recipe remains a cherished favorite across generations. Furthermore, the use of jaggery makes it a slightly better alternative to snacks made with refined white sugar. Additionally, the unique shell shape is not just for looks. The ridges allow the sweet syrup to sit inside perfectly. Consequently, you get a consistent flavor in every single bite. Moreover, the texture stays crispy even after the syrup dries, which is a hallmark of a well-made batch.themes Tips for Perfecting the Sweet Jaggery Shells Recipe To achieve the best results, you must use a fork or a dedicated shell board carefully. Consequently, the ridges will look professional and hold the syrup well. Moreover, always maintain a medium flame while frying the dough shells. If the oil is too hot, the inside remains raw while the outside burns. Therefore, patience is your best friend in the kitchen. Additionally, ensure the jaggery syrup reaches a ‘one-string’ consistency. Otherwise, the shells will turn soggy instead of staying crisp. If you follow these steps, you will create a snack that rivals any professional bakery. Furthermore, adding a touch of dry ginger powder to the syrup can provide a lovely warm undertone to the flavor profile. whyWatch You should try this Sweet Jaggery Shells Recipe because it uses natural sweeteners that provide a rich taste. Furthermore, it is a fun activity for the whole family to participate in. Thus, you create memories and delicious snacks simultaneously. Additionally, the ingredients are likely already sitting in your pantry. Therefore, you do not need to go on a special shopping trip to start cooking. Finally, the satisfying crunch of these shells is truly addictive!

Read More »

Upma

intro Upma is a classic South Indian breakfast dish that people love for its simplicity. This Upma Recipe offers a perfect balance of nutrition and taste for busy mornings. It uses roasted semolina and various fresh vegetables to create a hearty meal. Because it is light yet filling, many families enjoy it every single day.story South Indians love starting their day with this warm, comforting dish. Therefore, you will find it in almost every household from Chennai to Bangalore. People traditionally call it Rava Upma. However, many modern variations exist today. You can customize it with peas, carrots, or green beans. Additionally, the texture depends entirely on your water ratio. Consequently, a fluffy and non-sticky Upma makes everyone happy during breakfast time.cast To make this dish, you need 1 cup of semolina (rava). Additionally, gather 2.5 cups of water and 1 finely chopped onion. You also need 1 green chili, 1 teaspoon of mustard seeds, and 1 teaspoon of urad dal. For flavor, use fresh curry leaves, oil or ghee, and salt. Finally, keep some fresh coriander and lemon juice ready for the garnish.songs 1. First, roast the rava in a pan until it smells nutty and looks slightly golden. 2. Second, heat oil or ghee in a heavy-bottomed pan. 3. Add mustard seeds and urad dal until they crackle. 4. Add onions, green chilies, and curry leaves. Sauté them until the onions become soft. 5. Pour water into the pan and add salt. Bring the mixture to a rolling boil. 6. Gradually stir in the roasted rava. This prevents lumps from forming. 7. Cover the pan and cook on low heat for two minutes. 8. Finally, fluff it with a fork and serve hot.about Why this Upma Recipe Works: This Upma Recipe is famous because it is incredibly fast to prepare. For instance, you can cook the entire meal in under 20 minutes. Moreover, it provides sustained energy for your busy morning schedule. Because it uses simple pantry ingredients, you likely have everything you need already. Thus, it remains a top budget-friendly option for large families. Furthermore, the dish is easy to digest, making it suitable for children and seniors alike.themes First, always roast your semolina properly before cooking. If you skip this step, the Upma becomes sticky and thick. Second, use hot water instead of cold water for a better texture. Furthermore, adding a squeeze of fresh lemon juice adds a bright, zesty flavor. Additionally, you can add roasted cashews for a crunchy surprise. Finally, always garnish with fresh coriander to achieve a professional, restaurant-style look.whyWatch You should try this dish because it is extremely versatile. Whether you need a quick breakfast or a light dinner, it fits perfectly. Therefore, add this dish to your weekly meal plan immediately. You will certainly love the aromatic spices and the soft, melt-in-your-mouth texture. Additionally, it serves as a wonderful canvas for your favorite seasonal vegetables.

Read More »

Poori

intro Poori is a beloved fried bread that originated in the Indian subcontinent. Furthermore, this Poori Recipe helps you create light and airy rounds that melt in your mouth. Families often enjoy these golden treats during festive mornings or weekend breakfasts. Additionally, you can serve them with a variety of side dishes like spicy potato curry or sweet shrikhand. Therefore, learning this simple technique will surely impress your guests and satisfy your cravings. story For generations, Indian households have cherished the tradition of making fresh bread. Many children remember waking up to the sound of sizzling oil in the kitchen. Consequently, a hot plate of fried dough became the symbol of a happy Sunday. However, achieving that perfect, balloon-like puff requires a bit of skill. Additionally, every region has its own minor variations in flour or thickness. For instance, some cooks add a bit of semolina for extra crunch. Therefore, this bread remains a timeless staple that brings people together across different cultures. Ingredients 1. 2 cups Whole wheat flour (Atta) 2. 1 tablespoon Semolina (Suji) for a crispy texture 3. 1/2 teaspoon Salt 4. 1 teaspoon Vegetable oil for the dough 5. 3/4 cup Lukewarm water (adjust as needed) 6. Vegetable oil for deep frying. steps 1. First, combine the whole wheat flour, salt, and semolina in a large mixing bowl. 2. Add one teaspoon of oil and mix it into the flour with your fingertips. Furthermore, ensure the oil is evenly distributed. 3. Pour water gradually and begin kneading the mixture. Consequently, you will form a stiff and smooth dough. 4. However, do not add too much water at once, as the dough must remain firm. 5. Cover the dough with a damp cloth and let it rest for 15 minutes. 6. Next, divide the dough into small, lemon-sized balls. 7. Grease your rolling pin with a drop of oil to prevent sticking. Additionally, avoid using dry flour for dusting if possible. 8. Roll each ball into an even circle of medium thickness. 9. Heat the frying oil in a deep pan over medium-high heat. Therefore, check the heat by dropping a tiny piece of dough into it. 10. Carefully slide the rolled dough into the hot oil. Furthermore, gently press the top with a slotted spoon to help it puff. 11. Flip the poori once it expands and fry until it turns golden brown on both sides. about The Magic of a Perfect Poori Recipe depends entirely on the temperature of the oil and the consistency of the dough. This Poori Recipe focuses on achieving a balance between a soft interior and a slightly crisp exterior. Because it uses whole wheat flour, it provides a hearty flavor that pairs well with savory and sweet toppings. Additionally, the inclusion of semolina ensures that the bread stays puffy for a longer time after frying. Furthermore, the absence of leavening agents like yeast makes it a quick option for busy mornings.themes You should always ensure the oil is sufficiently hot before frying. If the oil is too cold, the bread will absorb excessive grease and fail to puff. Consequently, the texture will become heavy rather than light. Additionally, knead a stiff dough rather than a soft one. Furthermore, roll the dough with even pressure to avoid thin spots. However, do not rest the rolled circles for too long; instead, fry them immediately to get the best rise. Therefore, following these small details will result in professional-quality results every time.whyWatch You should try this Poori Recipe because it is incredibly rewarding and fast. Moreover, it uses simple pantry staples that you likely already have. Therefore, it is the ultimate comfort food for your family. Additionally, the process of watching the dough transform into a golden balloon is truly satisfying. Consequently, you will master a skill that brings authentic flavor to your dining table.

Read More »

Medu Vada

intro If you love crispy South Indian snacks, you must try this Medu Vada Recipe today. Consequently, you will never need to buy them from a restaurant again. Furthermore, these savory donuts are incredibly easy to prepare at home with simple ingredients. Therefore, gather your kitchen tools and get ready for a crunchy and healthy treat.story Medu Vada is a staple breakfast item in millions of Indian households. Additionally, people enjoy it during grand festivals or as a simple tea-time snack. This dish features a soft, spongy interior and a golden, crunchy exterior. Since the batter uses black gram lentils, it provides a high amount of protein to your diet. Therefore, it is both delicious and nutritious for people of all ages. Many families share these vadas during Sunday brunch to celebrate together.cast 1 cup Urad Dal (Black Gram), 2 Green Chilies (finely chopped), 1 inch Ginger (grated), 1 pinch Hing (Asafoetida), 1 sprig Fresh Curry Leaves, Salt to taste, Oil for deep frying, 1 tablespoon Rice Flour (optional for extra crunch).songs First, soak the urad dal in water for at least four hours. Second, drain the water completely and grind the dal into a thick, smooth paste. However, use only a tiny splash of water if necessary. Third, beat the batter vigorously for five minutes to incorporate air. Fourth, add the salt, chilies, ginger, and curry leaves to the mix. Fifth, wet your palms and take a small portion of the batter. Sixth, make a hole in the center with your thumb to create a donut shape. Finally, drop the vadas into hot oil and fry them until they turn golden brown on both sides.about This dish originates from the southern regions of India but has gained immense popularity worldwide. Moreover, it pairs perfectly with hot sambar and spicy coconut chutney. Therefore, it serves as a complete and satisfying meal for breakfast or lunch. Many people also refer to it as ‘Uzhunnu Vada’ in various regional languages. Furthermore, the light texture makes it a favorite for those who enjoy savory snacks.themes ### Tips for a Perfect Medu Vada Recipe To ensure total success, you must use very little water while grinding the dal. However, if the batter becomes too thin, you can add some rice flour to thicken it instantly. Furthermore, always whisk the batter until it feels light and airy like a cloud. Thus, your vadas will float in water when you test a small drop for lightness. Consequently, they will absorb much less oil during the frying process. Additionally, keeping your hands wet prevents the batter from sticking to your skin while shaping.whyTry You should try this recipe because it uses simple pantry staples that you likely already have. Furthermore, homemade vadas are much healthier and fresher than store-bought versions. Additionally, the crunch factor is unbeatable when you eat them hot. Finally, sharing these with your family creates wonderful memories around the dining table. Therefore, do not wait any longer and start cooking this classic dish today!

Read More »

Dosa

introPeople across the globe love the classic Indian crepe. This dosa recipe brings the authentic taste of South India right into your kitchen. Anyone can master this dish with just a few simple ingredients and techniques. Prepare yourself for a delicious, crispy meal that everyone in your family will enjoy. It also provides a healthy start to your busy day. story/description Origins The history of the dosa stretches back centuries to the southern states of India. People originally created this thin pancake using fermented batter made of rice and lentils. Evolution Today, many variations include different fillings and grains. The natural fermentation process makes it very light on the stomach. Global Popularity You can find dosa in street stalls and high-end restaurants alike. It has become a global favorite for food lovers everywhere. The combination of a crunchy exterior and soft interior makes it absolutely irresistible. cast/ingredientsTo begin, gather these items: 3 cups parboiled rice, 1 cup urad dal (black gram), 1/2 teaspoon fenugreek seeds, salt to taste, water for soaking and grinding, and oil or ghee for frying. songs/steps Preparation First, wash the rice and lentils separately until the water runs clear. Then soak them in water with fenugreek seeds for at least six hours. After soaking, grind the mixture into a very smooth, thick batter. Fermentation Let the batter ferment in a warm place for about eight to ten hours until it rises. Once the batter doubles in size, add salt and mix gently. Cooking Heat a non-stick pan or a flat tawa over medium heat. Pour a ladle of batter in the center and spread it outward in a circular motion to make a thin disc. Apply a little oil around the edges and cook until it turns golden brown and crispy. Finally, fold the crepe and serve it hot with fresh coconut chutney or spicy sambar. about Cultural Significance Dosa is much more than just a meal; it is a cultural staple of India. Most people eat it for breakfast, but it also works as a great dinner option. Health Benefits It is naturally gluten-free and vegan, which suits many different diets. Health enthusiasts often choose it because it provides a good balance of carbohydrates and proteins. Variations You can also find various versions like Masala Dosa or Mysore Dosa in many cities. themes/tips Heat Control To get a very crispy texture, keep your pan at the right temperature. If the pan gets too hot, the batter will not spread easily. If it stays too cold, the dosa will stick to the surface. Equipment and Texture Use a well-seasoned cast-iron skillet for the most authentic results. Add a pinch of sugar to the batter to achieve a beautiful golden color. Keep your heat consistent throughout the cooking process for the best outcome. whyWatch/whyTry Taste and Flexibility Try this recipe because it offers a unique combination of crunch and tanginess. It also lets you experiment with various fillings like spiced potatoes, cheese, or vegetables. Practical Benefits Making this dish at home saves money and ensures the use of high-quality ingredients. The satisfaction of flipping a perfect, thin crepe feels truly rewarding. It also gives you a fun way to introduce your family to international flavors.

Read More »
కావలసిన పదార్ధాలు
  • మినపప్పు Urad Dal (Skinless) 1 cup
  • బియ్యం Rice (Raw) 2 cups
  • శనగపప్పు Chana Dal (Bengal Gram) 1 cup
  • బెల్లం Jaggery (Grated) 1 cup
  • యాలకుల పొడి Cardamom Powder (Fine Powder) 1/2 teaspoon
  • ఉప్పు Salt (Sea Salt) 1 pinch
  • నూనె Oil (Refined Vegetable Oil) Deep frying
  • నెయ్యి Ghee (Clarified Butter) 1 tablespoon
తయారి విధానం
  1. మినపప్పు మరియు బియ్యాన్ని విడివిడిగా లేదా కలిపి శుభ్రంగా కడిగి కనీసం 6 నుండి 8 గంటల పాటు నానబెట్టుకోవాలి.
    Wash and soak urad dal and rice together or separately for at least 6 to 8 hours.
  2. శనగపప్పును కూడా కడిగి 2 గంటల పాటు నానబెట్టి, తగినంత నీటితో కుక్కర్‌లో మూడు విజిల్స్ వచ్చే వరకు మెత్తగా ఉడికించుకోవాలి.
    Wash and soak chana dal for 2 hours, then pressure cook with just enough water for about 3 whistles until soft.
  3. నానబెట్టిన మినపప్పు మరియు బియ్యాన్ని కలిపి మెత్తటి పిండిలా (దోశ పిండి కంటే కొంచెం చిక్కగా) గ్రైండ్ చేసి, అందులో చిటికెడు ఉప్పు కలపాలి.
    Grind the soaked urad dal and rice into a very fine, smooth, and thick batter; the consistency should be slightly thicker than regular dosa batter.
  4. ఉడికించిన శనగపప్పులోని నీటిని పూర్తిగా వడకట్టి, అందులో బెల్లం తురుము వేసి స్టవ్ మీద పెట్టి దగ్గరపడే వరకు ఉడికించాలి.
    Drain any excess water from the cooked chana dal completely, add the grated jaggery, and cook on a medium flame until the mixture thickens and leaves the sides of the pan.
  5. ఈ మిశ్రమంలో యాలకుల పొడి మరియు నెయ్యి వేసి బాగా కలిపి, చల్లారిన తర్వాత చిన్న చిన్న నిమ్మకాయ పరిమాణంలో ఉండలుగా చుట్టుకోవాలి.
    Stir in the cardamom powder and ghee into the stuffing mixture, allow it to cool down, and then shape into small round balls.
  6. బాణలిలో డీప్ ఫ్రైకి సరిపడా నూనె వేడి చేయాలి.
    Heat a generous amount of oil in a deep frying pan or kadai.
  7. తయారు చేసుకున్న శనగపప్పు ఉండలను ఒక్కొక్కటిగా బియ్యం-మినపప్పు పిండిలో ముంచి, పిండి సమానంగా పూసిన తర్వాత నూనెలో జాగ్రత్తగా వేయాలి.
    Gently dip each stuffing ball into the prepared batter, ensuring it is fully and evenly coated on all sides.
  8. బూరెలు అన్ని వైపులా సమానంగా వేగి బంగారు రంగులోకి వచ్చే వరకు వేయించి తీసి వేడివేడిగా వడ్డించాలి.
    Carefully drop the coated balls into the hot oil and fry on medium heat until they turn a perfect golden brown and crispy.
[real3dflipbook id='1']